Jelena Matecic
DATA ENGINEER
Talk about energy saving and reusable energy has been part of the conversation for a long time now. If you’ve only just realized that these terms exist, step back and ask yourself “under which rock have I been sleeping?” Well, probably under a powerless one ![]()
All jokes aside, it is in the greater interest of the European Union to become greener and help to save our planet. To achieve this result, the European Green Deal was designed. The European Green Deal has a goal of achieving a carbon neutral continent by 2050. In order to achieve that goal, the way that energy is produced and distributed needs to change. And that’s where this project comes into the picture.
Consider this real-life scenario. You and your neighbor are currently getting your electricity from a state provider (if you live in Croatia that would be HEP). The electricity you are using isn’t harvested in a conscious way and you and your neighbor are contributing to the problem of CO2 emissions.
Now, consider there are some solar panels built on top of a bigger building in your neighborhood (e.g. library). The library harvests energy in a clean way because it uses renewable energy. Furthermore, the library doesn’t use all of it’s harvested energy and needs to sell it back to some of the electricity companies.
What if you and your neighbor could buy that excess energy from the library nearby and become clean energy champions? Perhaps even for a cheaper fare? I hope you said “That would be great!”. In this way you’ve just created an energy community consisting of your neighbor, the library and you. You all use renewable energy and enjoy life safely on the planet.
In order for this scenario to come to life, we need some kind of an electricity reader that could report how much energy your household is consuming and from which source (state provider or energy community you are a part of). Also, customers need to be able to see all the energy they are consuming and from which sources. That way, they will become more aware of the savings they’re making, energy and money wise. That’s what the software platform needs to provide.
The main goal of this blog is to present our project, supported by Innovation Norway, where Syntio and Grid ONE have collaborated. Together, we are developing hardware and software solutions for managing energy communities. Informel has also been helpful with providing extra hands for hardware and software prototypes for collecting measurements from smart meters.
You are more than welcomed to visit our web site: http://www.myenergycommunity.eu
The article talks mostly about registering devices (Smart Meter Wi-Fi Readers) on an IoT Hub and the problems we’ve encountered whilst trying to do so. There is a brief overview of the whole architecture and some next steps that could be considered.
IoT Hub overview
As mentioned in the “Introduction” part of this blog, we are using an Azure service called IoT Hub for device bulking, provisioning etc. This section gives a brief overview of the aforementioned service, and a closer look into the service’s most used entities.
The Internet of Things (IoT) is a network of physical devices that connect to and exchange data with other devices and services over the Internet or other networks. You can read more about it here, in the official documentation: https://docs.microsoft.com/en-us/azure/iot-hub/iot-concepts-and-iot-hub.
For this functionality, we wanted to bulk-register all devices to the same IoT Hub. In order to do that we had to get connection strings. Here is the catch: IoT Hub offers many different connection strings, from which you need to choose the most suitable one for your project needs.
Here are different types of the connection strings and their use cases:
- IoT Hub connection string – Used mainly for device registration/de-registration.
- IoT Hub’s Event Hub – compatible connection string – IoT Hub messages are saved in the built-in endpoint Events by default, you may use this endpoint as event hub with the event hub-compatible connection string
- IoT Hub device connection string – Mainly used by devices to send Device to Cloud messages, Receive Cloud to Device messages and Response direct method
Let’s take a look under the hood
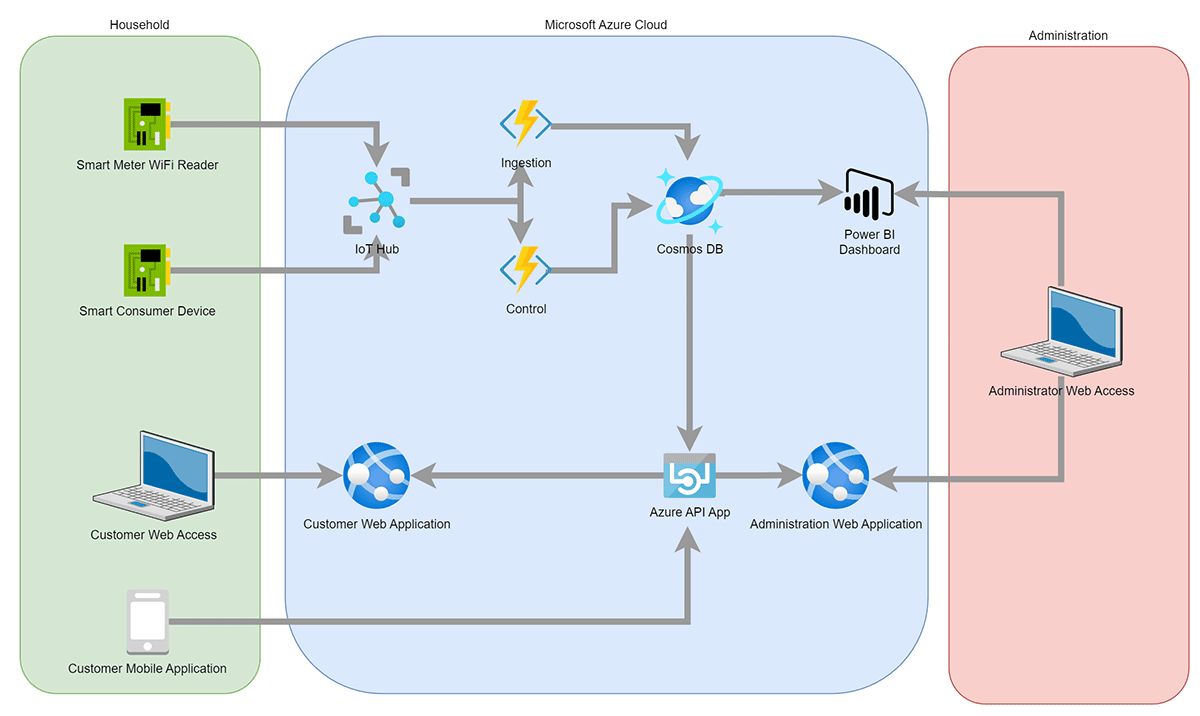
Communities consist of household members and, as mentioned in the introduction, energy supplier members. Each member has to have its own device/devices. Devices are registered via the function described in detail in our further text. Now, we will briefly go over the architecture and key components of the Energy Communities Software Platform.
Let’s start from the customer’s side. We expect that the Smart Meter Wi-Fi Reader will be installed and configured correctly in a household.
The Smart Meter Wi-Fi Reader and the IoT Hub, connect via Wi-Fi. The Reader sends requests periodically to the IoT Hub and, if any are received, collects the results from the Hub. The later part is not yet available, but is planned for later releases. We will do it this way, since it is more affordable and convenient than using a bi-directional connection. IoT Hub is connected to a database (Cosmos DB) via different Azure Functions. The “Ingestion” Function is used for ingesting data into the database. The database is directly connected to Power BI where we create visualizations of the data stored in the database and monitor our energy consumption.
The household also includes a Smart Consumer Device, planned for development in later stages of the project, which is a set of devices controlled by the IoT Hub. We want to enable users to control the distribution of energy on an hourly or cost basis. That means, if the energy price is lower in the morning, our customers could set the washing machine to turn on during those “low cost” hours. The Smart Consumer Device is controlled via an Azure function called “Control”. We also gather data from those devices for energy usage visualization. That is why Functions “Control” and “Ingestion” are connected in the architecture schema.
We’ve already developed an Azure API App that connects to the database and is simply used as a middleware between our customers and our database.
The mentioned API is used to create a Web Application that has access to data collected by the IoT Hub. We also need an administration Web Application which can be used by administrators to get a better look at our working system and to intervene if needed. The administration has access to Power BI dashboards, since these are used for monitoring and visualizing data.
The bridge between devices and IoT Hub
Now, let’s start at the beginning. First, we need to register our devices onto our IoT Hub. After we’ve registered our devices, we need to create their configuration files. Configuration files will be used later on to program each device.
In this proof of concept, we used the basic settings for the IoT Hub and wrote Azure Functions in Python 3.8. For configuration files, we stored the generated device ID, the connection string and the QR code of the device. The QR code is used by the user. After scanning the QR code, users register their device/devices in the community and get access to their own dashboard of metrics used by their device/devices.
Users need to have physical devices prepared for provisioning. After the devices are ready, users trigger the Azure Function and give the information about how many devices there are in a bulk as parameters. A successfully ran function will return a string of your devices IDs and their connection strings. Also, the QR code will be stored on a cloud, which will be later on used as a “quick log-in” for customers’ application.
Now that your devices are connected to Wi-Fi, they will be able to send data to the IoT Hub (which is connected to CosmosDB from where that data is served to a customer via API). If you don’t want to manually delete devices from your IoT Hub and their config files from storage, use the rollback option when sending an HTTP request to the Azure Function. Now, when we have generated QR codes and configuration files we can proceed with programming devices and get those user apps rolling with the device measurements. ![]()
Device bulking
IoT Hub has an identity registry you can use to create per-device resources in the service. The identity registry also enables you to control access to the device-facing endpoints. Here we are going to explain how we managed to import devices in a bulk (you can think of a bulk as a group).
In order to create a bulk of devices, we first need to create device objects and store them in some kind of a collection. We used a list. The device object consists of an ID, primary key, secondary key and type of authentication. The device ID has to be unique, and we generate it using the “generate_device_id()” method not shown in a code snippet below. The “generate_device_id()” method simply checks if the created device ID occurs in the IoT Hub. If it does, the ID is generated until it truly is unique. We check the ID using the “query_iot_hub()” method which is a standard method of the IoTHubRegistryManager class.
The snippet of code shows how to create mentioned bulk. First, we create the list of devices that only have an ID. Then we have to add primary and secondary keys to each created device in order to create the authentication method. We create those using the “generate_keys()” method. This method uses base64 for creating keys. Lastly, we call “bulk_create_or_update_devices()” method which is a standard method of the IoTHubRegistryManager class and our bulk is created.
from azure.iot.hub import IoTHubRegistryManager
from azure.iot.hub.models import QuerySpecification
from azure.iot.hub.protocol.models import ExportImportDevice, SymmetricKey, AuthenticationMechanism
...
client = IoTHubRegistryManager(CONNECTION_STRING)

devices = [ExportImportDevice(id=generate_device_id(), import_mode="create", status="enabled") for i in range(number_devices)]

for device in devices:
primary_key, secondary_key = generate_keys()
symmetric_key = SymmetricKey(primary_key=primary_key, secondary_key=secondary_key)
device.authentication = AuthenticationMechanism(type="sas", symmetric_key=symmetric_key)

client.bulk_create_or_update_devices(devices)
Storing config files
Configuration files are the files we need for programming devices after they’ve been registered on the IoT Hub. They consist of the device connection string and the device ID.
In order to save the files, we first need to create the BlobServiceClient object using an Azure Storage connection string:
from azure.storage.blob import BlobServiceClient, ContentSettings
...
blob_service_client = BlobServiceClient.from_connection_string(conf.CONNECTION_STRING_STORAGE)
Then, we need to create a container for our blobs of data. Keep in mind that the container name has to be unique. We do it like so:
container_client = blob_service_client.create_container(container_name)
Now, all we need to do is create the aforementioned files and store them as blobs. To store them, we call the “get_blob_client()” method and upload data via the returned blob client object. Blob client is a service client, we use it for managing blobs inside our container.
blob_client = blob_service_client.get_blob_client(container=conf.CONTAINER_NAME, blob=local_file_name)

# Upload the created file
with open(upload_file_path, "rb") as data:
blob_client.upload_blob(data)
“Upload_file_path” is the path where our files are created.
We do the same with uploading QR images. The only difference is that when uploading images as blobs, we need to set the “content_type value” to ‘image/png’ like shown below.
# upload created qr image
blob_client = blob_service_client.get_blob_client(container=conf.CONTAINER_NAME, blob=local_img_name)

image_content_setting = ContentSettings(content_type='image/png')

with open(upload_qr_path, "rb") as data:
blob_client.upload_blob(data, content_settings=image_content_setting)
Deploy
Since we are using local storage to store config files and QR codes for devices, we need to use a temporary file. We use instances of a “TemporaryDirectory” interface in order to store local files.
Our Azure Function is triggered by an HTTP request. Through that request, we send the number of devices we want to register and if we want rollback or not. If the number of devices isn’t specified, we register two devices by default.
Rollback essentially deletes devices from the IoT Hub and their co-respondent config files stored in blob storage. To do so, we need to first make a connection with our BlobServiceClient, get the blob client for each blob we are trying to delete, and then delete the blob. We do the same with IoT Hub. We again connect with the IoTHubRegistryManager class instance and use it to delete devices.
Lastly, rollback has to update our device IDs file. We need to delete device IDs that we are going to delete from the IoT Hub. To do so, we have to download the blob which carries our information about device IDs (this blob contains only the deviceid.txt file). After downloading it, we have to read the file and overwrite it to update our existing device IDs.
