Leo Milos, Petar Tisma
DATA ENGINEERS
Introduction
DATABRICKS is an organization and big data processing platform founded by the creators of Apache Spark. It was founded to provide an alternative to the MapReduce system and provides a just-in-time cloud-based platform for big data processing clients. The platform is available on Microsoft Azure, AWS, Google Cloud and Alibaba Cloud.
Databricks was created for data scientists, engineers and analysts to help users integrate the fields of data science, engineering and the business behind them, across the machine learning life-cycle. This integration helps to ease the processes from data preparation to experimentation, and machine learning application deployment. By unifying the pipeline involved with developing machine learning tools, DataBricks is said to accelerate development and innovation, and increase security. Data processing clusters can be configured and deployed with just a few clicks. The platform includes varied built-in data visualization features to graph data.
In this research, Azure Databricks platform was used for batch processing, using Azure Service Bus as a message broker, and for streaming processing using Azure Event Hubs for real-time data ingestion.
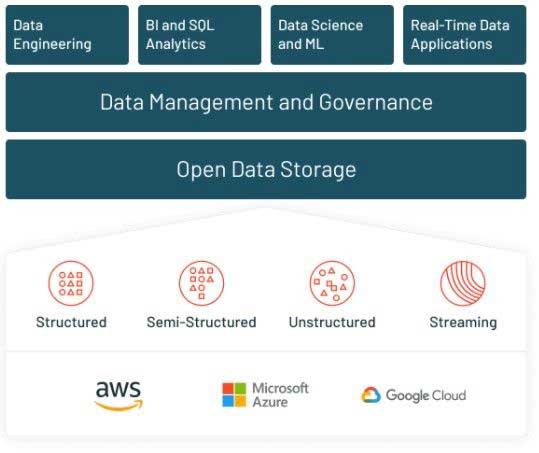
Databricks platform overview
Architecture
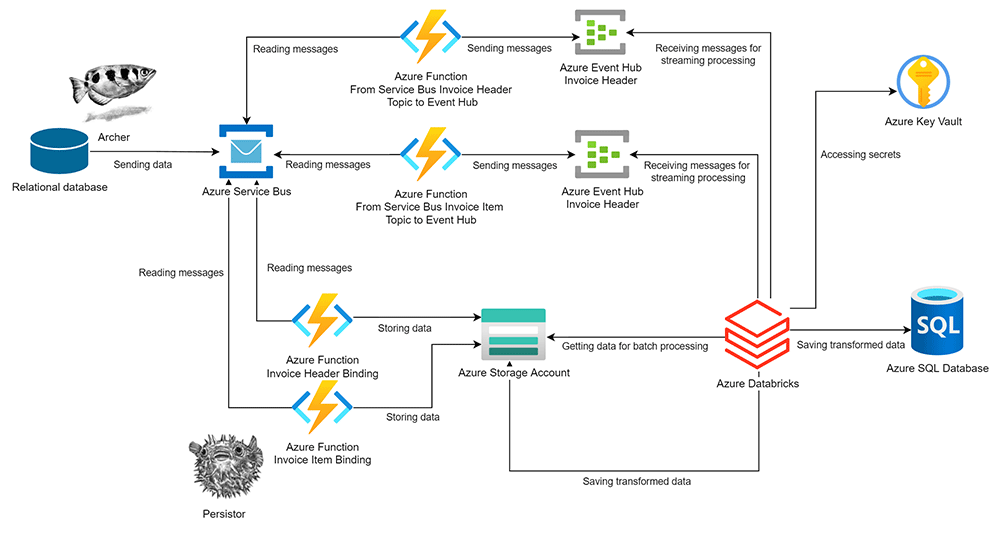
Archer extracts data for processing from relational databases and sends it to Azure Service Bus topics. There are two types of data: invoice headers and invoice items. From there, data is sent to Azure Databricks in two different ways:
- Data is sent from Azure topic subscriptions to Azure Storage Account Container using Persistor Azure Functions for the storing process, and then loaded in Azure Databricks.
- Data is sent from Azure topic subscriptions to Azure Event Hubs and consumed in real time in Azure Databricks with streaming.
After transforming received data in Azure Databricks, newly created data is stored on Azure Storage Account Container and in Azure SQL Database.
Creating a cluster on Azure Databricks
First, a new Azure Databricks workspace must be created if there are none that have been previously created.
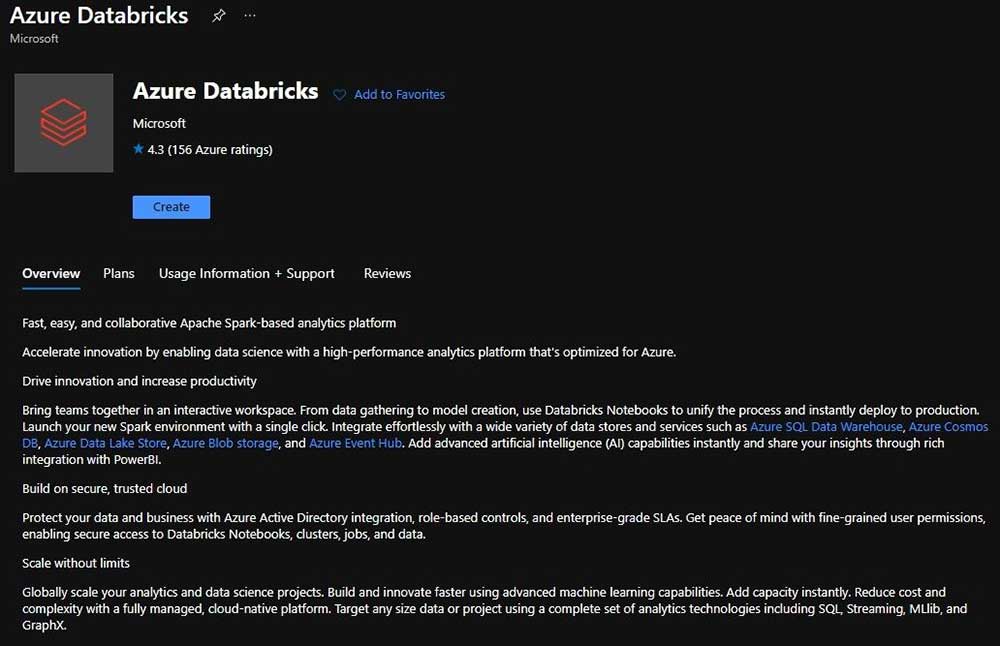
Azure Databricks resource main page
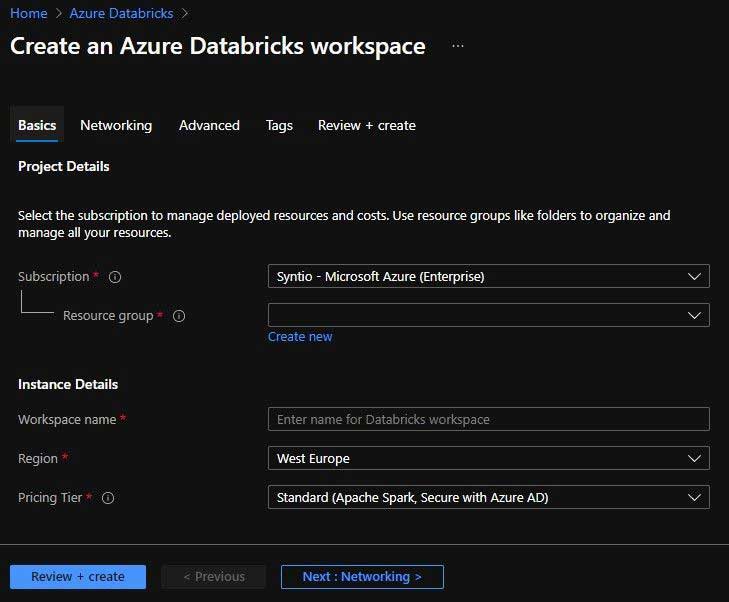
In the next step, the user must choose a resource group or create new one for new Azure Databricks workspace. The User should also provide a name for the new Databricks workspace. The Region should be set to West Europe for a better and faster service, and the Pricing Tier should be set to Standard.
Create an Azure Databricks workspace page
Upon opening recently created Azure Databricks workspaces, clusters can be created by clicking the Create button in the sidebar and selecting Cluster from the menu. The Create Cluster page will appear. The Page can also be accessed from New Cluster link under Common tasks on the main page of the workspace.
Create cluster page
The Create Cluster page has many configurations that the user can change. First, the user must provide a name for new cluster. Cluster Mode is set to Standard (classic cluster with driver node and worker nodes) which is recommended for a single user. It is recommended to set Databricks Runtime Version to the latest long-term support version, in this case 9.1 (Scala 2.12, Spark 3.1.2).
Autopilot Options offer to scale workers based on workload (Enable autoscaling) and terminate cluster after a selected period of time (Terminate after [number] minutes of inactivity). These 2 options are very useful for the cost optimization of the cluster.
Next, the number and type of workers should be set. For this research, worker type Standard_DS3_v2 has enough processing power for the actions we execute on cluster. Also, the minimum is set to one worker and the maximum is set to three workers.
Azure Databricks charges per DBU per hour. The more workers that are active in cluster, the higher the price of cluster per hour. For this reason, the minimum number of workers should be set with that in mind. Driver type can be set to be the same as the worker or can be changed to another option. With the created cluster in this research there are 3 worker nodes available, each with 4 vCPUs, 14GB RAM and 28 GB Temporary Storage.
Preparation for Data Processing
Creating notebook on Azure Databricks
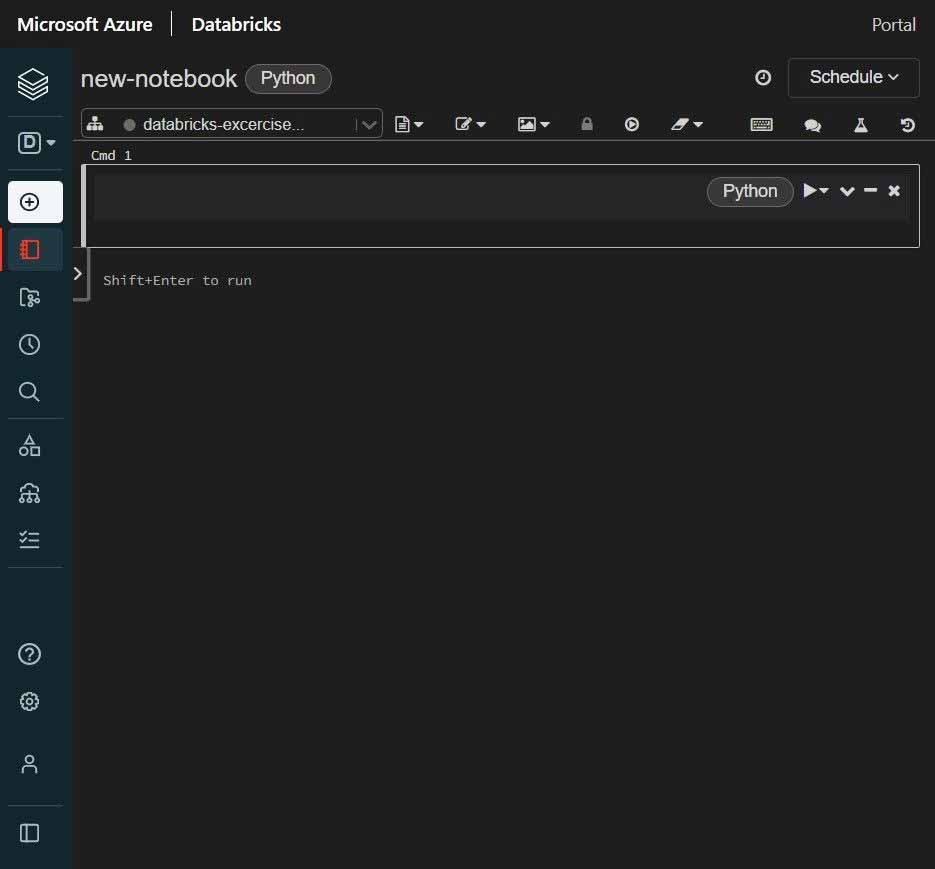
To start working on data processing in Azure Databricks, a new notebook must be created first. Notebook can be can be created by clicking the Create button in the sidebar and selecting Notebook from the menu. The Create Notebook dialogue will appear. The Create Notebook dialogue can also be accessed from the New Notebook link under Common tasks on the main page of the workspace. In dialogue, the user must name the new notebook and select the default language and cluster to attach the notebook to.
Notebook example in Azure Databricks
Creating Azure Storage Account
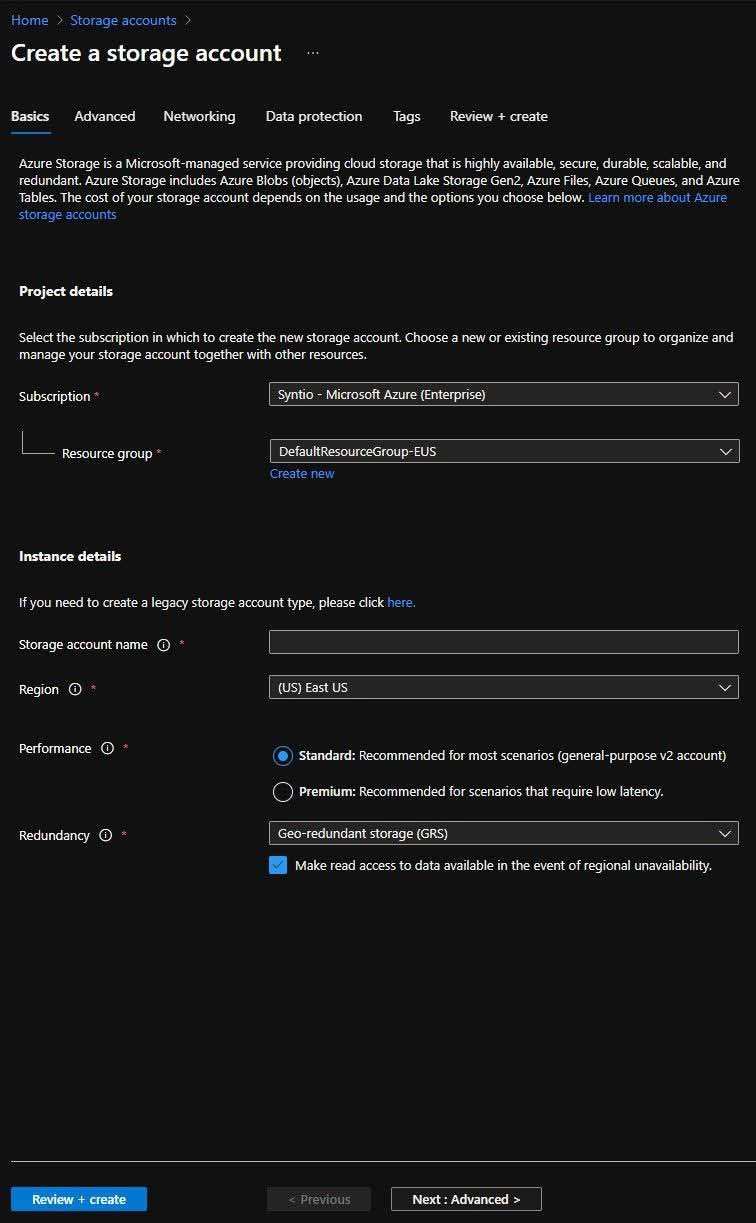
To create a new Storage Account, select Storage accounts from the left portal menu to display a list of Storage Accounts, and on the Storage accounts page, select Create. When creating a Storage Account, a new name must be inserted and a resource group must be chosen. Also, it is useful, as for all resources, to set the Region to West Europe. The Storage Account will be used for storing data from topic subscriptions and saving transformed data from Azure Databricks.
Create a storage account page
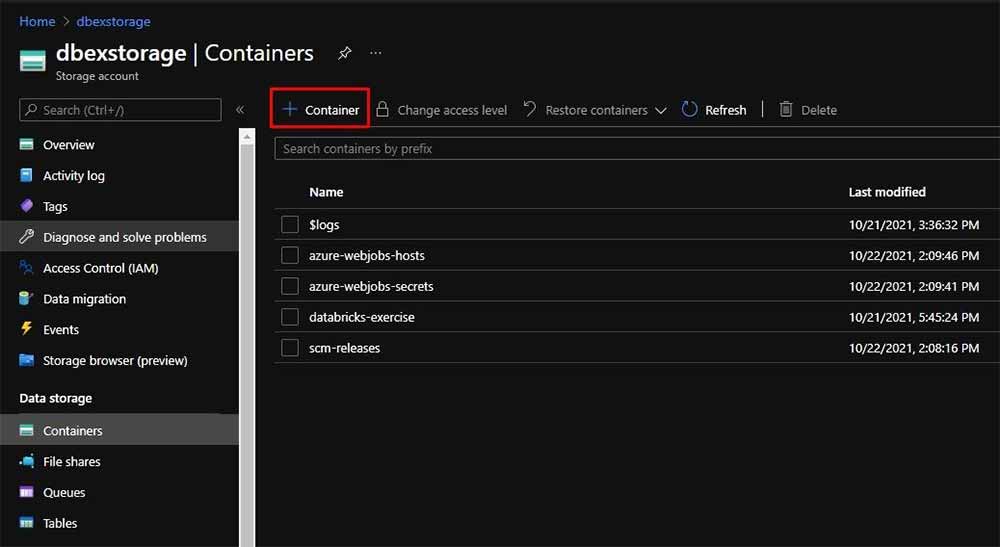
Data in this research is being stored in containers. A new container on Azure Storage Account is created by going to the Data storage → Containers setting in Azure Storage Account and choosing the Container button on the list of available containers. A name must be provided and public access level set when creating new a Container.
Creating new Container
Creating Secret Scope
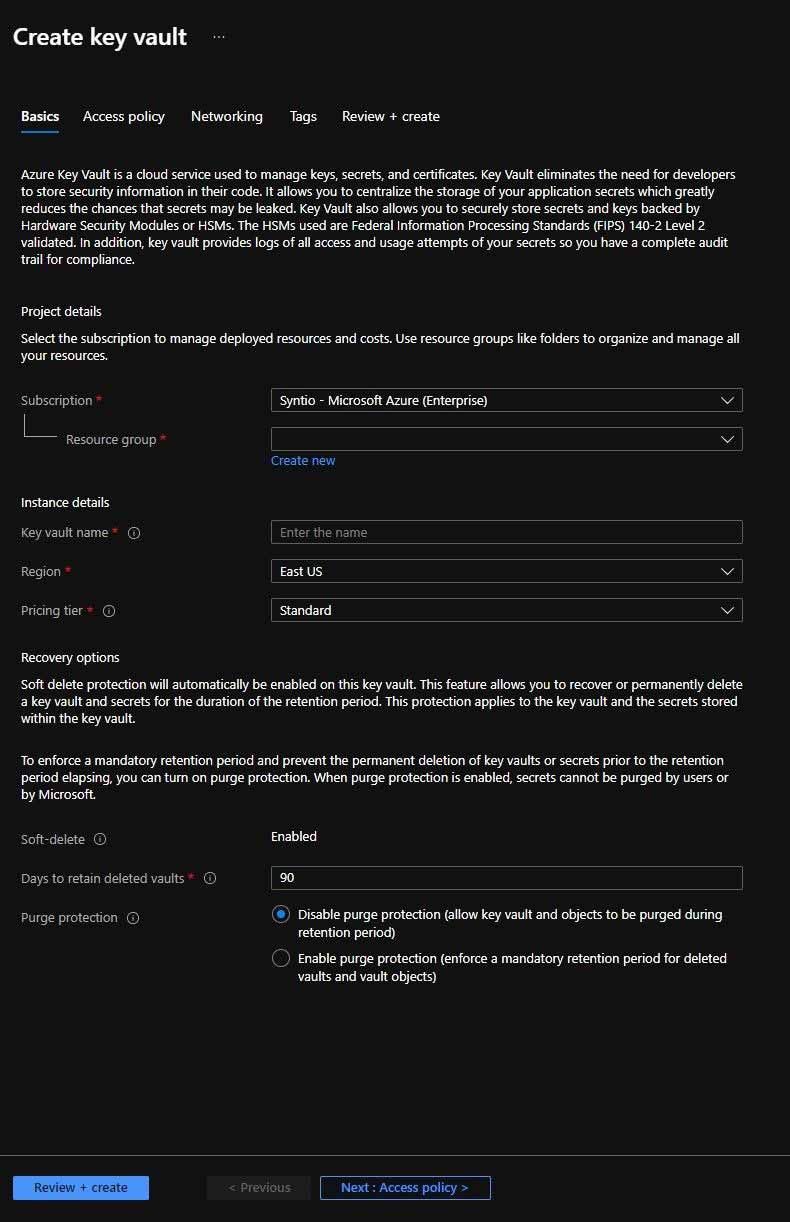
To access created storage accounts in Azure Databricks, notebook Secret Scope must be created and used for defining the Azure Storage Account key. To create secrets for Secret Scope, Key Vault must be created first. Key Vault can be created through the list of Key Vaults accessible from Azure Portal. When creating a new Key Vault, the name must be provided and resource group and region should be the configuration options that the user should pay attention to.
Create key vault page
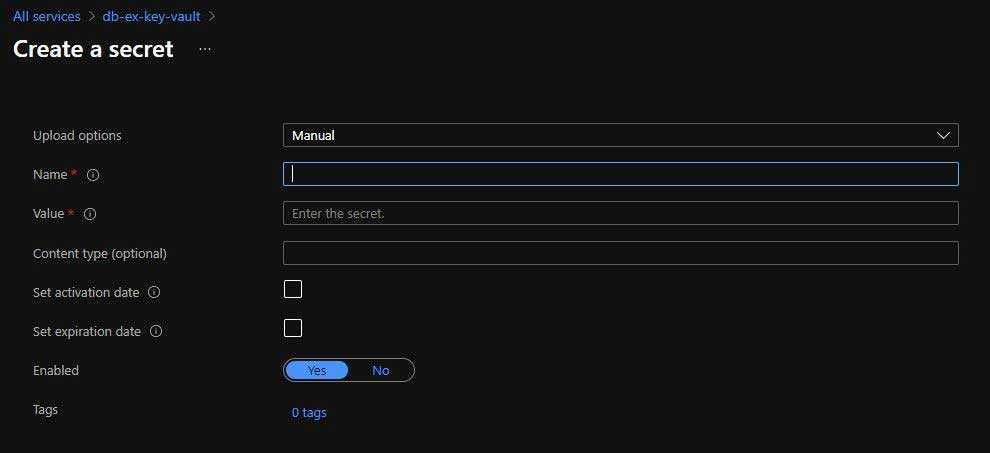
After creating a new Key Vault, on the Key Vault setting pages Secrets must be selected to generate new secret. After clicking on the Generate/Import button Create a secret page opens and a new secret can be created with the provided name and value. The name of secret is how real value (secret) will be accessed in notebook.
Create a secret page
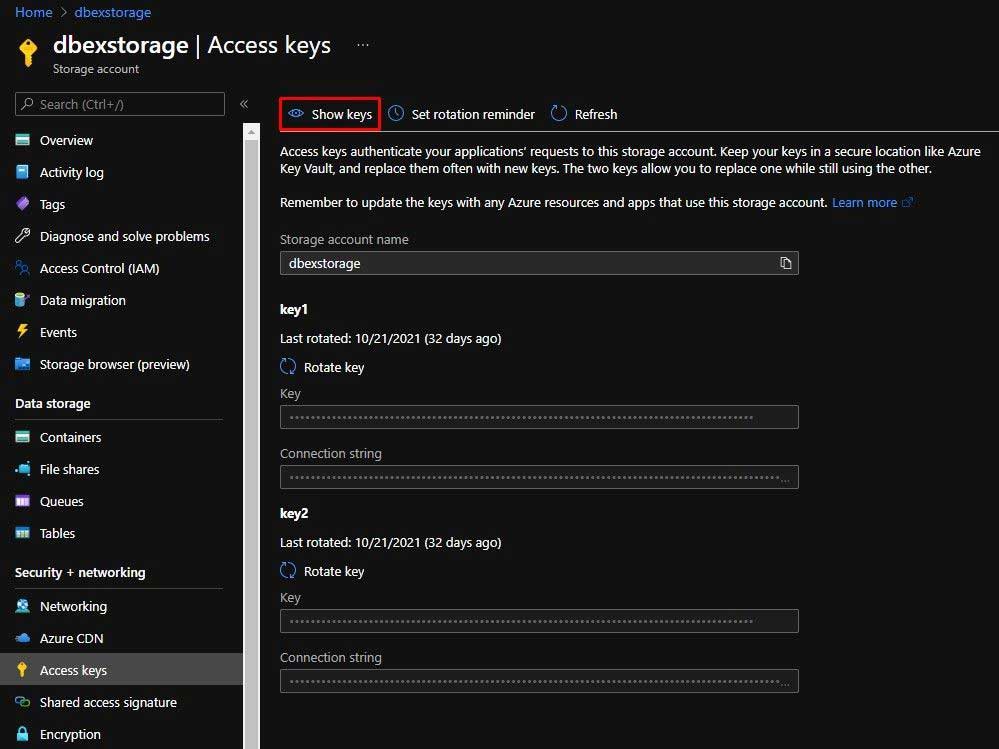
Here Azure Storage Account Key must be added as a value. The key can be found under Security + networking → Access Keys of Azure Storage Account after pressing the Show keys button. In this case, key1 → Key option is used for the value.
Getting value for secret
The next step is creating Secret Scope. Secret Scope can be created with this link:
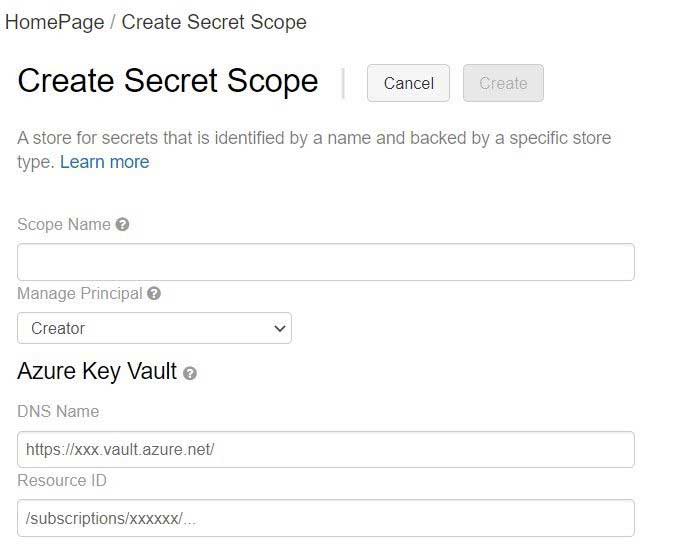
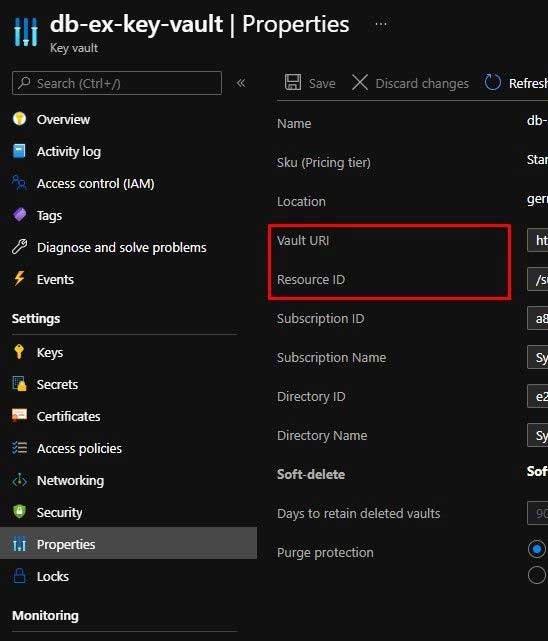
https://#secrets/createScope (add secrets/createScope to link to main page of Azure Databricks). Here the name must be provided, who can use Secret Scope must be set (Creator/ All users), and set DNS Name (Vault URI in Key Vault Properties) and Resource ID of Key Vault with secrets. DNS Name and Resource ID can be found in Settings → Properties of Key Vault.
Create Secret Scope page
Vault URI and Resource ID parameters in Key Vault
Creating Azure Service Bus Namespace, Topics and Subscriptions
AZURE SERVICE BUS is a fully managed enterprise message broker with message queues and publish-subscribe topics (in a namespace). Service Bus is used to decouple applications and services from each other, providing the following benefits: load-balancing work across competing workers, safely routing and transferring data, and control across service and application boundaries, coordinating transactional work that requires a high-degree of reliability.
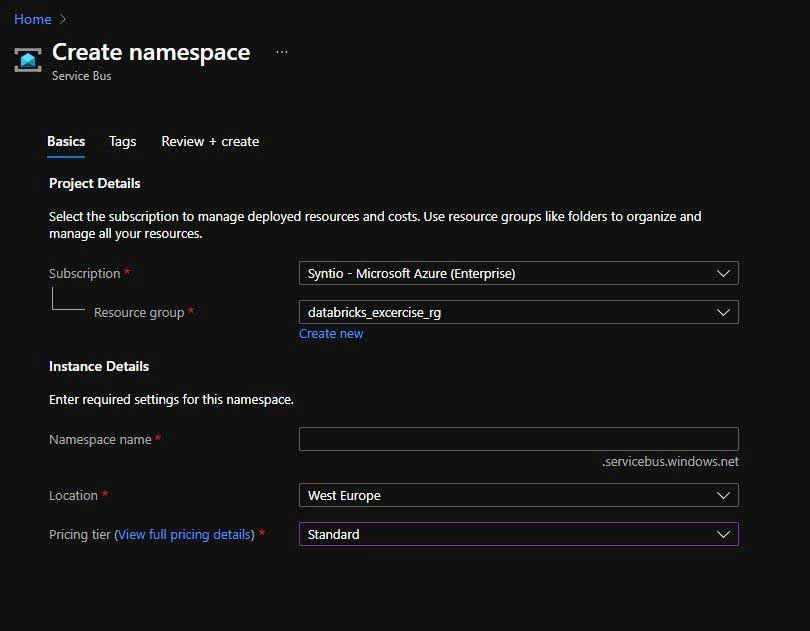
In this research, the topics and subscriptions functionality of Azure Service Bus is used for receiving incoming data and batch processing. Before creating topics and subscriptions, Service Bus Namespace resources must be created. The name must be provided, and the resource group and location must be set. The pricing tier must be set to Standard, so topic and subscriptions can be created (Basic pricing tier doesn’t support topics and subscriptions).
Create Service us namespace page
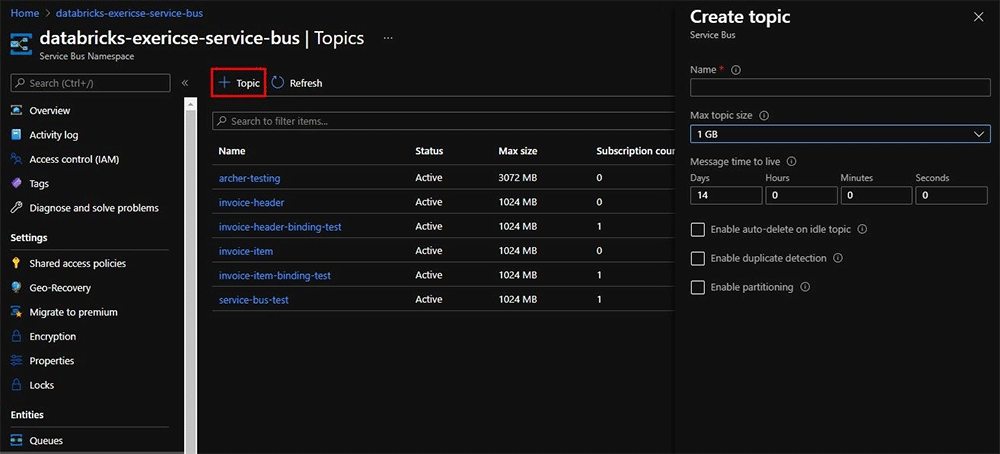
After creating the namespace, topics can be created. In this case, two topics are created: one for incoming invoice headers and one for incoming invoice items. To create a topic, go to the Topics option on the Namespace sidebar. The name must be provided, default settings can be kept as they are.
Creating topic
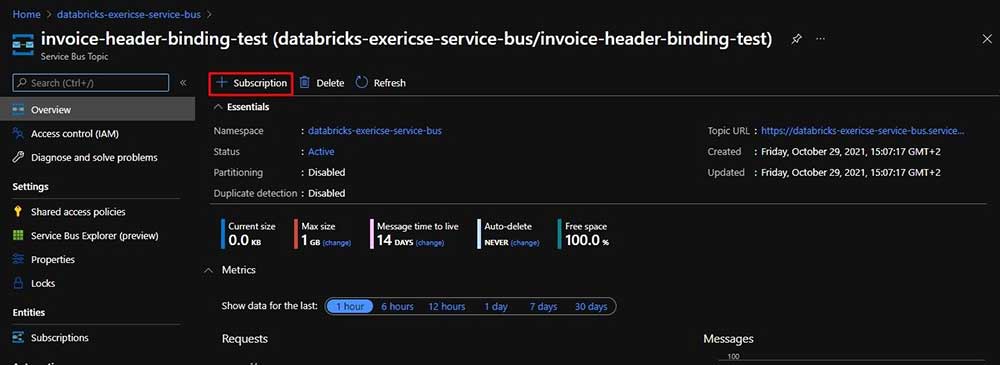
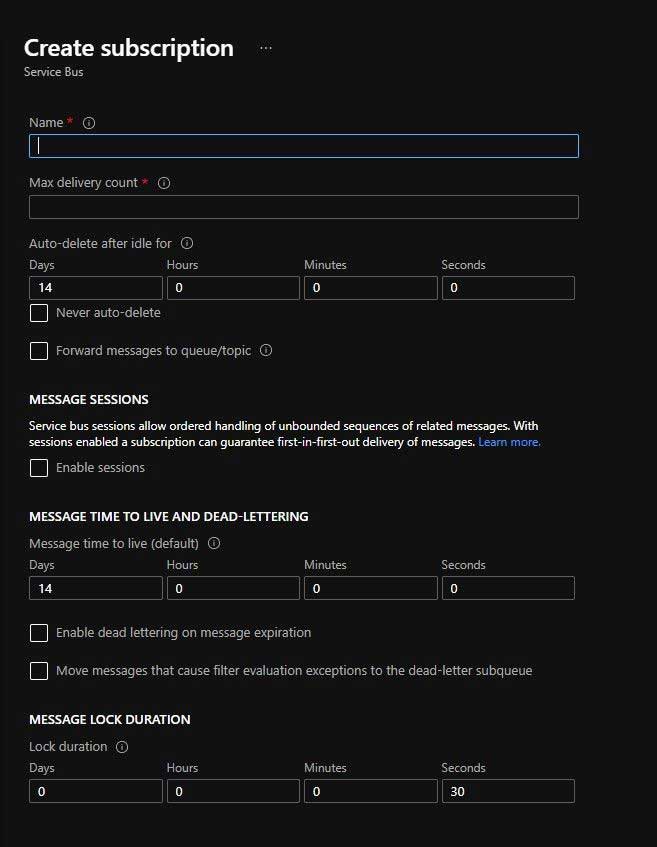
Now a subscription can be created with the Subscription button on the topic’s main page. Name and Max delivery count must be provided, default settings can be also kept as they are. Separate subscriptions are created for each topic for batch and structured processing.
Creating subscription
Create subscription options
Creating Persistor Azure Functions
(See PERSISTOR WIKI for more information).
Persistor is used to store sent data to topics on the Storage Account. To use the Persistor funcionality, Azure functions for Service Bus Binding are generated in VS Code. In this case two Persistors are generated. One for invoice headers, and one for invoice items.
For generating Service Bus Binding functions generator_config.json configuration is set as:
{
  "persistorServices": [
    ["SERVICE_BUS_BINDING", "serviceBusBinding", {"sb_type":  "topic"}]
  ],
  "output": "../output/serviceBusBinding"
}
After generating function, a newly created folder with Persistor function must be opened in separate VS Code. Functions are deployed with VS Code Azure Extension to Cloud with settings for attributes:
“PERSISTOR_STORAGE_CONNECTION_STRING”, “PERSISTOR_CONTAINER_NAME”,
“SERVICE_BUS_BINDING_TOPIC_NAME”, “SERVICE_BUS_BINDING_SUB_NAME”,
“SERVICE_BUS_BINDING_CONNECTION_STRING” manually set in local.settings.json.
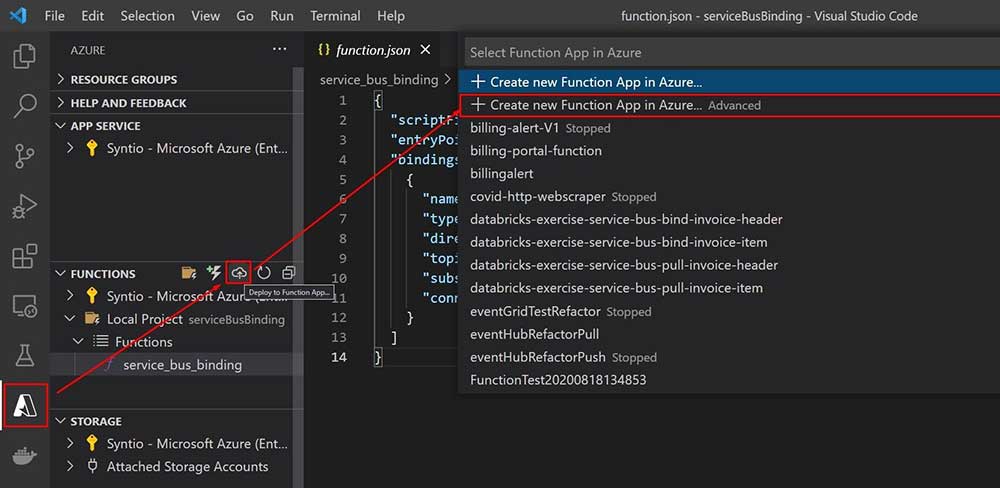
Functions must be deployed with advanced options in Azure extensions so resource group, Storage Account, Hosting Plan (Consumption in this case) and Application Insights (if there are no Application Insights available, create new) can be set for the new function.
Example of deploying Azure function in VS Code
Creating Azure SQL Database
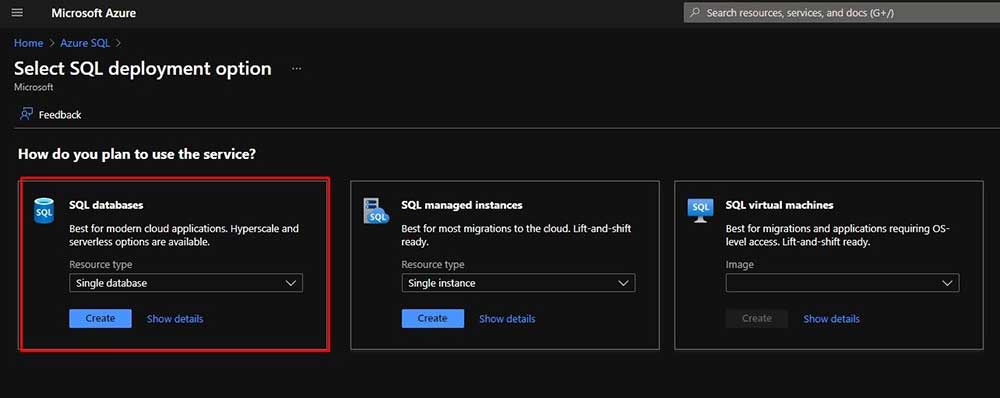
Besides storing transformed data in notebook to the Azure Storage Account, it will also be stored to Azure SQL Database (Azure SQL resource) When creating Azure SQL resource SQL database options will be selected.
Select SQL deployment option page
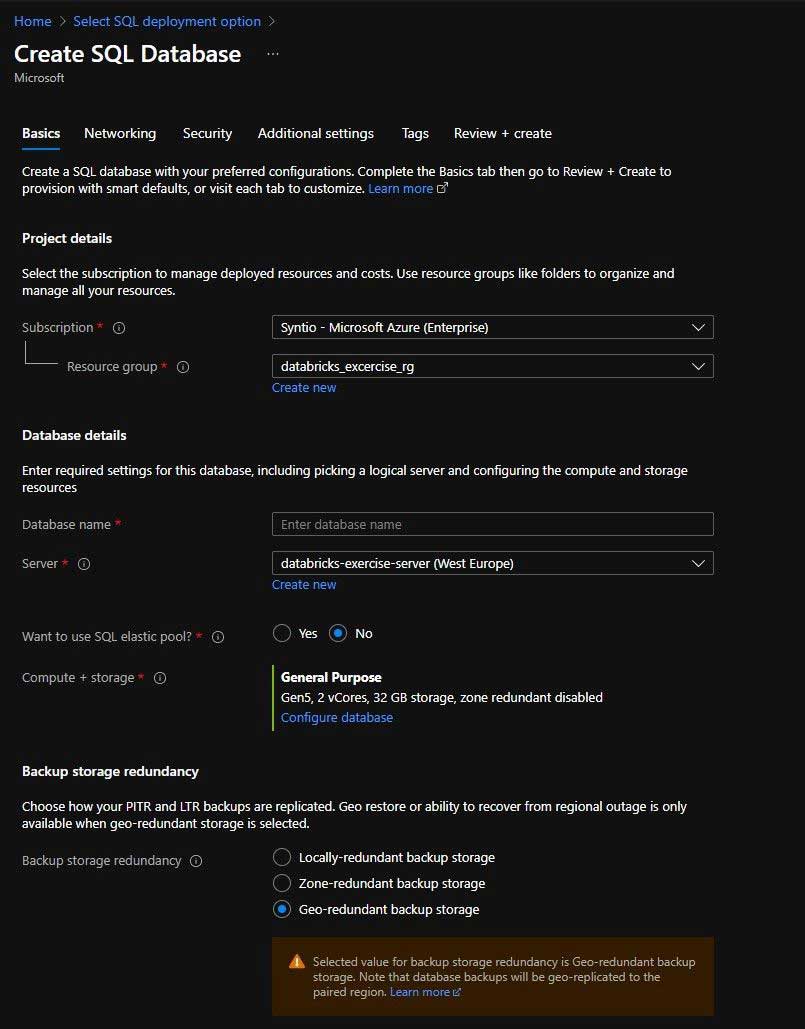
When creating new a database, a name must be provided, as well as a SQL server.
Create SQL Database page
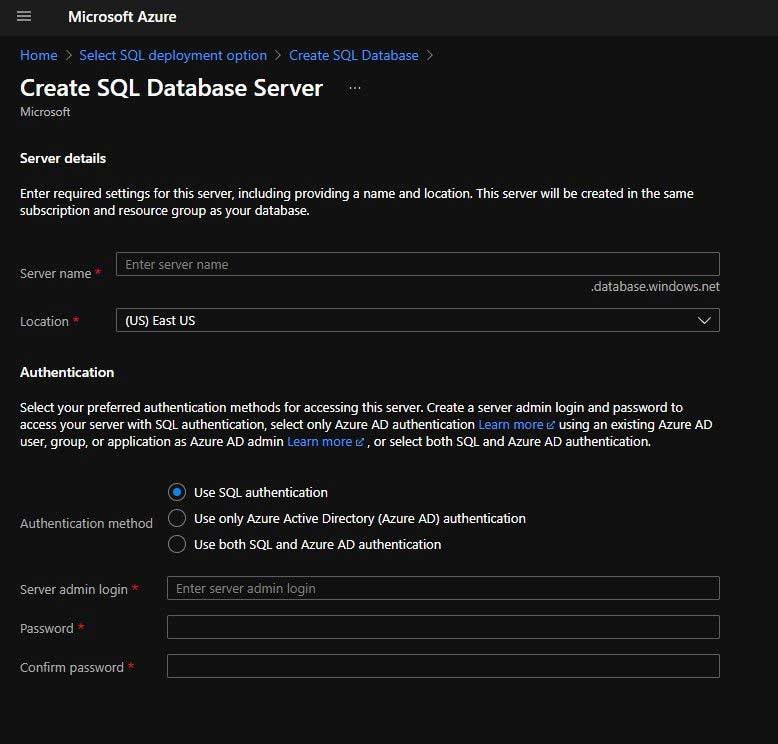
If there are no SQL servers available, a new one must be created with the provided name, server admin login and password.
Create SQL Database server page
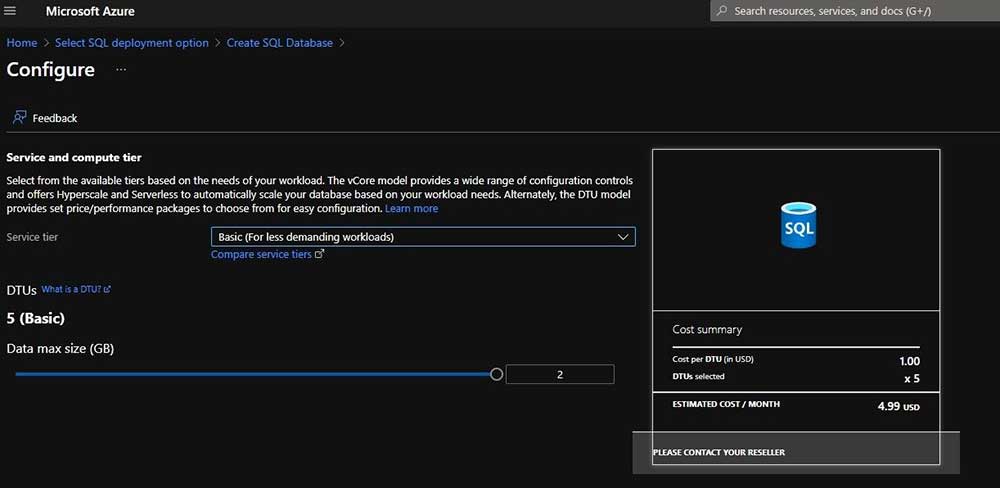
Also, Compute + storage option should be changed because in this case, Basic option is good enough for storing data.
Compute + storage option page
Creating Azure Event Hubs
AZURE EVENT HUBS is a big data streaming platform and event ingestion service. It can receive and process millions of events every second. Data that is sent to an event hub can be transformed and stored by using any real-time analytics provider or batching/storage adapters.
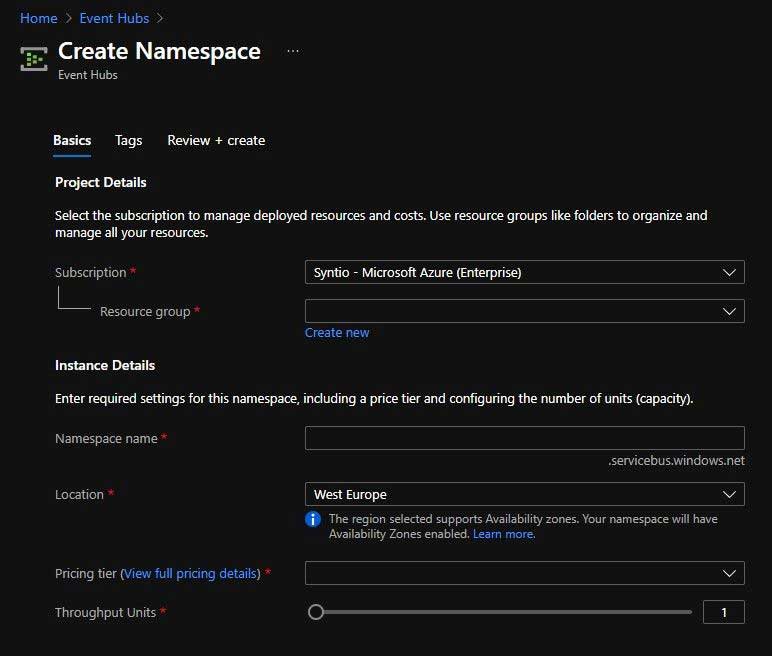
Azure Event Hubs will be used for streaming processing in this research. To create Event Hubs, first an Event Hub namespace must be created through the Event Hubs page on the Azure portal. The resource group, name and pricing tier (Basic in this case) should be provided before creating a namespace.
Create Namespace page
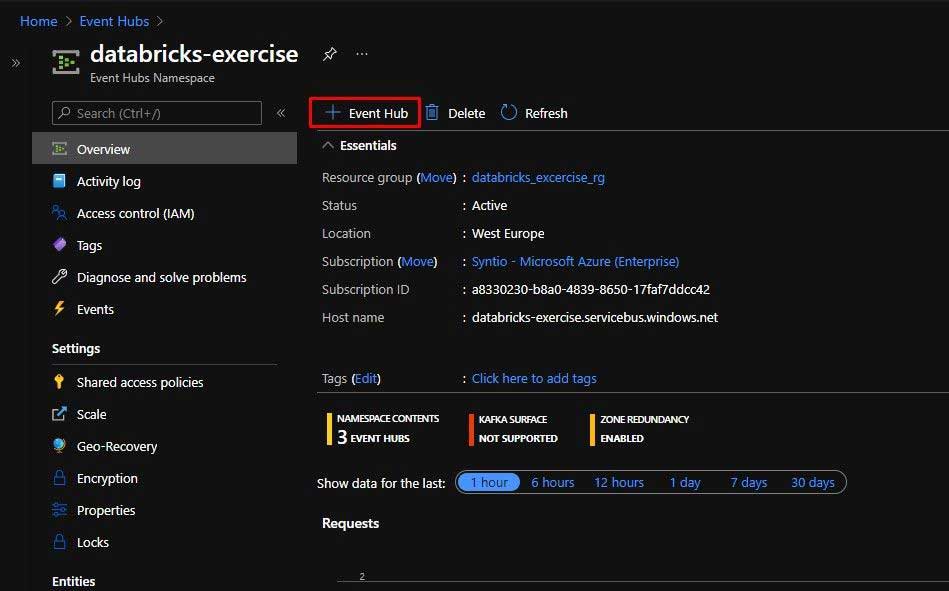
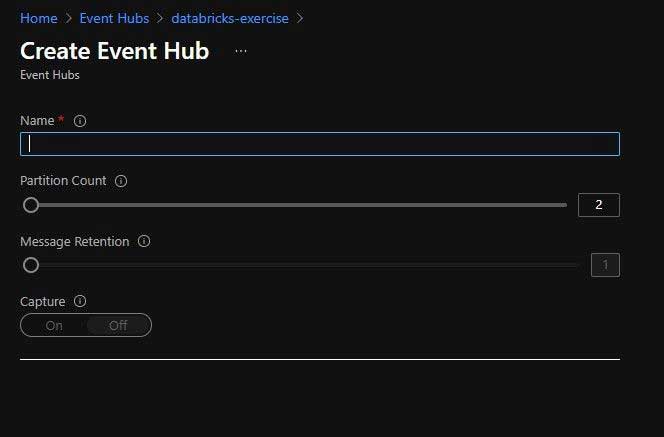
After creating a namespace, Event Hubs can be created through the Namespace main page by clicking on the Event Hub button and providing a name for a new Event Hub. In this case, two Event Hubs will be created, one for invoice headers and one for invoice items.
Event Hub Namespace main page
Create Event Hub page
Creating Azure functions for sending data from Service Bus Topics To Event Hubs
Event hubs will receive data from Service Bus topics with Azure Service Bus Trigger function, which will send message data to the Event hub when the Service Bus Topic receives a message. To create this function, the VS Code Azure extension can be used.
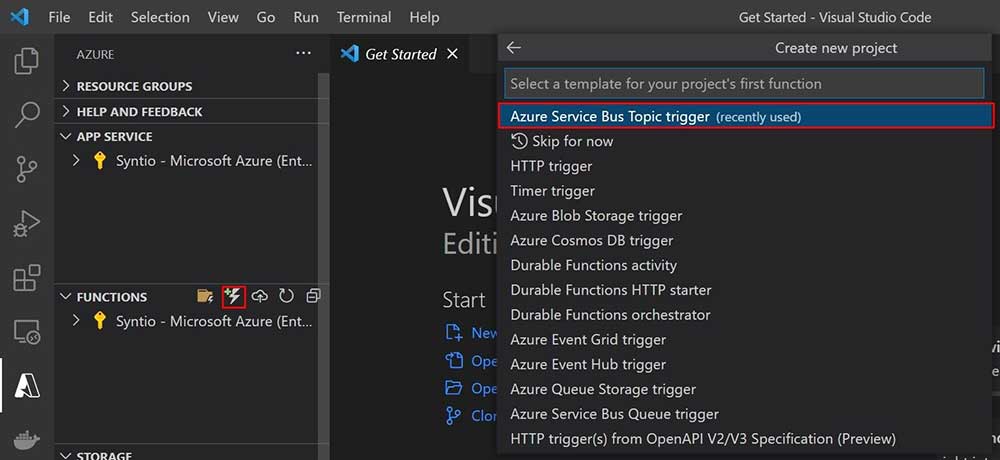
When creating a new function, Azure Service Bus Topic trigger should be selected, as well as Service Bus Namespace, Topic and Subscription.
Azure Functions templates
After creating the function, __init__.py file should be modified to send data to the Event Hub with the help of Python library azure-eventhub for working with Azure Event Hubs and creating concurrency. host.json will be used to define configuration options for concurrency. All required Python libraries must be defined in requirements.txt file. The function gets a list of Service Bus messages, then creates a batch of received messages and sends them to the Event Hub. The PRODUCER for the Event Hub should be defined outside of the main function so all function calls will use same producer. Parameter “maxConcurrentCalls” in host.json defines the number of function executions in parallel. In this case, the best results are achieved with a smaller number of concurrent calls (5 in code).
__init__.py for Service Bus Trigger for incoming invoice headers and items (only the eventhub_name parameter is different):
    import logging
from typing import List

import azure.functions as func
from azure.eventhub import EventData
import azure.eventhub.aio as event

PRODUCER = event.EventHubProducerClient.from_connection_string(conn_str="Endpoint=sb://databricks-exercise.servicebus.windows.net/;SharedAccessKeyName=RootManageSharedAccessKey;SharedAccessKey=oBOwDO/UTnibkZn91qt34aMfIU0y831oizIn692e81Q=", eventhub_name="databricks-event-hub-invoice-item")

async def main(messages: List[func.ServiceBusMessage]):
    # Log the Service Bus Message as plaintext

    event_data_batch = await PRODUCER.create_batch()

    for message in messages:
        message_body = message.get_body()
        event_data_batch.add(EventData(message_body))
        logging.info("Python ServiceBus topic trigger processed message.")
        logging.info(message_body)


    #Send message to Event Hub
    # Create a batch.

    # Send the batch of events to the event hub.
    await PRODUCER.send_batch(event_data_batch)

    logging.info("Event Hub received message.")
function.json for both functions (topicName and subscriptionName parameters are different for header function):
{
  "scriptFile": "__init__.py",
  "entryPoint": "main",
  "bindings": [
    {
      "name": "messages",
      "type": "serviceBusTrigger",
      "direction": "in",
      "cardinality": "many",
      "topicName": "invoice-item",
      "subscriptionName": "invoice-item-event-hub-sub",
      "connection": "databricksexericseservicebus_SERVICEBUS",
      "dataType": "string"
    }
  ]
}
host.json for both functions:
{
  "version": "2.0",
  "logging": {
    "applicationInsights": {
      "samplingSettings": {
        "isEnabled": true,
        "excludedTypes": "Request"
      }
    }
  },
  "extensionBundle": {
    "id": "Microsoft.Azure.Functions.ExtensionBundle",
    "version": "[2.*, 3.0.0)"
  },
  "extensions": {
    "serviceBus": {
      "messageHandlerOptions": {
        "maxConcurrentCalls": 5
      }
    }
  }
}
requirements.txt for both functions:
# DO NOT include azure-functions-worker in this file
# The Python Worker is managed by Azure Functions platform
# Manually managing azure-functions-worker may cause unexpected issues

azure-functions
azure-eventhub
Batch Processing
Spark Dataframe API will be used for data loading, transformation and writing.
All code discussed in this chapter is available on NOTEBOOOK ON AZURE DATABRICKS.
First, the Azure Databricks notebook must be connected with the Azure Storage Account using Secret Scope (parameter key is secret in Key Vault) and Spark Configuration.
storage_account_name = 'dbexstorage'
storage_account_key = dbutils.secrets.get(scope = "key-vault-secrets", key = "dbexstorage-account-key")
spark.conf.set('fs.azure.account.key.' + storage_account_name + '.blob.core.windows.net', storage_account_key)
Invoice headers are loaded from the Container. They are located in a folder created by the Persistor function (topic-name/year/month/day).
# Definition of path to folder on Container that contains Invoice Headers that were sent from Persistor
container_name = 'databricks-exercise'
file_path_invoice_header = "wasbs://" + container_name + "@" + storage_account_name + ".blob.core.windows.net/invoice-header/2021/10/28"

# Loading Data into Spark DataFrame
df_invoice_header = spark.read.text(file_path_invoice_header)

display(df_invoice_header)
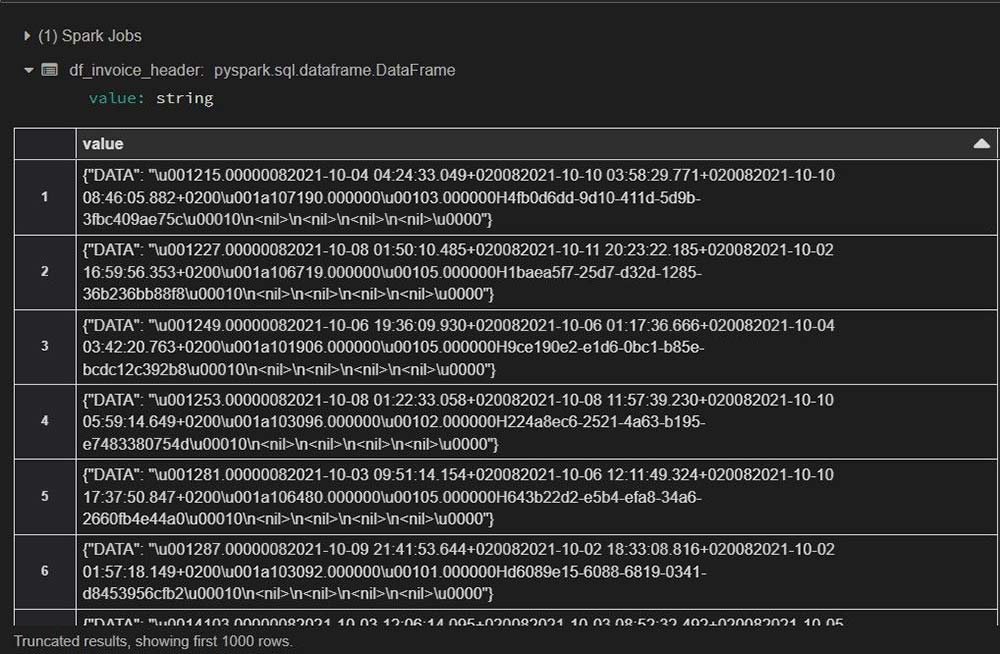
Result of display
Data received is string type and looks like a JSON object. Persistor creates a {“DATA”: “PAYLOAD”} type message where the PAYLOAD is an actual message that was sent to the topic. The payload received is in Avro format so function from_avro() in Spark Avro package with provided Avro Schema (string type) from Archer, must be used to decode and parse Avro binary data into a column.
from pyspark.sql.functions import from_json, col, get_json_object
from pyspark.sql.avro.functions import from_avro
from pyspark.sql.types import StructType,StructField,StringType

schema_json = StructType([
  StructField("DATA", StringType(), True),
])

schema_invoice_header ='''{"type":"record","name":"mySchema","fields":[{"name":"CLIENT_ID","type":"string"},{"name":"CREATION_DATE","type":"string"},{"name":"DUE_DATE","type":"string"},{"name":"FULLY_PAID_DATE","type":"string"},{"name":"INVOICE_ID","type":"string"},{"name":"INVOICE_STATUS_ID","type":"string"},{"name":"NOTES","type":"string"},{"name":"items","type":{"type":"array","items":{"type":"record","name":"items","fields":[{"name":"APPOINTMENT_ID","type":"string"},{"name":"BILLING_ITEM_ID","type":"string"},{"name":"INVOICE_ITEM_ID","type":"string"},{"name":"TOTAL_COST","type":"string"}]}}}]}'''


df_invoice_header_json = df_invoice_header.withColumn("jsonData",from_json(col("value"), schema_json)) \
                   .select("jsonData.*").withColumn("binary_encoded", col("DATA").cast("BINARY"))

#display(df_invoice_header_json)

df_invoice_header_parsed = df_invoice_header_json.select(from_avro(col("binary_encoded"), schema_invoice_header).alias("header")).select("header.*").drop("items")

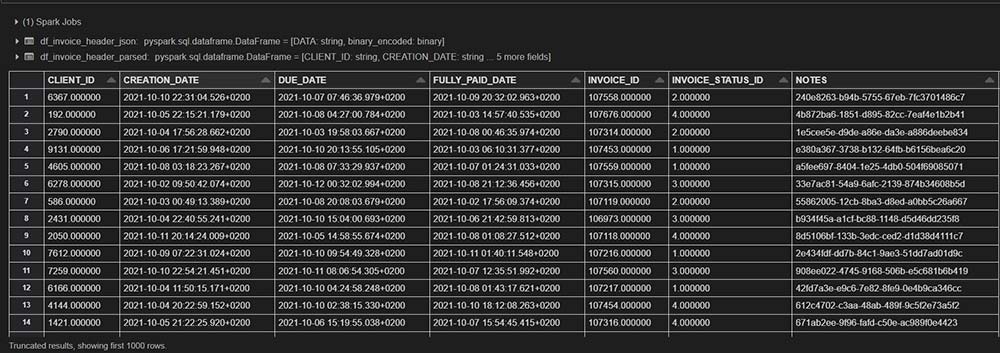
display(df_invoice_header_parsed)
Invoice items after parsing
Now two dataframes can be joined on the column INVOICE_ID:
df_invoice_header_parsed = df_invoice_header_parsed.alias('df_invoice_header_parsed')
df_invoice_item_parsed = df_invoice_item_parsed.alias('df_invoice_item_parsed')

df_invoice_header_item_joined = df_invoice_header_parsed.join(df_invoice_item_parsed, 'INVOICE_ID') \
    .select('df_invoice_header_parsed.INVOICE_ID',
            'df_invoice_item_parsed.INVOICE_ITEM_ID',
            'df_invoice_header_parsed.CLIENT_ID',
            'df_invoice_header_parsed.INVOICE_STATUS_ID',
            'df_invoice_item_parsed.BILLING_ITEM_ID',
            'df_invoice_item_parsed.APPOINTMENT_ID',
            'df_invoice_item_parsed.TOTAL_COST',
            'df_invoice_header_parsed.CREATION_DATE',
            'df_invoice_header_parsed.DUE_DATE',
            'df_invoice_header_parsed.FULLY_PAID_DATE',
            'df_invoice_header_parsed.NOTES')

display(df_invoice_header_item_joined)
Result of join transformation
The new joined dataframe can be saved on the container in Parquet format:
output_blob_folder_parquet = "wasbs://" + container_name  + "@" + storage_account_name + ".blob.core.windows.net/Invoice-Header-Item.parquet"

# write the dataframe to blob storage
(df_invoice_header_item_joined
 .write
 .mode("overwrite")
 .option("header", "true")
 .format("parquet")
 .save(output_blob_folder_parquet))
Loading the saved Parquet file is similar to loading the original data:
file_path_invoice_item_header_parquet = "wasbs://" + container_name  + "@" + storage_account_name + ".blob.core.windows.net/Invoice-Header-Item.parquet"
df_invoice_header_item_parquet = spark.read.format("parquet").load(file_path_invoice_item_header_parquet)

display(df_invoice_header_item_parquet)
The new joined dataframe can also be saved on the container in Avro format:
output_blob_folder_avro = "wasbs://" + container_name + "@" + storage_account_name + ".blob.core.windows.net/Invoice-Header-Item.avro"

(df_invoice_header_item_joined
 .write
 .mode("overwrite")
 .option("header", "true")
 .format("avro")
 .save(output_blob_folder_avro))
Loading the saved Avro file is similar to loading the original data:
file_path_invoice_item_header_avro = "wasbs://" + container_name + "@" + storage_account_name + ".blob.core.windows.net/Invoice-Header-Item.avro"
df_invoice_header_item_avro = spark.read.format("avro").load(file_path_invoice_item_header_avro)

display(df_invoice_header_item_avro)
The joined dataframe can also be saved on the Azure SQL database. First the JDBC connection must be created for the previously created database. SQL username and password are provided through secret scope (with creating secrets inside the same Key Vault where the Storage Account Key secret is defined).
# Connections for Database
jdbc_hostname = "databricks-exercise-server.database.windows.net"
jdbc_database = "databricks_exercise_database"
jdbc_port = 1433

# Retrieve the database username and password from Key Vault
jdbc_username = dbutils.secrets.get(scope = "key-vault-secrets", key = "sql-username")
jdbc_password = dbutils.secrets.get(scope = "key-vault-secrets", key = "sql-password")

# URL Connection
jdbc_url = "jdbc:sqlserver://{0}:{1};database={2}".format(jdbc_hostname ,jdbc_port, jdbc_database)
props = {
  "user" : jdbc_username,
  "password" : jdbc_password,
  "driver" : "com.microsoft.sqlserver.jdbc.SQLServerDriver"
}
Now, the joined dataframe can be written on the SQL database:
df_invoice_header_item_joined.write.jdbc(url=jdbc_url, table="invoice_header_item_joined", mode="overwrite", properties=props)
Streaming Processing
Note: All three streams (invoice header, invoice, item and joined stream) must be started before sending data becuase of the @latest option for offset parameter in the Azure Event Hub.
Spark Dataframe API will be used for data loading, transformation and writing.
Spark Structured Streaming API will be used for streaming processing.
All code discussed in this chapter is available on NOTEBOOOK ON AZURE DATABRICKS.
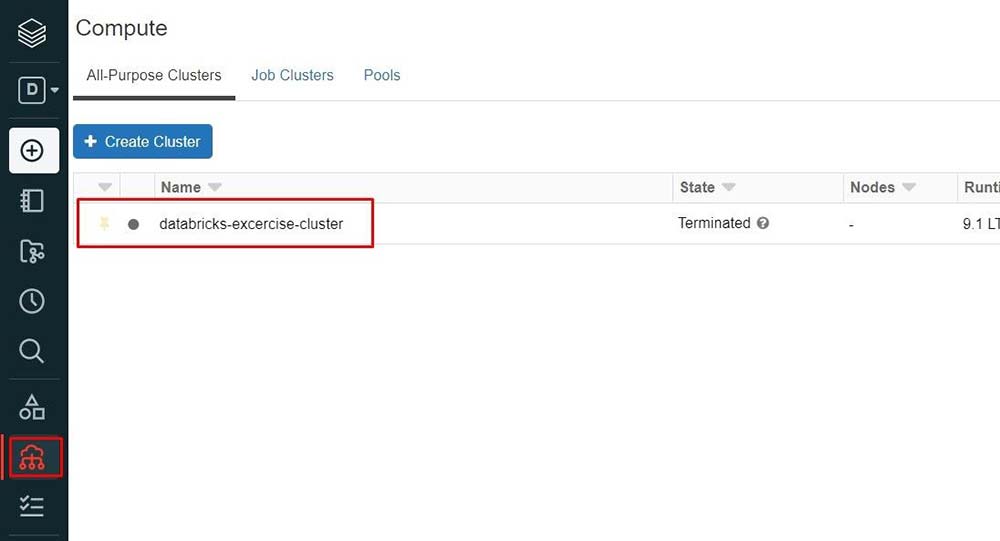
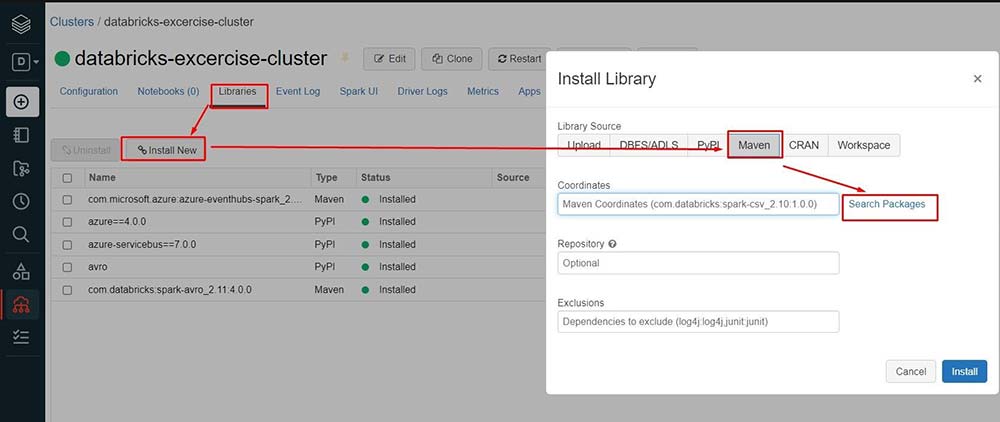
To use Azure Event Hubs in Spark cluster, the library com.microsoft.azure:azure-eventhubs-spark must be installed first. To install the library on the cluster in Azure Databricks, first access the cluster in the Compute section available in the sidebar of Azure Databricks.
Selecting cluster from Compute section
Next, Libraries option must be chosen, and Install New dialogue must be opened. Now, the library can be searched for and installed on the cluster.
Installing new libraries on Databricks cluster
The same as for batch processing, Azure Databricks notebook must be connected with the Azure Storage Account using Secret Scope and Spark Configuration.
{storage_account_name = 'dbexstorage'
storage_account_key = dbutils.secrets.get(scope = "key-vault-secrets", key = "dbexstorage-account-key")
spark.conf.set('fs.azure.account.key.' + storage_account_name + '.blob.core.windows.net', storage_account_key)
Event Hub connection strings must be defined and encrypted otherwise they won’t work. The event Hub connection string must be created on the Event Hub page:
event_hub_connection_string_header = "Endpoint=sb://databricks-exercise.servicebus.windows.net/;SharedAccessKeyName=both;SharedAccessKey=gx7glhRHFIwb/P0c1tQsJmdK8BbDPMB7BwV0yqh/e5U=;EntityPath=databricks-event-hub-invoice-header"
event_hub_connection_string_header = sc._jvm.org.apache.spark.eventhubs.EventHubsUtils.encrypt(event_hub_connection_string_header)

event_hub_connection_string_item = "Endpoint=sb://databricks-exercise.servicebus.windows.net/;SharedAccessKeyName=both;SharedAccessKey=3ZLIHewz9qHlw6T30rwPb3S+6SFpj5WNDZUT26YhJWk=;EntityPath=databricks-event-hub-invoice-item"
event_hub_connection_string_item = sc._jvm.org.apache.spark.eventhubs.EventHubsUtils.encrypt(event_hub_connection_string_item)
The same as for batch processing, Avro schemas must be used for decoding and parsing incoming data into columns in the dataframe.
schema_invoice_header ='''{"type":"record","name":"mySchema","fields":[{"name":"CLIENT_ID","type":"string"},{"name":"CREATION_DATE","type":"string"},{"name":"DUE_DATE","type":"string"},{"name":"FULLY_PAID_DATE","type":"string"},{"name":"INVOICE_ID","type":"string"},{"name":"INVOICE_STATUS_ID","type":"string"},{"name":"NOTES","type":"string"},{"name":"items","type":{"type":"array","items":{"type":"record","name":"items","fields":[{"name":"APPOINTMENT_ID","type":"string"},{"name":"BILLING_ITEM_ID","type":"string"},{"name":"INVOICE_ITEM_ID","type":"string"},{"name":"TOTAL_COST","type":"string"}]}}}]}'''

schema_invoice_item ='''{"type":"record","name":"mySchema","fields":[{"name":"BILLING_ITEM_ID","type":"string"},{"name":"CLIENT_ID","type":"string"},{"name":"CREATION_DATE","type":"string"},{"name":"INVOICE_ITEM_ID","type":"string"},{"name":"NOTES","type":"string"},{"name":"items","type":{"type":"array","items":{"type":"record","name":"items","fields":[{"name":"APPOINTMENT_ID","type":"string"},{"name":"INVOICE_ID","type":"string"},{"name":"TOTAL_COST","type":"string"}]}}}]}'''
In Spark 2.1, option watermark was introduced, which lets the engine automatically track the current event time in the data and attempt to clean up the old state accordingly. The watermark of a query can be defined by specifying the event time column and the threshold on how late the data is expected to be, in terms of event time. In this example the “enqueuedTime” column is used which represents the time that the message was received on the Service Bus topic in a timestamp format.
First, watermark delays are defined on both streaming inputs, so that the engine knows how delayed the input could be. Then constraint on event-time across the two streaming inputs is defined, so that the engine can figure out when old rows of one input are not going to be required (i.e. will not satisfy the time constraint) for matches with the other input.
A watermark delay of “X time” guarantees that the engine will never drop any data that is less than “X time” delayed. In other words, any data less than “X time” behind (in terms of event-time) the latest data processed up until then is guaranteed to be processed, but data delayed by more than “X time” may or may not get processed.
Next, invoice header streaming can be started and displayed as it arrives:
from pyspark.sql.functions import col
from pyspark.sql.avro.functions import from_avro
import json

# Source with default settings
eh_conf_header = {
  'eventhubs.connectionString' : event_hub_connection_string_header,
  'eventhubs.startingPosition' : json.dumps({"offset":"@latest", "seqNo":-1,"enqueuedTime": None,"isInclusive": True}) #offset: @latest for records that event hub received after stream is started
}


# Invoice Header Streaming
streaming_invoice_header =  spark \
  .readStream \
  .format("eventhubs") \
  .options(**eh_conf_header) \
  .load() \
  .select(from_avro(col("body"), schema_invoice_header).alias("header"), col("enqueuedTime").alias("HEADER_TIME")) \
  .select("header.*", "HEADER_TIME") \
  .drop("items")
display(streaming_invoice_header)
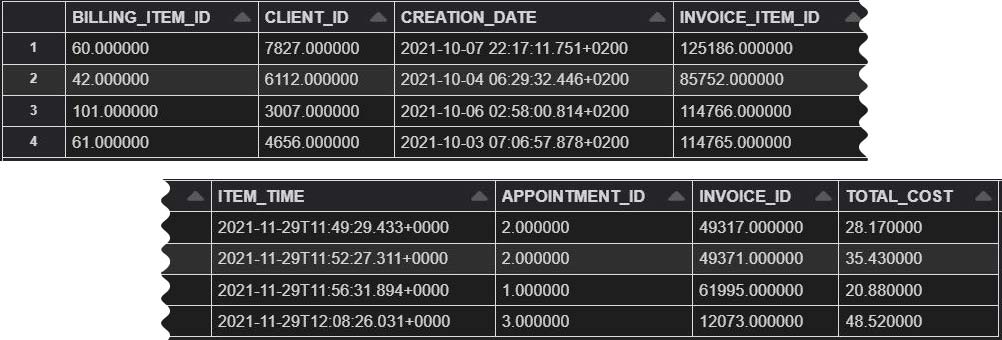
Invoice item streaming result
If the parameter @latest is used for offset in the Event Hub Configuration, only new data that comes after the Stream has been started will be visible.
Now new Stream-Stream Join can be created, that will join running Invoice Item and Invoice Header streams on the column INVOICE_ID and new joined stream can be written on the storage account in Avro format:
from pyspark.sql.types import *
from pyspark.sql.functions import *


streaming_invoice_header_watermarked = streaming_invoice_header.withWatermark("HEADER_TIME", "10 minute").alias("header") #.dropDuplicates("INVOICE_ID", "HEADER_TIME")
streaming_invoice_item_watermarked = streaming_invoice_item.withWatermark("ITEM_TIME", "10 minute").alias("item") #.dropDuplicates("INVOICE_ID", "ITEM_TIME")


invoice_join_stream = streaming_invoice_header_watermarked.join(
  streaming_invoice_item_watermarked,
  expr("""
    item.INVOICE_ID = header.INVOICE_ID AND (item.ITEM_TIME > header.HEADER_TIME - interval 10 minute AND
 item.ITEM_TIME < header.HEADER_TIME + interval 10 minute
)
    """)
).select('header.INVOICE_ID',
            'item.INVOICE_ITEM_ID',
            'header.CLIENT_ID',
            'header.INVOICE_STATUS_ID',
            'item.BILLING_ITEM_ID',
            'item.APPOINTMENT_ID',
            'item.TOTAL_COST',
            'header.CREATION_DATE',
            'header.DUE_DATE',
            'header.FULLY_PAID_DATE',
            'header.NOTES')
display(invoice_join_stream)

container_name = "databricks-exercise"

#Path where Data will be written
target_folder_path = "wasbs://" + container_name + "@" + storage_account_name + ".blob.core.windows.net/" + "Joined-Stream.parquet"

# Writing to Azure Storage
writing_query = invoice_join_stream.writeStream \
                              .format("avro") \
                              .option("path", target_folder_path) \
                              .option("checkpointLocation", "tmp/databricks-exercise-avro") \ #checkpoint must be new for old files
                              .outputMode("append") \
                              .start()
If the parameter @latest is used for offset in the Event Hub Configuration, only new data that comes after the Stream has been started will be visible.
Now new Stream-Stream Join can be created, that will join running Invoice Item and Invoice Header streams on the column INVOICE_ID and new joined stream can be written on the storage account in Avro format:
from pyspark.sql.types import *
from pyspark.sql.functions import *


streaming_invoice_header_watermarked = streaming_invoice_header.withWatermark("HEADER_TIME", "10 minute").alias("header") #.dropDuplicates("INVOICE_ID", "HEADER_TIME")
streaming_invoice_item_watermarked = streaming_invoice_item.withWatermark("ITEM_TIME", "10 minute").alias("item") #.dropDuplicates("INVOICE_ID", "ITEM_TIME")


invoice_join_stream = streaming_invoice_header_watermarked.join(
  streaming_invoice_item_watermarked,
  expr("""
    item.INVOICE_ID = header.INVOICE_ID AND (item.ITEM_TIME > header.HEADER_TIME - interval 10 minute AND
 item.ITEM_TIME < header.HEADER_TIME + interval 10 minute
)
    """)
).select('header.INVOICE_ID',
            'item.INVOICE_ITEM_ID',
            'header.CLIENT_ID',
            'header.INVOICE_STATUS_ID',
            'item.BILLING_ITEM_ID',
            'item.APPOINTMENT_ID',
            'item.TOTAL_COST',
            'header.CREATION_DATE',
            'header.DUE_DATE',
            'header.FULLY_PAID_DATE',
            'header.NOTES')
display(invoice_join_stream)

container_name = "databricks-exercise"

#Path where Data will be written
target_folder_path = "wasbs://" + container_name + "@" + storage_account_name + ".blob.core.windows.net/" + "Joined-Stream.parquet"

# Writing to Azure Storage
writing_query = invoice_join_stream.writeStream \
                              .format("avro") \
                              .option("path", target_folder_path) \
                              .option("checkpointLocation", "tmp/databricks-exercise-avro") \ #checkpoint must be new for old files
                              .outputMode("append") \
                              .start()
Joined streaming result
Benchmarking
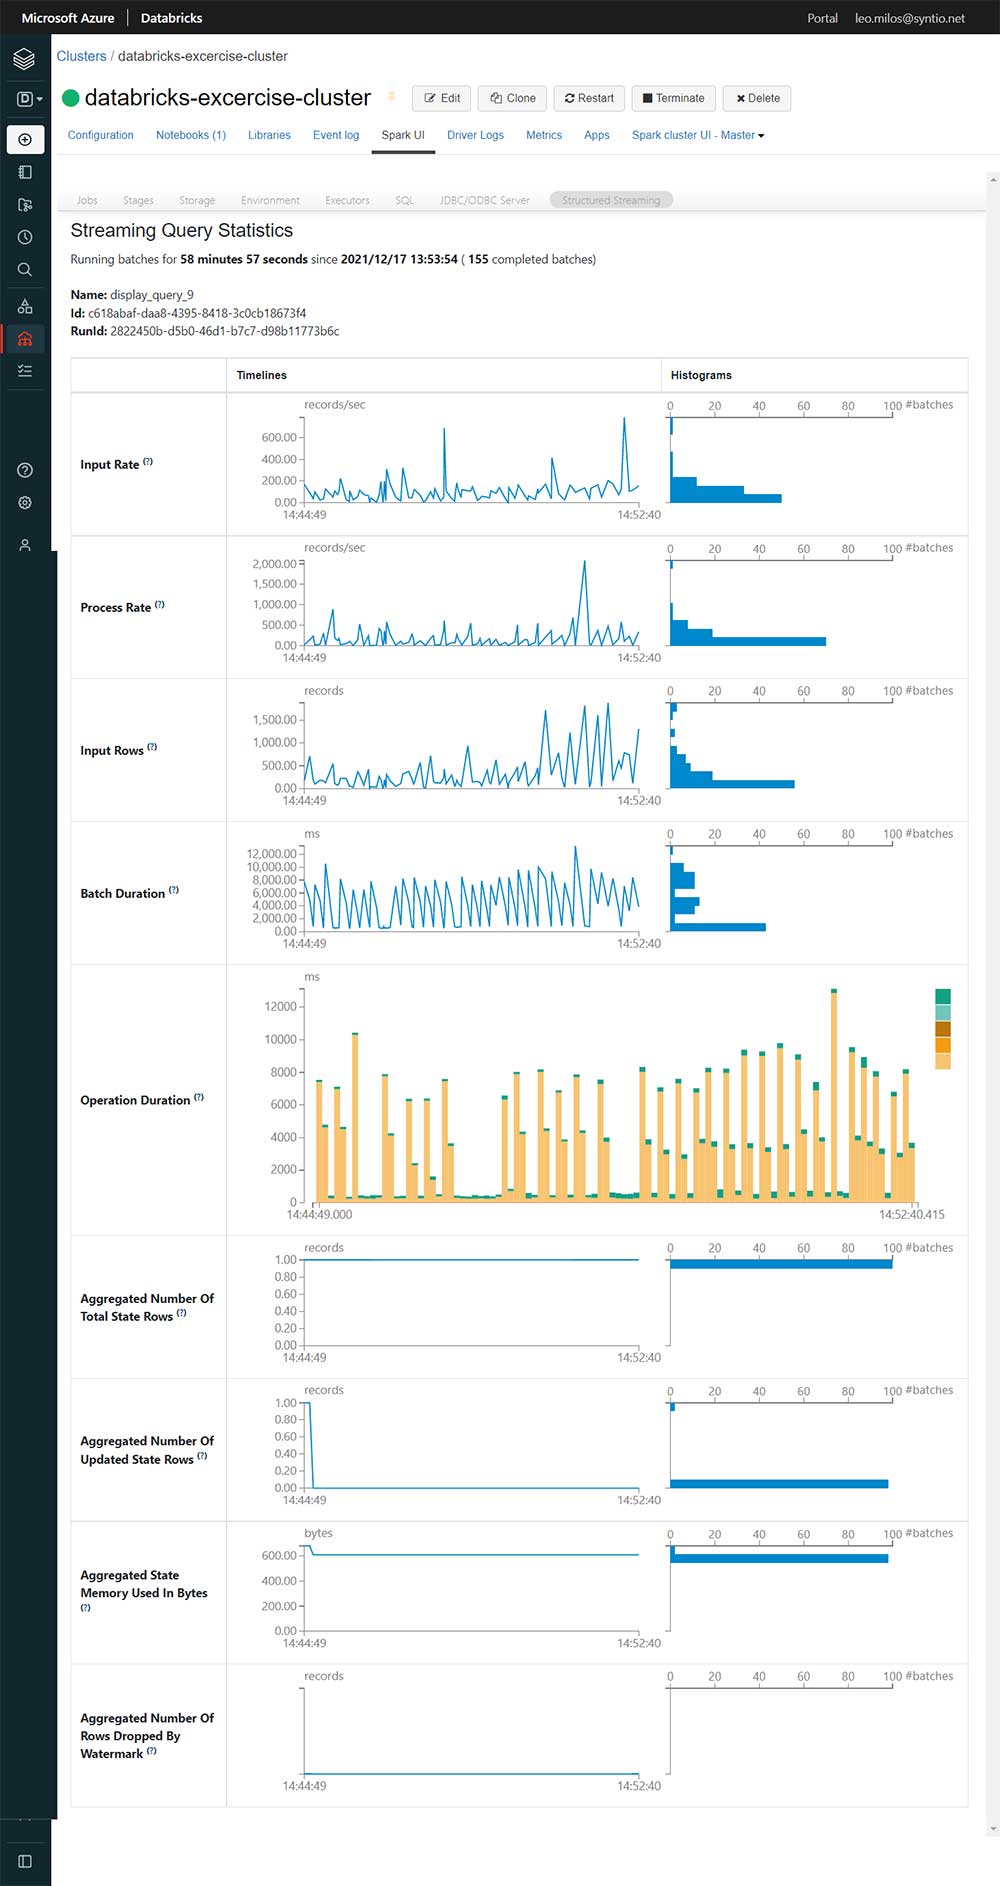
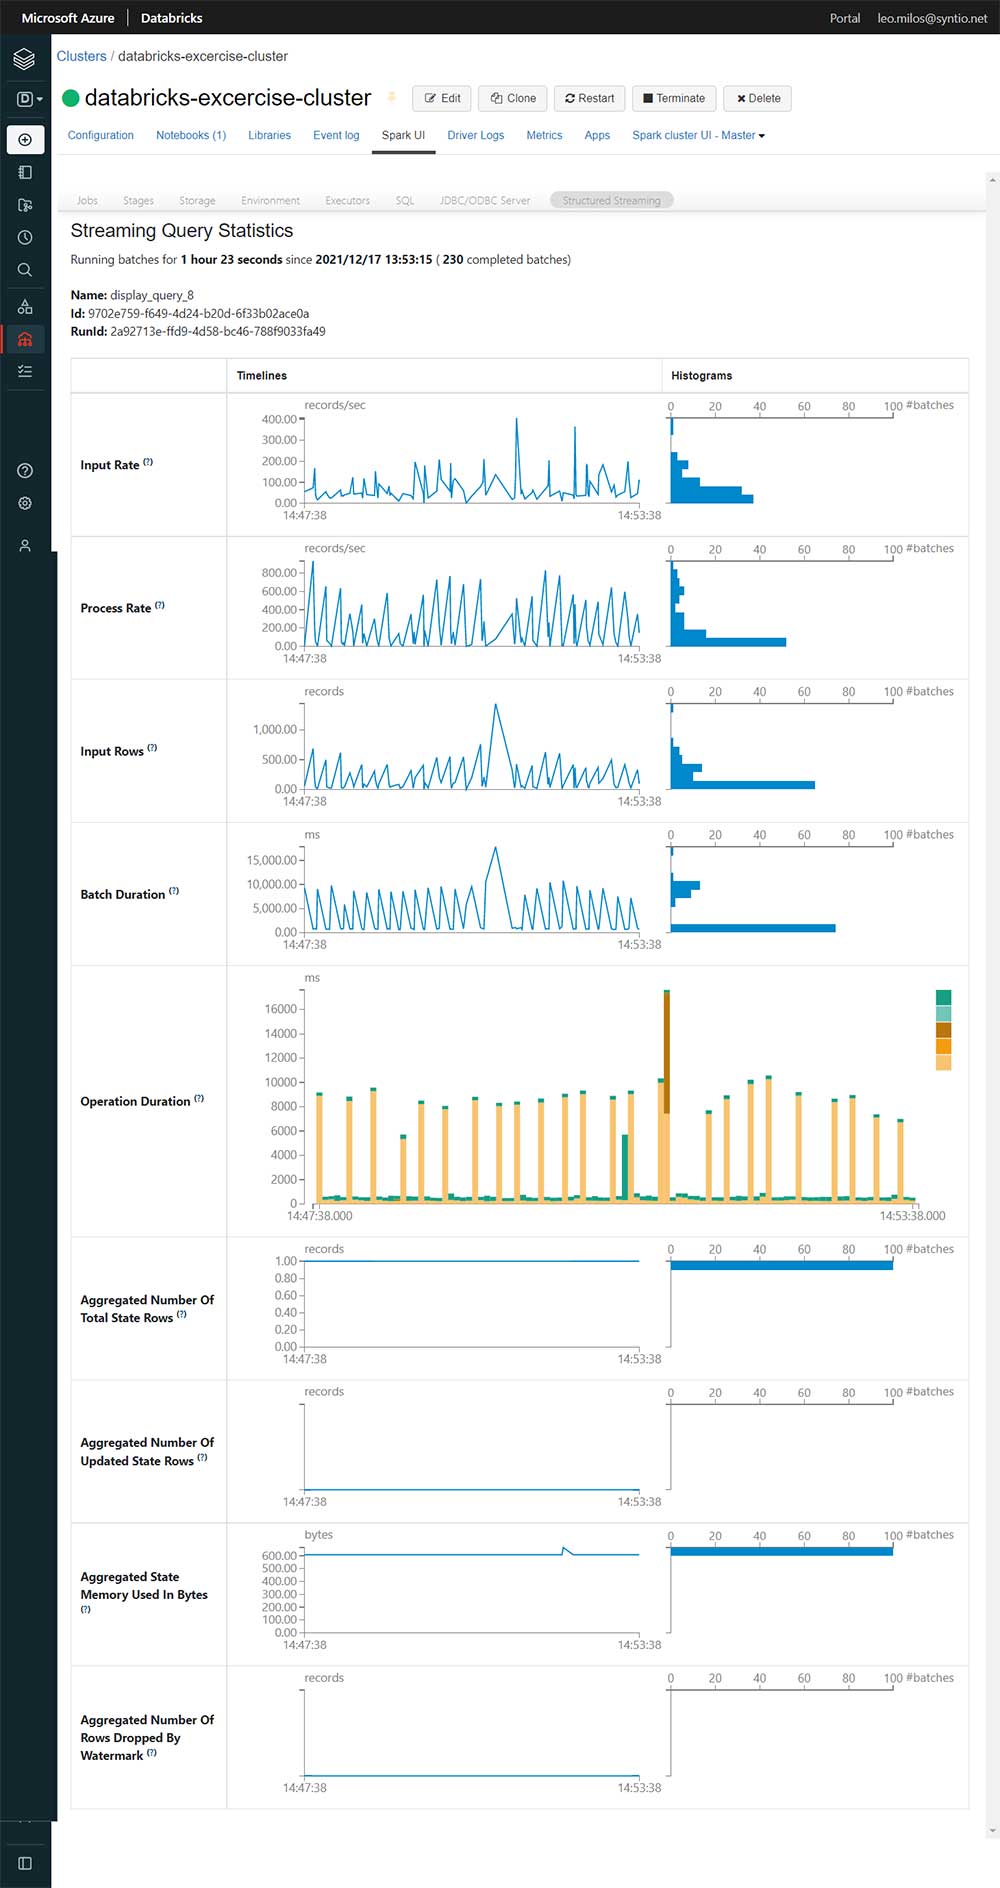
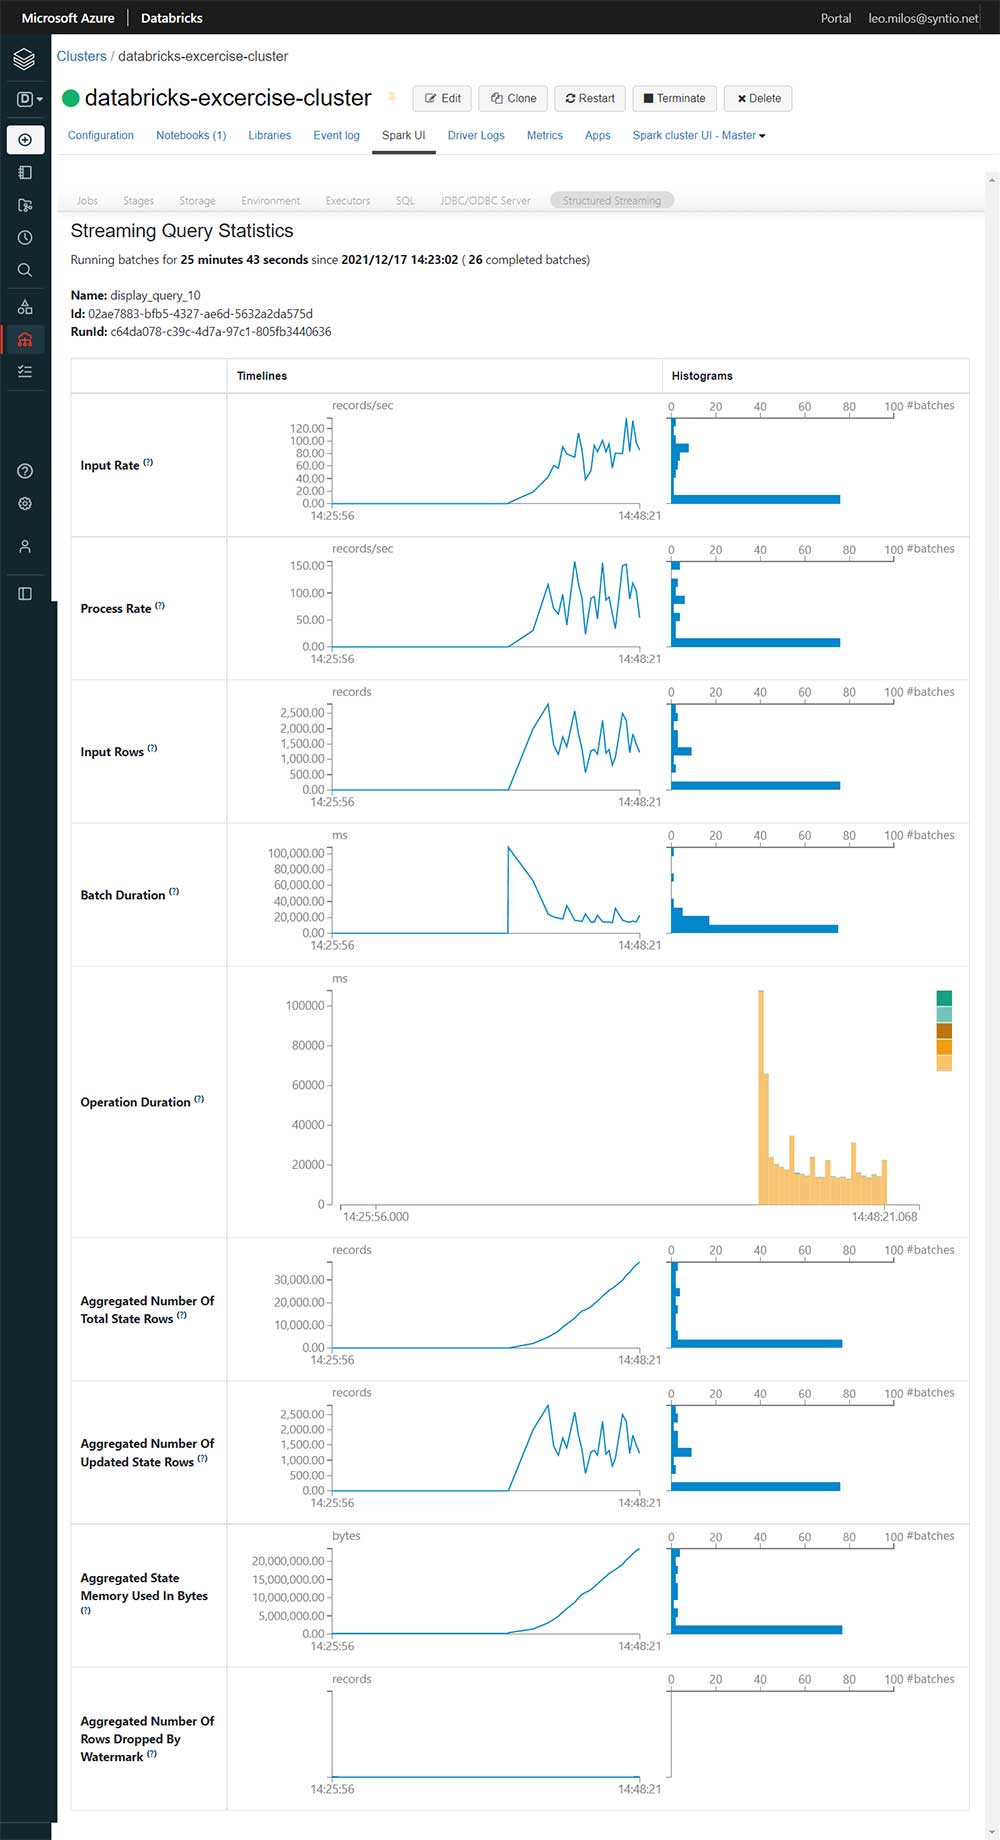
Performance of streaming queries can be viewed in STRUCTURED STREAMING UI, which can be accessed in the Spark UI of the created cluster in the Databricks workspace (Compute tab → choose Cluster on list → Spark UI tab → Structured streaming tab). Structured Streaming UI can be seen when at least one query is running in notebooks.
The new Structured Streaming UI provides a simple way to monitor all streaming jobs with useful information and statistics, making it easier to troubleshoot during development debugging as well as improving production observability with real-time metrics. For each query detailed statistical information about the streaming query, including Input Rate, Process Rate, Input Rows, Batch Duration, and Operation Duration are avaliable. Also, SPARK 3.1 new metrics are added: Aggregated Number Of Total State Rows, Aggregated Number Of Updated State Rows, Aggregated State Memory Used In Bytes, Aggregated Number Of State Rows Dropped By Watermark.
Metrics:
- Input Rate: The aggregate (across all sources) rate of data arriving.
- Process Rate: The aggregate (across all sources) rate at which Spark is processing data.
- Batch Duration: The duration of each batch.
- Operation Duration: The amount of time taken to perform various operations in milliseconds.
- Aggregated Number Of Total State Rows
- Aggregated Number Of Updated State Rows
- Aggregated State Memory Used In Bytes
- Aggregated Number Of State Rows Dropped By Watermark
Statistics for invoice headers stream, invoice items stream and joined stream can be seen on the following pictures (all results are achieved with 3 worker nodes with 4 vCPUs, 14GB RAM and 28 GB Temporary Storage):
Invoice header statistics page
Invoice item statistics page
Joined stream statistics page
Conclusion and next steps
This research, has shown how Databricks can be useful when we want to quickly set up Spark clusters and start working instantly with data. Batch and streaming processing are successfully executed with use of: Archer, Persistor, Azure Functions, Spark Dataframe API and Spark Structured Streaming API.
Databricks has shown itself to be a great tool in this research, because it integrates so well with the rest of the Microsoft technologies (Azure Databricks uses the Azure Active Directory (AAD) security framework, so thanks to that, the Access and identity control are all done through the same environment). Working with Databricks is easy and productive, thanks to the many features Databricks have implemented to speed up the workflow: workspaces, version control and production deployments.
As shown in the research setting up clusters and configuring them is an out of the box experience which removes the mundane administrator tasks and lets developers focus on their own tasks. Data is saved in the cloud even after clusters are shut down.
Even though Databricks is Apache Spark-based big data analytics, it supports multiple programming languages besides Scala, such as Python, SQL, R through built-in core API. As a result of the auto-scaling feature, the performance was consistently good on all levels of data load.
In conclusion, Databricks proved to be a great match in this research task and we definitely look forward to using it in other future projects.

