Tihomir Habjanec, Tea Bratic
DATA ENGINEERS
This can be a huge accelerator when kicking off a new project and helps to easily and quickly create an MVP solution.
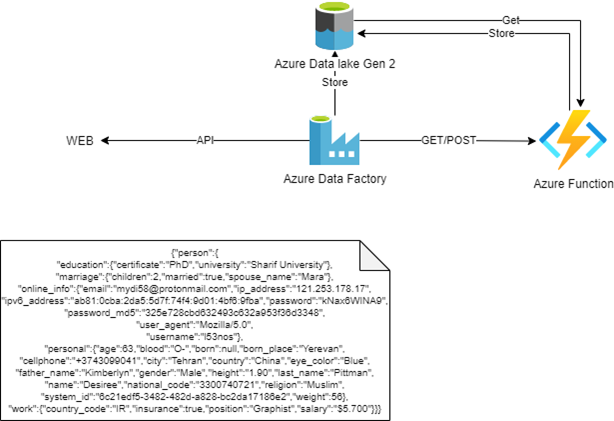
Having set up multiple analytics data platforms in Azure, we at Syntio have settled on using Azure Data Factory as an orchestration engine for scheduling batch jobs. Being a cloud-native solution, not only does it offer different scheduling mechanics but it has a plethora of connectors that allow you to fetch data from a variety of on-premise and cloud data sources. This can be a huge accelerator when kicking off a new project and helps to easily and quickly create an MVP solution. Aside from different databases, files, etc., analytic platforms are usually enriched with data from different APIs. We’ll try to describe how you can easily set up in Azure and process the API data before it will be consumed. Azure Data Factory (ADF) allows moving data between on-premises and cloud systems, as well as scheduling and orchestrating complex data flows by creating and scheduling data-driven workflows (or pipelines) that can ingest data from disparate data stores. In this case, we will implement sourcing data from a public API and then triggering an Azure Function written in Python that processes the data.
Fetching data from an API
Taking into consideration that we already have an ADF instance up and running, we can proceed to go on and specify our data sources and targets. For this use case, we will use PIPL.IR, an API that generates random and fake person data in JSON format.
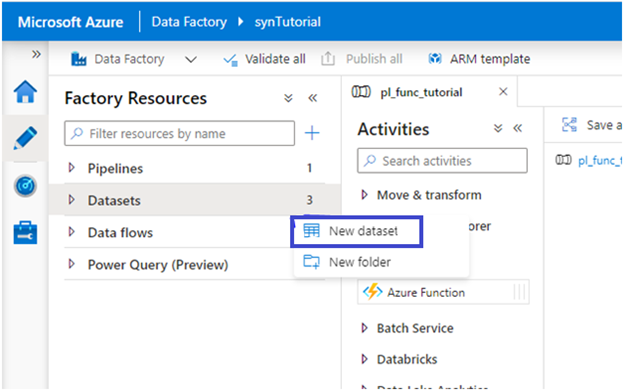
Before doing so, for ADF, we need to specify where the data will be coming from and where it will be saved. In order to achieve that, we need to create two separate Datasets which can be done by selecting “New Dataset” from the left-hand side window:
Source Dataset – pipl.ir API:
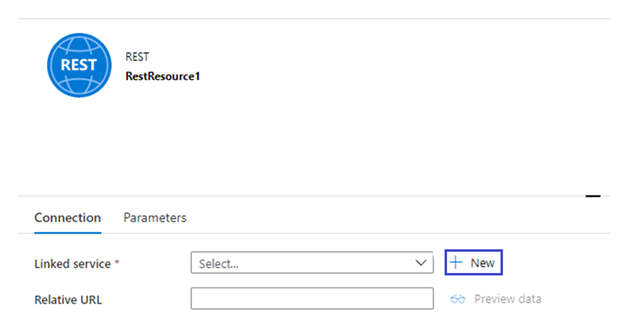
Before we can create the actual Dataset, it is important to understand that a Dataset points to a specific object or path that can be reached using Linked Services – these Linked Services specify what type of source or target we are using, and represent a “bridge” between the ADF integration services and the specific Dataset itself.
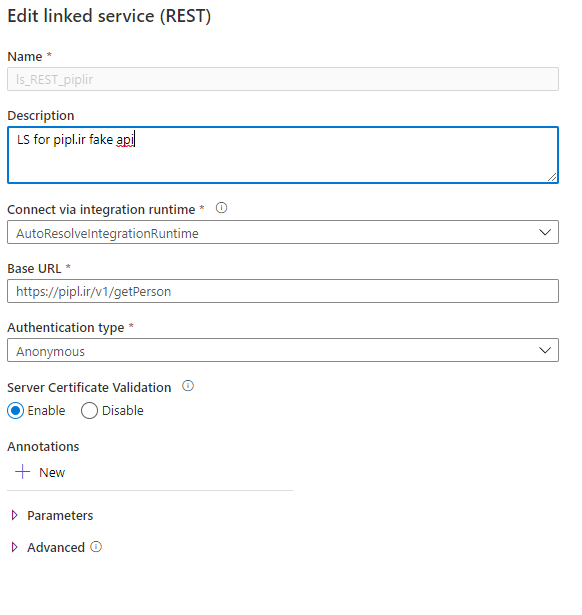
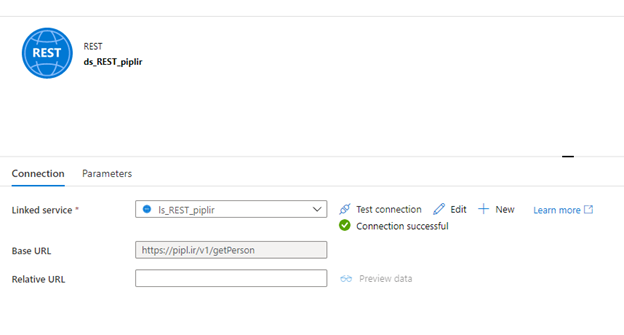
Let’s create a Linked Service for this REST API
Feel free to click on Create – once it is done, we should be able to successfully test the connection with the specified API, and after that, we are finished with the creation of the Source Dataset:
Sink Dataset – JSON files on Azure Data Lake Gen2:
In this specific use case, we want to save all the data that we receive from the API into our own Azure Data Lake.
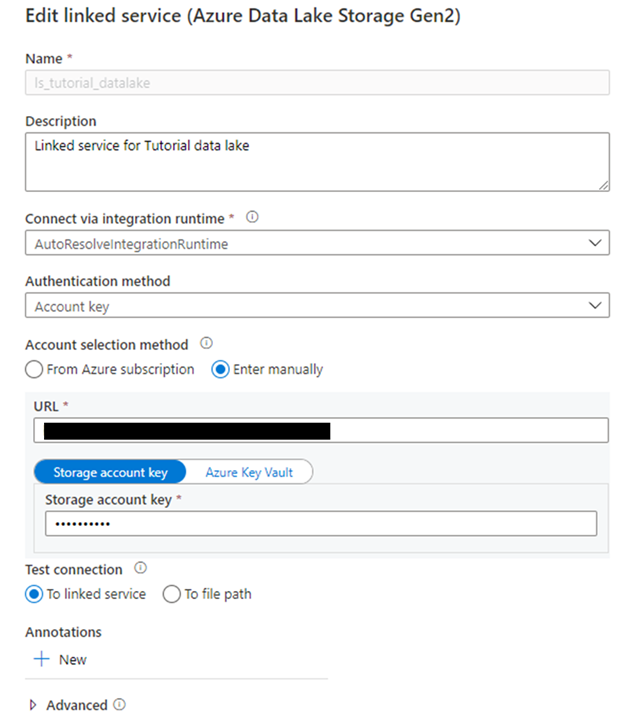
Once again, we will create a new Dataset in the same way as before, but this time we will create a Linked Service that will point to the Data Lake:
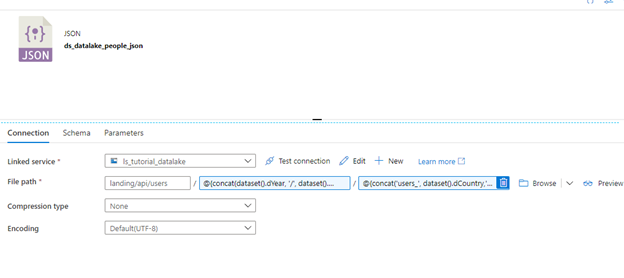
Now to edit the Dataset:
Once you have specified the path where the files should be saved, click on Test connection to check that everything has been set up correctly. You will notice in the picture above that we have already parametrized our own path where the files will be saved in the following format: YEAR/MONTH/DAY/HOUR.
The path, in our case, looks as follows:
landing/api/users/@{concat(dataset().dYear, ‘/’, dataset().dMonth, ‘/’, dataset().dDay, ‘/’, dataset().dHour)}/ @{concat(‘users_’, dataset().dCountry,’_’,dataset().dYear, dataset().dMonth, dataset().dDay, ‘_’, dataset().dHour, ’00.json’)}
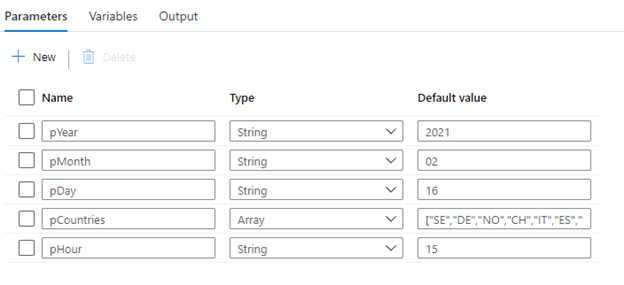
To create these parameters, you can click anywhere in the pipeline, and then in the bottom left-hand corner select the tab “Parameters”. We will also input some default values for testing.
We will go through that process more in our Scheduling section, but for now, we will create the actual Copy Activity that will fetch the data from the API and save it to our Data Lake.
To proceed, we need to understand the ForEach activity in ADF – for those familiar with software development this is basically a ‘For’ clause or, in other words, this activity will run inner activities X number of times, depending on the parameters received.
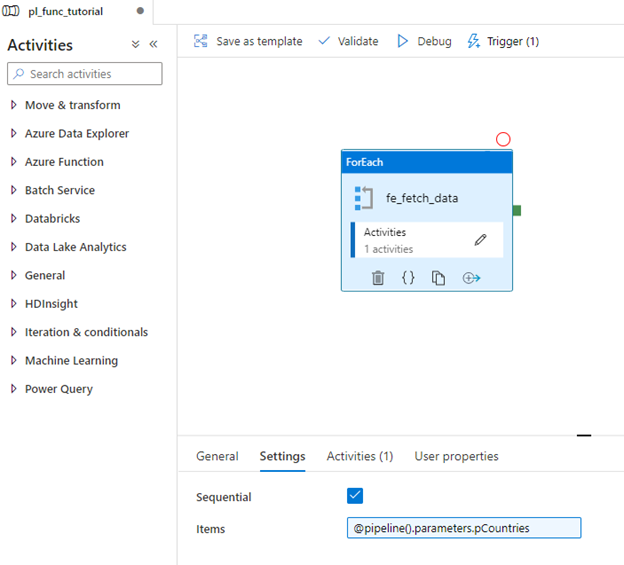
We will implement one ForEach activity which will run our Copy activity a couple of times so that in one run we can fetch multiple sets of data:
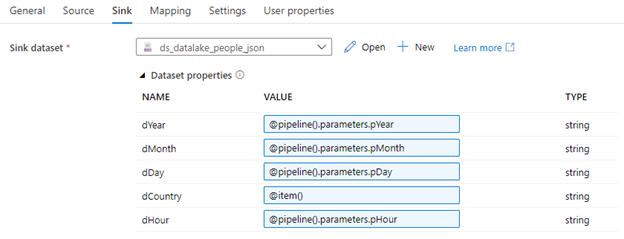
You will notice that we have once again used parameters in the Settings tab of this ForEach activity. These parameters specify how many times an inner activity (in this case our Copy activity) will run per one trigger of each ForEach activity.
If you take a closer look at the pCountries parameter, you will notice it consists of short names for Countries – [“SE”,”DE”,”NO”,”CH”,”IT”,”ES”,”US”,”GB”,”RU”,”FI”,”HR”,”SK”,”CZ”,”CA”]. The ForEach activity will run once for each countries’ short name, or in this case, a total of 14 times. Each time, a different parameter will be forwarded, depending on which Countries’ turn it is, so for the first time, “SE” will be used as a parameter, the second time “DE”, and so on. With this, we are simulating fetching customers for those different countries.
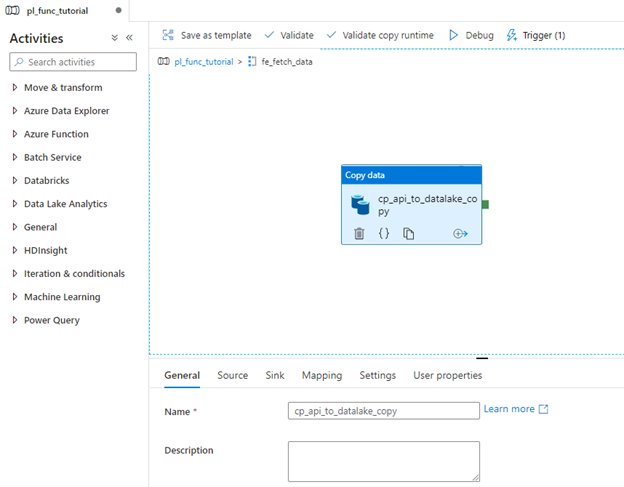
Now we will specify the exact Copy activity inside the ForEach activity:
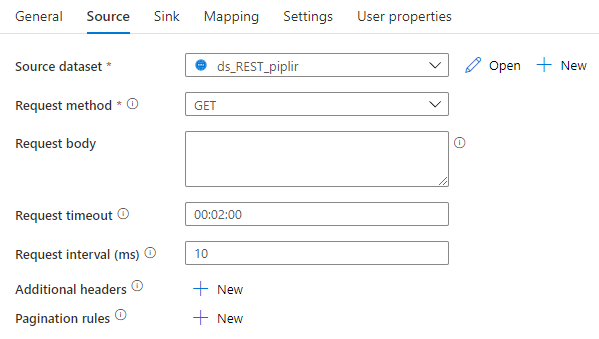
Select the REST API as the source dataset:
Bear in mind that for most of the API calls you will usually have to set up authentication, additional headers, and so on. This part is not covered here, as the API we are using does not require such a thing. For any secure data, Azure Key Vault can be used to store sensitive information and can be used as part of Azure Data Factory. We will look at how we use it with Azure Functions later.
Now, set Data Lake as the target dataset:
With that done, we can finally start receiving some data from the API, save it in our DataLake, and start using our Azure Functions to play with the data.
First, let’s look at how we can trigger these Functions from an ADF pipeline itself, and we will focus on the functions in the second part of our blog.
Trigger Azure Functions
Let’s go back to the root of our pipeline…
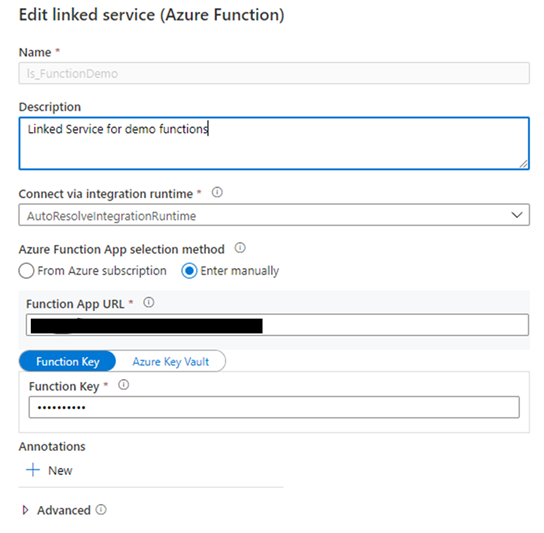
Once again, we need to create a Linked Service for our Azure Functions to be able to access them from ADF:
The URL and the Function key can be both found in Function App in Azure Portal, the URL in Overview, and the Function Key in App Key. Paste them into their respective fields, and you should be good to go.
You are also able to see all your Functions there, as well as their names, which we will need to know to be able to schedule the correct Functions.
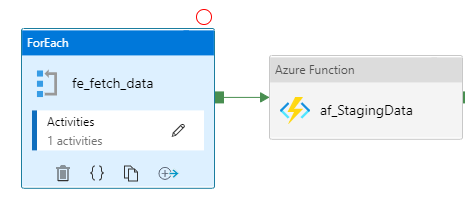
First, we want to schedule our ‘f1-stagingData’ function, so we need to modify our Azure Function activity accordingly:
And with that – we are done. When this pipeline runs, it will first fetch the data from the API and then it will trigger the Function after that.
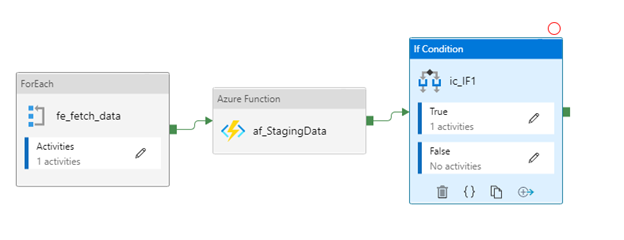
In addition to the above, we want to schedule one more Azure Function that will be used for the daily aggregation of data. Since we do not want to run this every time this pipeline runs, but only once daily, we can implement something that is called an IF activity in ADF:
IF activity, like ForEach activity, has inner activities that run based on the Condition provided, both for the case if the Condition is either True or False.
In this case, we only want to run the aggregation Function once per day, specifically at 11 PM, and so to do that, we need to configure the condition in the IF activity by clicking on the Expression:
This will make sure that our Aggregation Function will only run if it is 11 PM since this parameter will be forwarded from the ADF Scheduler.
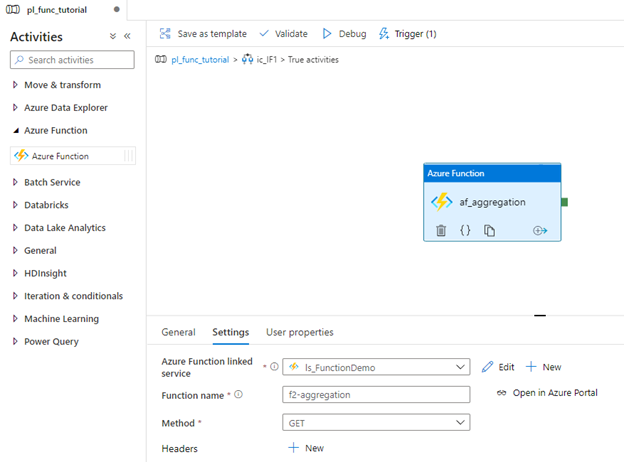
With that done, we can open the ‘True’ inner activity and create another Azure Function activity, using the previously created linked service, but this time we will call the aggregation function:
We are finished! We have a full pipeline that fetches the data from the API, saves it to our Data Lake, modifies the data and aggregates it once per day.
Finally, we need to schedule this job, but before doing that, we need to publish this pipeline by clicking on the Publish all button in the top left of the screen:
Triggering, scheduling, and monitoring
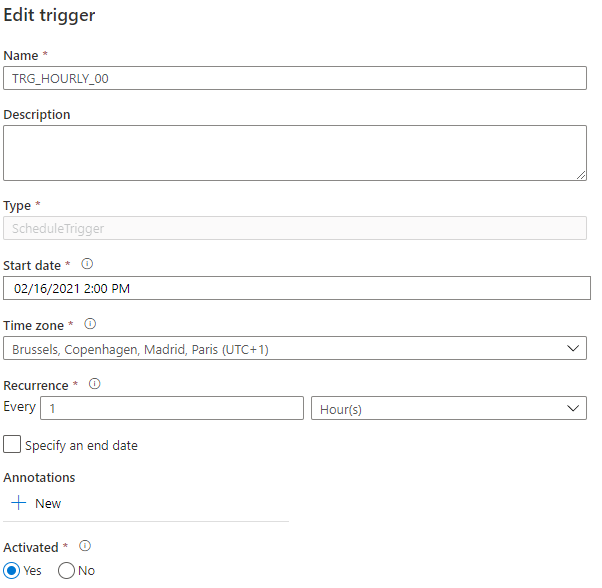
With the pipeline open in ADF, select the Trigger menu at the top of the screen and create a new trigger:
We have specified the recurrence of 1 hour, which means that the whole pipeline will run once every one hour.
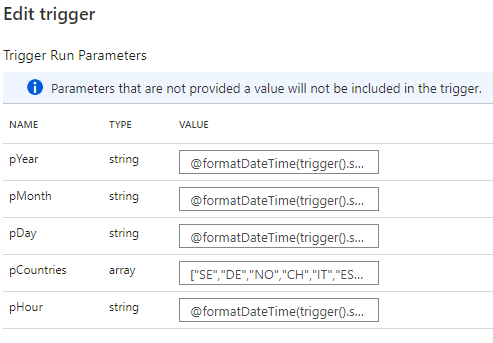
We also need to know what day, and what time it was when a specific run was triggered, and so to know that we need to create parameters for this trigger:
• pYear = @formatDateTime(trigger().scheduledTime, ‘yyyy’)
• pMonth = @formatDateTime(trigger().scheduledTime, ‘MM’)
• pDay = @formatDateTime(trigger().scheduledTime, ‘dd’)
• pCountries = [“SE”,”DE”,”NO”,”CH”,”IT”,”ES”,”US”,”GB”,”RU”,”FI”,”HR”,”SK”,”CZ”,”CA”]
• pHour = @formatDateTime(trigger().scheduledTime, ‘HH’)
As mentioned before when creating all the activities, these parameters are forwarded throughout the whole pipeline.
Once again, we can publish the changes and we are officially done – we have the full pipeline scheduled once every hour with the aggregation Function running only once per day, whilst the whole pipeline is parameterized so that the files are saved accordingly.
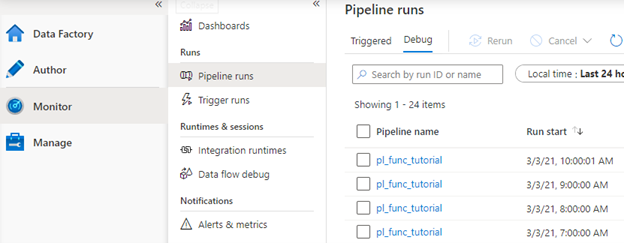
We can monitor the actual pipeline runs in the Monitor tab:
Stay tuned for part two where we will go into how to create data processing functions and deploy them to Azure.

