Ivan Zeko
DATA ENGINEER
Welcome to the last part of our Kerberos series where we will integrate Kerberos authentication mechanism into Cloudera CDH environment.
Introduction
Welcome to the last part of our Kerberos series where we will integrate Kerberos authentication mechanism into Cloudera CDH environment. If you are not familiar with what CDH is, it is “the most complete, tested, and popular distribution of Apache Hadoop and related projects. CDH delivers the core elements of Hadoop – scalable storage and distributed computing – along with a Web-based user interface and vital enterprise capabilities”. The whole platform has a lot to offer, but we are here to give you an example of improving its security component by enabling the Kerberos which is supported by default. Cloudera itself has a pretty good DOCUMENTATION on this topic, but we are here to give you a specific set of instructions on how we did it. We will also describe some of challenges we faced during this setup and how we solved them.
Kerberos distribution that you will need for this setup is from MIT. If you don’t have it already, you can jump to the PART 1 of this blog series where we explained the installation process of Kerberos KDC server and how to configure it. The configuration of KDC server is not that complicated and for the most of you it’s going to be enough.
Beside Kerberos, we will also show you the way of enabling SSL/TLS encryption between Cloudera Manager Server and all Cloudera Manager Agent host systems in the cluster using self-signed certificates.
Prerequisites
In order to complete this walkthrough completely, you need to make sure that you have:
-
Kerberos KDC server up and running with admin rights (or you can ask you administrators for completing some steps)
-
Cloudera CDH cluster up and running withsudopermissions on all cluster nodes and full administrative rights for CM Console
In the examples, we will be using the following notations:
-
kdc.example.com – representing FQDN of KDC server. This means that our REALM will be EXAMPLE.COM
-
clouderam01.company.com – representing FQDN of CDH master node. Each other master node is having the same FQDN with the increased number (master node 2 – cloudera02.company.com, worker node1 –clouderaw01.company.com, etc.)
That is basically all that you’re going to need so, without further ado, let’s jump right into it.
Configuring TLS Encryption
TLS is the first step of enabling Kerberos on our CDH cluster. This is not directly related, but it’s quite important segment because during the Kerberos integration process, Cloudera Manager Server sends keytab files to the Cloudera Manager Agent hosts. TLS is here to encrypt that network communication, so that these files are protected.
For this step, we will use self-signed certificates, but you can also sign them by generating certificate signing request to your Certificate Authority. For detailed description on how to enable TLS using Certificate Authority signed certificates, you can click HERE. Using self-signed certificates lets you easily obtain certificates and may be appropriate for non-production or test setups.
Important! Self-signed certificates should not be used for production deployments. Self-signed certificates are created and stored in the keystore, specified during the key-generation process, and should be replaced by a signed certificate. Using self-signed certificates requires generating and distributing the certificates and establishing explicit trust for the certificate.
GENERATING SELF-SIGNED CERTIFICATES
Connect to you CDH master node and preform the following steps.
On your CDH master node:
1. Create the directory for the certificates
With the sudo user createa x509 and jks directories by running the following command:
$ sudo mkdir -p /opt/cloudera/security/x509/ /opt/cloudera/security/jks/
2. Position yourself to the jks directory
$ cd /opt/cloudera/security/jks
3. Generate the key pair and self-signed certificate
Now you need to generate key pair and self-signed certificate, storing everything in the keystore with the same password for keystore and storepass. To avoid raising ajava.io.IOException: HTTPS hostname wrongexception, we will use wildcard for CN certificate value. This way, we can simply create one certificate and copy it to every node. Also, replace values for OU, O, L, ST, and C with entries appropriate for your environment. In our example, wildcard will look like this:
*.company.com
So, using this information, run the following command:
$ sudo /usr/java/jdk1.8.0_181-cloudera/bin/keytool -genkeypair -alias cmhost -keyalg RSA -keysize 2048 -dname "cn=*.company.com, ou=<organizational_unit>, o=, l=, st=, c=<2_letter_country_name>" -keypass -keystore cloudera-keystore.jks -storepass
4. Export the certificate from the keystore (cloudera-keystore.jks)
$ sudo /usr/java/jdk1.8.0_181-cloudera/bin/keytool -export -alias cmhost -keystore cloudera-keystore.jks -rfc -file cloudera-selfsigned.cer
5. Copy the self-signed certificate (selfsigned.cer) to the/opt/cloudera/security/x509 directory, but this time with .pem extension
$ sudo cp cloudera-selfsigned.cer /opt/cloudera/security/x509/cmhost.pem
6. Give Cloudera Manager access to the jks directory by setting the correct permissions
$ sudo chown -R cloudera-scm:cloudera-scm /opt/cloudera/security/jks $ sudo umask 0700
IMPORTING INTO TRUSTSTORE
Importing generated self-signed certificates will requiresudorights on whole CDH cluster since every step in this section needs to be executed on each cluster node.
1. Copy security folder
First step of importing our self-signed certificate into CDH truststore is copying them on the same location of every host with the same privileges:
$ sudo scp -r -P <SSH_PORT> user@clouderam01.company.com:/opt/cloudera/security /opt/cloudera/ $ sudo chown -R cloudera-scm:cloudera-scm /opt/cloudera/security/jks $ sudo umask 0700
2. Copy default Java truststore
Next, we need to copy the default Java trust store, called cacerts, to the same location only a different name, jssecacerts:
$ sudo cp /usr/java/jdk1.8.0_181-cloudera/jre/lib/security/cacerts /usr/java/jdk1.8.0_181-cloudera/jre/lib/security/jssecacerts
3. Import the public key
All you need to do now is to import the public key into the alternate truststore (jssecacerts) using keytool. This way, every process that runs with Java on your machine will trust imported key. The default password for the Java truststore is “changeit”. Do not use the password created for the keystore in step 3. inGenerate self-signed certificatesection:
$ sudo /usr/java/jdk1.8.0_181-cloudera/bin/keytool -import -alias cmhost -file /opt/cloudera/security/jks/cloudera-selfsigned.cer -keystore /usr/java/jdk1.8.0_181-cloudera/jre/lib/security/jssecacerts -storepass changeit
Again, these 3 steps need to be executed on each host in your cluster.
CONFIGURE TLS FOR THE CLOUDERA MANAGER ADMIN CONSOLE
In order to configure TLS for the CM admin console, you will need full administrator privileges.
1. Enable HTTPS
To enable HTTPS, simply follow these steps:
-
Log into the Cloudera Manager Admin Console
-
Select Administration > Settings
-
Click the Security category
-
Configure the following TLS settings:
2. Specify SSL Truststore Properties for Cloudera Management Services
Roles such as Host Monitor and Service Monitor cannot connect to Cloudera Manager Server and will not start if TLS is enabled and Java truststore location and password are not specified. So, in order to get everything working properly:
-
Log into the Cloudera Manager Admin Console
-
Select Administration > Settings
-
Select the Security category
-
Edit the following TLS/SSL properties:
3. Click Save Changes to commit the changes
4. Service restart
For TLS encryption to work, you need to restart both Cloudera Manager Server and the Cloudera Management Service, otherwise, the Cloudera Management Services cannot communicate with Cloudera Manager Server. In order to do that, on your master node run the following command:
$ sudo systemctl restart cloudera-scm-server
5. Restart from Console
The last step of this section would be to restart Cloudera Manager from console to apply the changes (Cloudera Management Service > Actions > Restart)
Important! After you enable this, port for accessing web UI will be changed to 7183 by default so make sure that you adjust the firewall rules, if you have them.
CONFIGURE TLS FOR CLOUDERA MANAGER AGENTS
The last part of our TLS setup is configuring encryption in communication between Cloudera Manager Server and the Agents. Procedure is quite simple.
Within your Cloudera Manager Admin Console:
-
Select Administration > Settings
-
Select the Security category
-
Select the Use TLS Encryptionfor Agents option
-
Click Save Changes to commit the changes
Next, on every cluster node:
1. Config.ini configuration
Using one of the text editors, open the/etc/cloudera-scm-agent/config.iniconfiguration file and set the use_tls parameter in the [Security] section as follows:
use_tls=1
Important! Make sure that server_hostvalue is set to match the FQDN of your node since SSL/TLS use those values to compare it with the CN wild card.
2. Restart the Cloudera Manager Server
This set you need to execute just on your master node. Run the following command to restart the Cloudera Manager Server:
$ sudo systemctl restart cloudera-scm-server
3. Restart the Cloudera Manager Agent
On each agent host (including the Cloudera Manager Server host), restart the Cloudera Manager Agent service:
$ sudo systemctl restart cloudera-scm-agent
Enabling Kerberos
In previous example, when we were integrating Kerberos with Apache Kafka, we had to manage everything by ourselves. On the other hand, Cloudera Manager provides us with a wizard that will do a bunch of things for us and make our job a lot easier, but more on that later.
Important! If you have firewall enabled, make sure that you enable traffic on port 88.
INSTALLING KERBEROS CLIENT PACKAGES
You will start your Kerberos integration by installing required packages on your cluster, if you don’t have them already:
-
krb5-workstation, krb5-libs on all hosts
So, to install them, simply run the following on each of your cluster nodes:
$ sudo yum install krb5-workstation krb5-libs -y
CREATE THE KERBEROS PRINCIPAL FOR CLOUDERA MANAGER SERVER
We have already mention that Cloudera will do most of the things for us. To make that possible, we need to create a new admin principal specifically for our Cloudera Manager Server. New admin principal will allow your Cloudera to create most of the required principals and to automatically manage the keytab files. In order to do that, you will need to have admin rights on your Kerberos KDC Server.
In our first part of this Kerberos series, we defined that our admin principals will have /admin suffix behind the admin username. So, by following that rule, run the following commands on your KDC Server as a root user:
# kadmin.local kadmin: addprinc cloudera-scm/admin@EXAMPLE.COM
DISTRIBUTING KRB5.CONF FILES
Cloudera CDH offers you the option of self-managing the krb5.conf files. We will not use that option in our integration setup. Instead, you can simply copy the file from your KDC server and paste it in the/etcdirectory on each cluster node. You just need to make sure that krb5.conf files are same on every server.
Example of our krb5.conf that we defined in the first part of this Kerberos series:
[root~]# vi /etc/krb5.conf # Configuration snippets may be placed in this directory as well includedir /etc/krb5.conf.d/ [libdefaults] default_realm = EXAMPLE.COM dns_lookup_kdc = false dns_lookup_realm = false ticket_lifetime = 86400 renew_lifetime = 604800 forwardable = true default_tgs_enctypes = aes256-cts default_tkt_enctypes = aes256-cts permitted_enctypes = aes256-cts udp_preference_limit = 1 kdc_timeout = 3000 rdns = false [realms] EXAMPLE.COM = { kdc = kdc.example.com admin_server = kdc.example.com default_domain = example.com } [domain_realm] .example.com = EXAMPLE.COM example.com = EXAMPLE.COM [logging] kdc = FILE:/var/log/krb5kdc.log admin_server = FILE:/var/log/kadmin.log default = FILE:/var/log/krb5lib.log
If your krb.conf file has default_ccache_name parameter defined, then make sure to comment it out since CDH does not support the keyring credential cache. For example:
#default_ccache_name = KEYRING:persistent:%{uid}
KERBEROS KDC.CONF
Beside krb5.conf, it is quite important that you have the following settings in you kdc.conf (on KDC server):
max_life = 1d max_renewable_life = 7d
If that’s not the case, then make sure to add them and that you restart Kerberos after you change kdc.conf configuration. It is extremely important that your tickets are renewable so that Cloudera can manage them.
HOSTNAME AND /ETC/HOSTS FILE CONFIGURATION
In previous posts we mentioned the importance of hostname and /etc/hosts file. There are no differences here. Make sure that your hostname matches FQDN of each node.
For example (master node):
$ hostname clouderam01.company.com
If that’s not the case, then make sure that you do the following:
-
open /etc/hostname file using some text editor that your machine has and change the content to match your machine FQDN:
$ sudo vi /etc/hostname clouderam01.company.com
-
After saving the changes, run the following command:
$ sudo hostnamectl set-hostname clouderam01.company.com
Do these two steps for each node of your cluster.
Beside hostname, make sure that you append the information about your Kerberos KDC server in/etc/hostsfile:
$ sudo vi /etc/hosts <kdc_server_ip> kdc.example.com
And save the changes.
STARTING THE KERBEROS WIZARD
Getting started
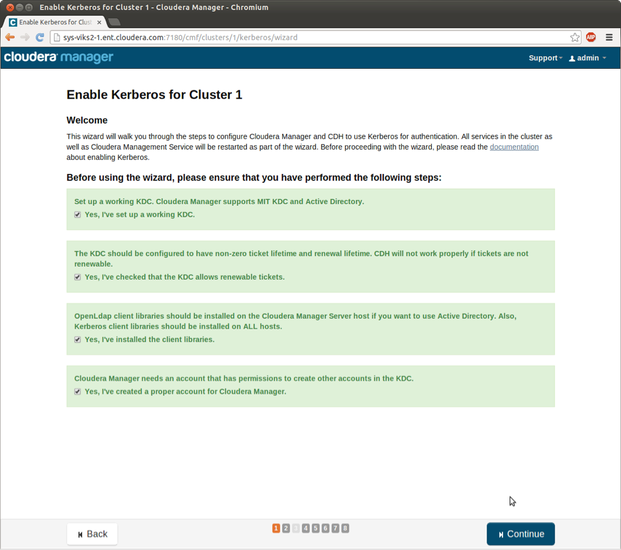
By this step, you should have everything ready for completing the Kerberos wizard. It’s a simple process and we will walk you through every step. To get started, log into the Cloudera Manager Admin Console, select Administration > Security and click on Enable Kerberos. So, now you have started the Kerberos wizard and you should be able to see Getting started window that looks like this.
As you can see here, wizard will ask you to go through this list of prerequisites a make sure that you have done all of them. If you follwed this post so far, then you shloud be ready. Simply check every box on this windows and click Continue.
Setup KDC
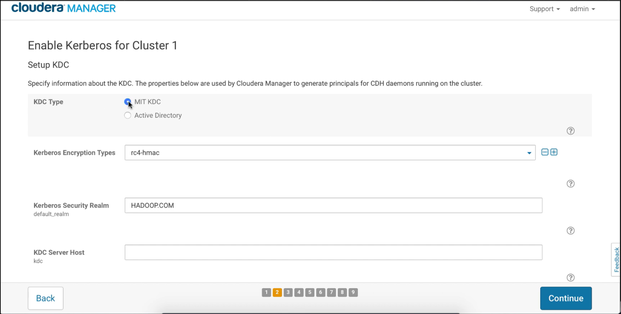
Now, the second step will ask you to fill the information about your KDC and it looks like this:
-
KDC type
We have already mentioned that we are working with the MIT KDC so make sure that you mark the correct type.
-
Kerberos Encryption types
If you followed our installation guide, then you have limited encryption down to one. In our krb5.conf file we defined only aes256-cts as supported algorithm. You can also use multiple algorithms, but make sure that you avoid the weak ones.
-
Kerberos Security Realm
Your KDC realm in capital letters. Through these blog series our Kerberos realm was EXAMPLE.COM. Make sure you adjust this to match your environment.
-
KDC server and admin host
These are the FQDNs of your KDC server. We have show you an example where server host and admin host are on the same machine so the values for these parameters would be identical, kdc.example.com. Adjust these values to match your environment.
-
Maximum renewable life for principals
This is the last parameter that we need to change on this page. If you followed our example this value should be set on 7 since we defined that the period of 7 day sis our maximum renewable life.
All these values can be read from your krb5.conf file. After you filled the page with required information simply press Continue and the wizard will take you to the next page.
Manage krb5.conf
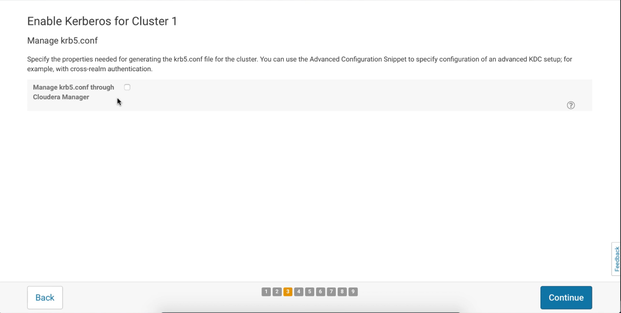
Now, this is the step where you decide if your CM should manage the krb5.conf or you will do it manually. Through this Kerberos wizard walkthrough, we will manage krb5.conf by ourselves and that’s why we have already distributed krb5.conf across the cluster nodes. So, if you want to follow the same path then simply leave this box unchecked like we did, otherwise fill the page with the required information:
Setup KDC Account
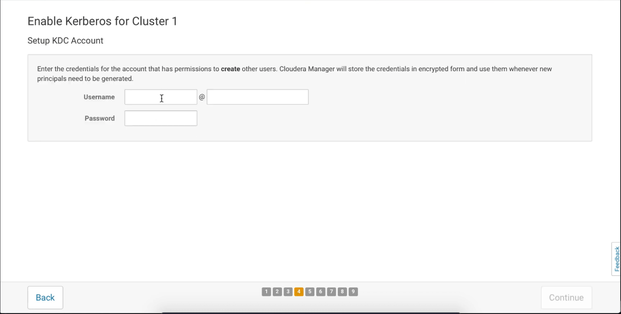
This page asks us to enter information about our new admin account that we created specifically for Cloudera Manager. In this post, the principal we created was cloudera-scm/admin@EXAMPLE.COM. Fill these fields so that matches your environment and click Continue:
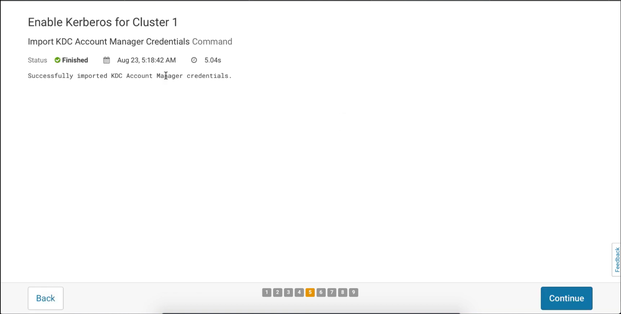
Importing KDC Account Manager Credentials
If you have done everything right, then this step should be able to successfully import credentials from your KDC server. After the process finishes, press Continue:
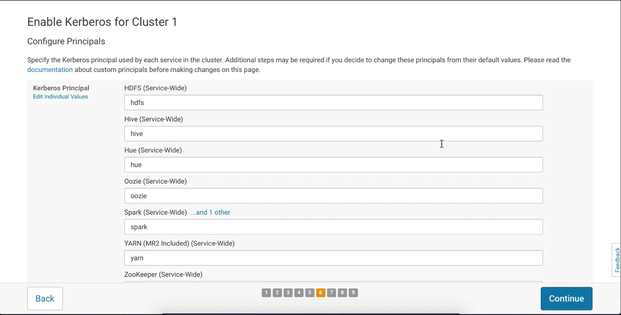
Configure principals
We have already mentioned that Cloudera will do most of the stuff for us and this step is one of those. Here you can manage principal names for the services that Cloudera is going to create on your KDC server and automatically add them to the appropriate keytab files. You really don’t need to change anything here, but you can if you want and then press Continue:
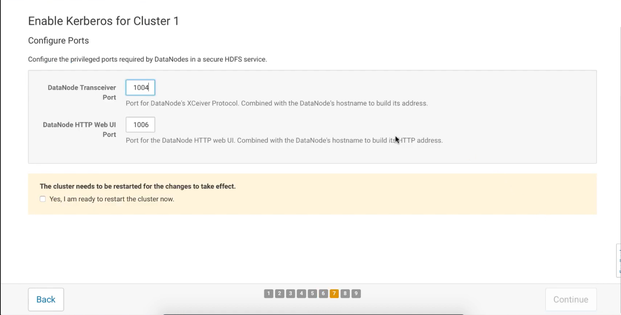
Configure ports
This page also does not require any modifications, but you can dedicate different ports if you want for the DataNode Transceiver and DataNode HTTP Web UI, and press Continue:
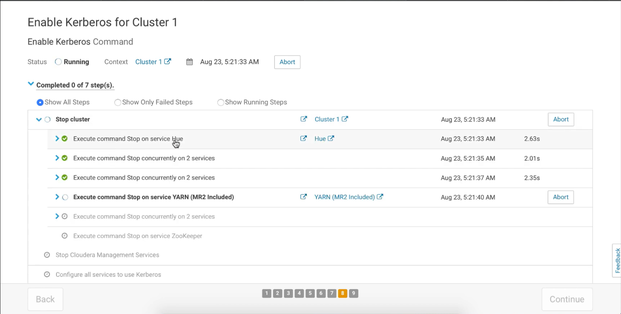
Finishing steps
This are the last steps of Cloudera Kerberos wizard that will create new principals and set the environment for you. This last step will finish successfully if you done everything right, even though in some cases you will see an error when Cloudera tries to start Kerberos Ticket Renewer. This happens sometimes when starting Hue. We have also faced with this problem and we will show you how to fix it. When wizard finishes the processes, simply press Continue and then Finish:
If the Kerberos Ticket Renewer does not start for some services after you finish all of Kerberos wizard steps (it often happens if your hue principals are not renewable), check your KDC configuration and the ticket renewal property, maxrenewlife, for that service principals and krbtgt principals to ensure they are renewable. If not, running the following commands on your KDC will enable renewable tickets for those principals:
kadmin.local: modprinc -maxrenewlife 7day krbtgt/EXAMPLE.COM # take hue service for example. To successfully start the Kerberos Renewer, run the # following command for every hue’s principal. Replace hostname value so it matches your # environment kadmin.local: modprinc -maxrenewlife 7day +allow_renewable hue/@EXAMPLE.COM
Now, go to Hue service in your Cloudera Manager Console, start the Kerberos Ticket Renewer again and everything should work this time.
Create HDFS Superuser
In order to be able to create home directories for different users, you will need superuser account which you will use to access HDFS. CDH automatically created the HDFS superuser account on each cluster host during CDH installation, but when you enable Kerberos for the HDFS service, you lost access to the default HDFS superuser account (using sudo -u hdfs commands). Cloudera recommends you use a different user account as the superuser, not the default hdfs account and that’s what we’re going to do now.
CREATE KERBEROS SUPERUSER PRINCIPAL
This is the first thing that you need to do after you decide what will be your superuser name. On your KDC server, create a new principal with the superuser name. In the kadmin.local or kadmin shell, type the following command to create a Kerberos principal called superadmin (you can decide what the name will be):
kadmin: addprinc superadmin@EXAMPLE.COM
CHANGE THE SUPERUSER GROUP PROPERTY
Go to the Cloudera Manager Admin Console and navigate to the HDFS service:
-
Click the Configuration tab
-
Select Scope > HDFS (Service-Wide)
-
Select Category > Security.
-
Locate the Superuser Group property and change the value to the appropriate group name for your environment. For example, superadmin.
-
Enter a Reason for change, and then click Save Changes to commit the changes.
-
Restart the HDFS service.
To run commands as the HDFS superuser, you must obtain Kerberos credentials for the superadmin principal. To do so, run the following command and provide the appropriate password when prompted:
$ kinit superadmin@EXAMPLE.COM
Now, you can simply run HDFS commands without sudo -u hdfs prefix.
Important! Now, when you have Kerberos enabled on your cluster, you need to make sure that every account that you create on your Cloudera Manager web console (this include accounts created on other services, like Hue web UI) exists on every machine on your cluster with ID higher than 1000. If your user doesn’t exist on Cloudera nodes, you won’t be able to preform some of the operations (For example, you won’t be able to execute queries that involve map reduce using Hive editor).
Summary
We hope that you enjoyed this last part of our Kerberos series and the whole series overall. Like we said, this is specific example of integration that, for some of you will be enough, and for the rest of you, we hope that this is good starting point. There are many more ways to improve the security of you Cloudera cluster and they are available on Cloudera official page.
We have, and we are planning to release, many more blog posts on topics that are closely connected with our work, so make sure to check us out and stay tuned for more.
Please visit the other two parts of the blog series:


