Lovro Kunic
DATA ENGINEER
HVR GUI is a Graphical User Interface used to configure replication. The GUI can just be run on the hub machine, but it can also run on the user’s PC and connect to a remote hubmachine.
Setting up and use of HVR
LAUNCH HVR GUI
HVR GUI is a Graphical User Interface used to configure replication. The GUI can just be run on the hub machine, but it can also run on the user’s PC and connect to a remote hub machine.To run HVR GUI we need to download and install VNC viewer on our CentOS machine:
- Go to this website and download VNC viewer rpm x86 file.
- Transfer it to hub machine and run command:
yum install VNC-Viewer-6.19.107-Linux-x86.rpm
- Run HVR GUI with hvrgui command.
REGISTER HUB
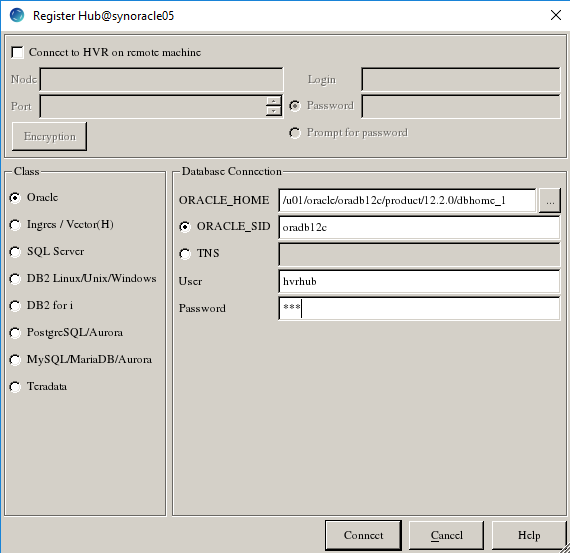
This section describes how to connect HVR GUI to the hub database.When you launch HVR GUI for the first time Register Hub window is displayed automatically. Register Hub can also be accessed from menu File -> Register Hub.
- Select Oracle in Class.
- Provide Database Connection details
- Enter directory path for ORACLE_HOME (/u01/oracle/oradb12c/product/12.2.0/dbhome_1). You can also click browse to select directory path.
- Enter Oracle System ID in ORACLE_SID or TNS credential (oradb12c).
- Enter user name of hub database in User (hvrhub.)
- Enter password for hub database in Password (hvr)
- Click Connect
- Click Yes in the prompt dialog asking to create catalog tables in HVR hub database.
On connecting successfully to the hub database, the navigation tree pane displays the hub machine and the hub database. Location Configuration, Channel Definitions, and Scheduler are displayed under the hub database.
CREATE LOCATION
Location is a storage place (for example, database or file storage) from where HVR captures (source location) or integrates (target location) changes.
Create one source location (src) connected to source schema (sourcedb) and one target location (tgt) connected to target schema (targetdb).
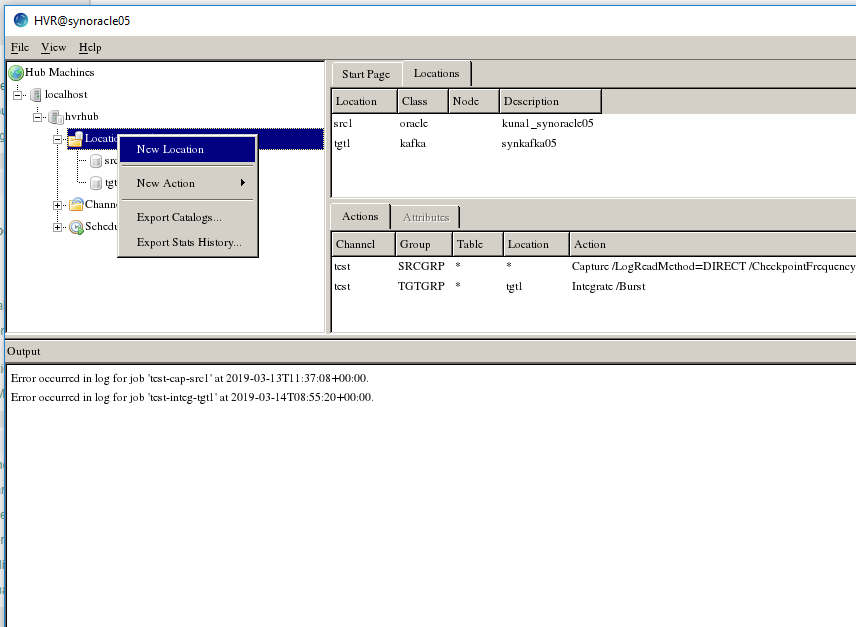
- In navigation tree pane, right–click Location Configuration ->New Location
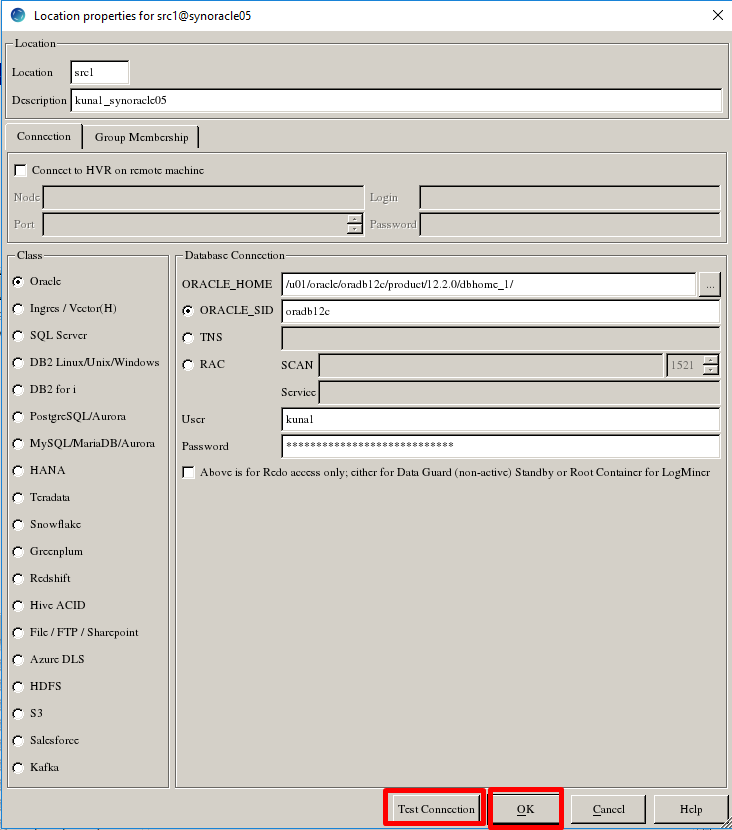
- Enter Location name and Description for the location.
- Select Oracle in Class.
- Provide Database Connection details
-
- Enter directory path for ORACLE_HOME. You can also click browse to select directory path.
- Enter Oracle System ID in ORACLE_SID or TNS credential or RAC credential
- Enter user name of schema in User
- Enter password for schema in Password
-
- Click Test Connection to verify the connection to location database.
- Click Ok
- Target location for kafka will be defined in later chapter (Create kafka location).
CREATE CHANNEL
A CHANNEL is an object in HVR that groups together the locations that should be connected together and the tables that should be replicated.
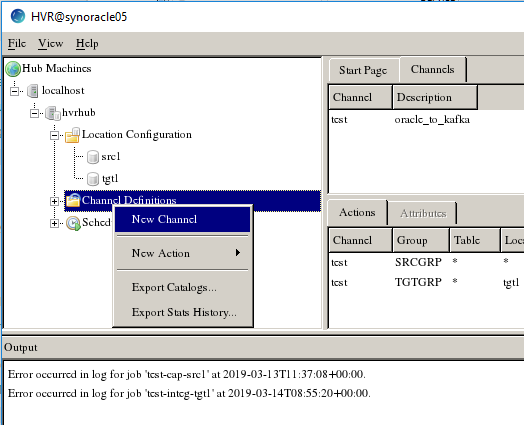
- In navigation tree pane, right–click Channel Definitions -> New Channel.
- Enter Channel name and Description for the channel in New Channel dialog.
- Click OK.
CREATE LOCATION GROUPS
The location groups are used for
defining action on the location. Typically a channel contains two location groups – one for the source location and one for the target location. Each location group can contain multiple locations.In this example,
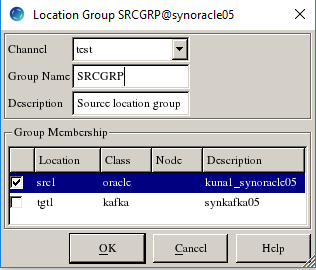
create one source location group (SRCGRP) and one target location group
(TGTGRP).
- In navigation tree pane, click+next to the
channel (test). - Create source location group (SRCGRP):
- Right–click Location Groups -> New Group.
- Enter Group Name and Description for the location group.
-
- Select source location (src1) from Group Membership.
- Click OK.
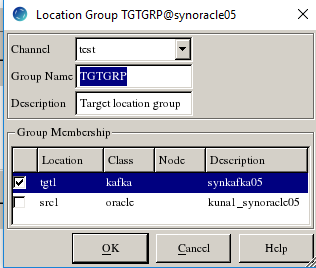
- Create target location group (TGTGRP):
- Right–click Location Groups -> New Group.
- Enter Group Name and Description for the location group.
- Select target location (tgt1) from Group Membership
- Click OK.
SELECT TABLES
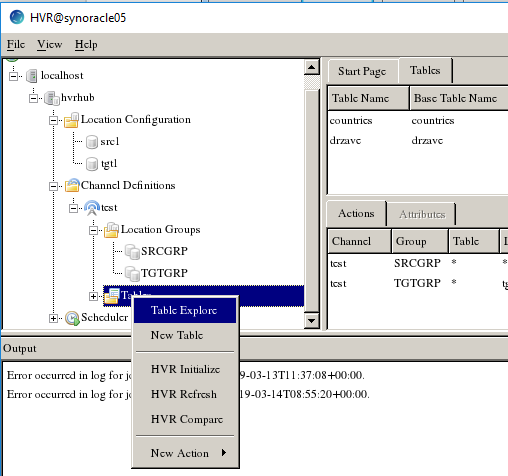
This section describes how to select the tables from source location for replication.Table Explore allows you to select schema(s) and/or table(s) for replication.
- Right–click Tables -> Table Explore
- Select source location (src1) from the list.
- Click Connect.
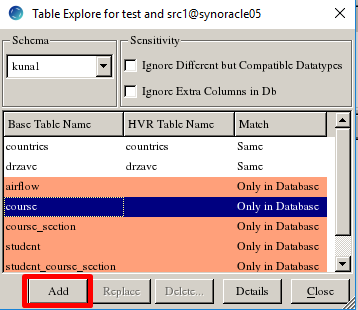
- Select tables from Table Explore dialog. Press Shift key to select multiple tables or Ctrl+Ato select all tables.
- Click Add to add the selected tables.
- Click OK in HVR Table Name dialog
- Click Close in Table Explore dialog
Define Actions
This section describes how to define Actions on the location groups (SRCGRP and TGTGRP). Actions define the behavior of a replication activity.
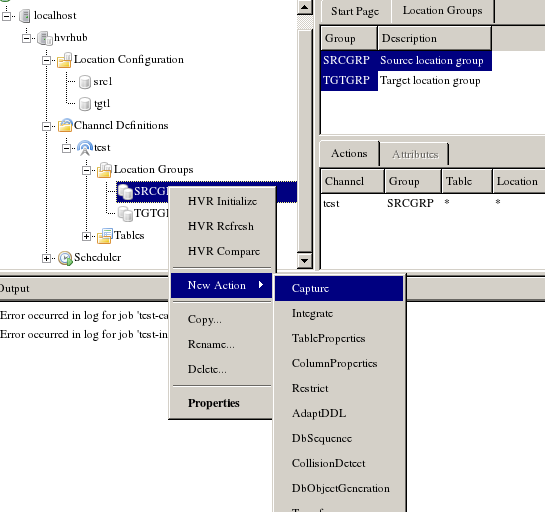
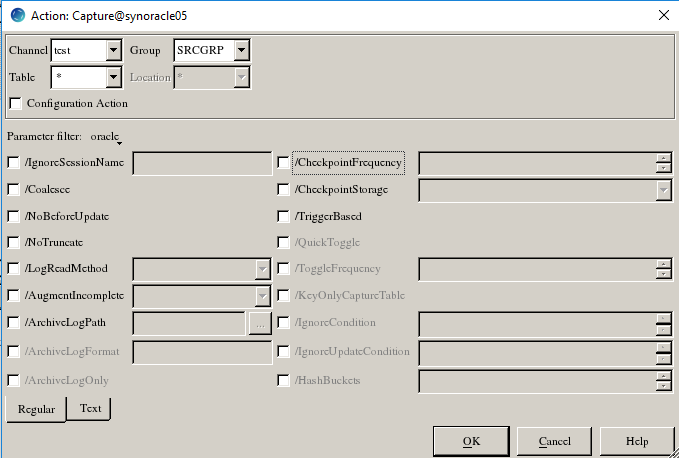
- Define action Capture to capture changes from all tables in the source location group.
- Right–click source location group SRCGRP -> New Action -> Capture
- Click OK.
- Define action Integrate.
- Right–click target location group TGTGRP -> New Action -> Integrate.
- Click OK.
INITIALIZE
This section describes how to initialize the replication. HVR Initialize first checks the channel and creates replication jobs in the HVR Scheduler.
In this example, HVR Initialize creates one capture job and one integrate job.
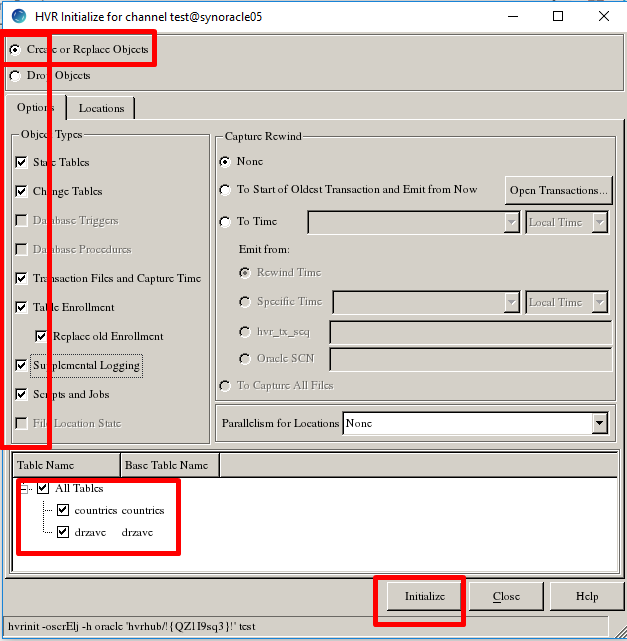
- Right–click channel test ->HVR Initialize.
- Select Create or Replace Objects in HVR Initialize dialog and check all the boxes.
- Click Initialize.
- Click OK.
- Click Close.
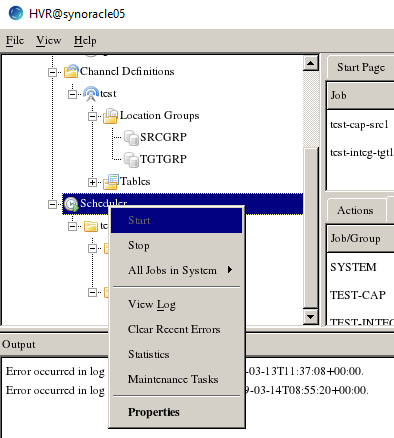
Click Scheduler node in navigation tree pane to view the capture and integrate jobs in Job stab.
START SCHEDULER AND CREATE WINDOWS SERVICE
This section describes how to start the HVR Scheduler and create Windows service.
- Start Scheduler. In the navigation tree pane, right-click Scheduler -> Start.
- Click Create… in the prompt asking to create the service hvrscheduler_hvrhub.
- Select Local System Account (‘SYSTEM’) in Create Windows Service dialog.
- Click Create…
START CAPTURE JOB
This section describes how to start the job for capturing changes from source location (src1). By starting the Capture job in HVR Scheduler, HVR begins capturing all changes since the moment HVR Initialize was executed. This ‘capture begin moment’ can be modified using the option Capture Rewind available in the Advanced Options tab of HVR Initialize dialog.
- In the navigation tree pane, click Scheduler.
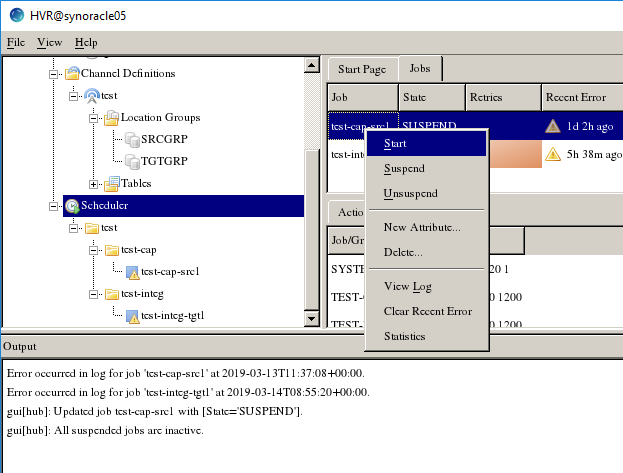
- Start capture job. In the Jobs pane, right-click capture job test-cap-src1 -> Start.
- Click Yes in Start dialog.
REFRESH
This section describes how to perform initial load into the target database. HVR Refresh copies all existing data from source location (src1) to the target location (tgt1) and optionally creates new tables and keys in target location.
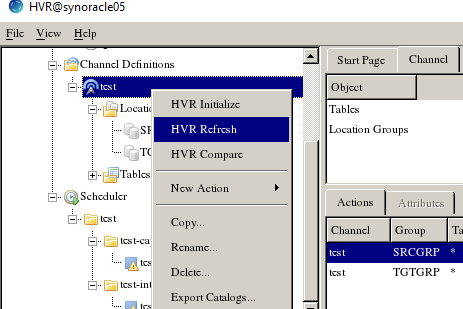
- In the navigation tree pane, right–click channel test -> HVR Refresh.
- Click Refresh.
- Click Yes to begin HVR Refresh. When the refresh is completed, the Refresh Result dialog displays the total number of rows replicated from the selected tables
- Click Close in Refresh Result dialog
- Click Close in HVR Refresh dialog
START INTEGRATE JOB
This section describes how to start the job to integrate changes into the target location (tgt).
- In the navigation tree pane, click Scheduler.
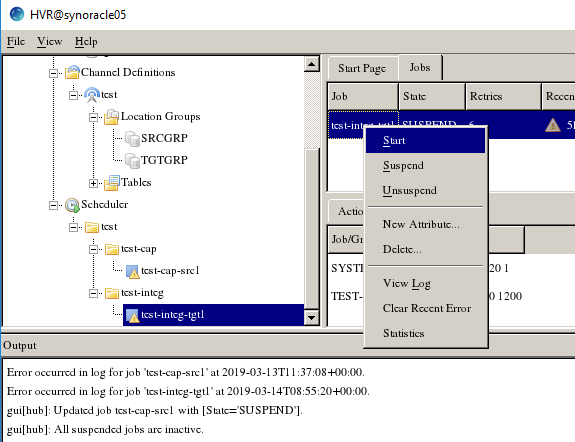
- Start integrate job. In the Jobs pane, right-click integrate job test-integ-tgt1 -> Start.
- Click Yes in Start dialog.
VERIFY REPLICATION
This section describes the two methods for verifying HVR’s replication activity.
-
Log file: HVR creates separate log file for the hub, channel (hvrdemo), and for each replication jobs (test-cap-src1 and test-integ-tgt1). This log file contains the details of the changes captured and integrated. To view the replication activity log:
- In navigation tree pane, click + next to the Scheduler.
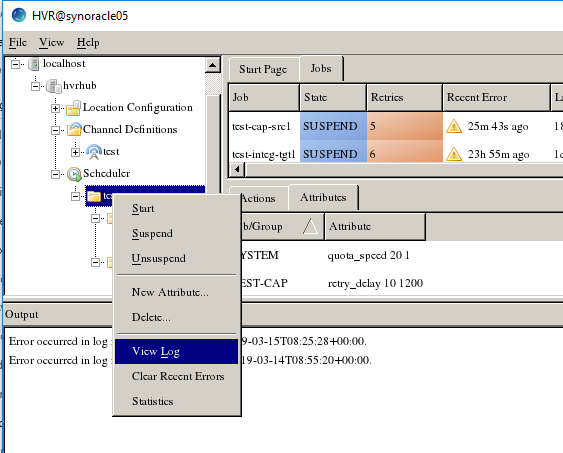
- Click test-> View Log to view the output of the jobs.
- Update the value(s) in source location database.
- HVR Compare(can’t be done with kafka): Verify the replication activity by comparing the data in source and target locations.
PREREQUISITES AND USING HVR WITH KAFKA
This section describes the requirements, access privileges, and other features of HVR when using Kafka for replication.
Installation Dependencies
On Linux, to use the Kafka authentication Mechanism (User Name and Password or Kerberos), HVR requires the library libsasl2.so.2 to be installed. This library is part of Cyrus SASL and can be installed as follows:
yum install cyrus-sasl
If you have libsasl2.so.3.0.0 then make the symbolic link libsasl2.so.2 that points to libsasl2.so.3.0.0.
Grants
grant create session to targetdb;
grant create table to targetdb;
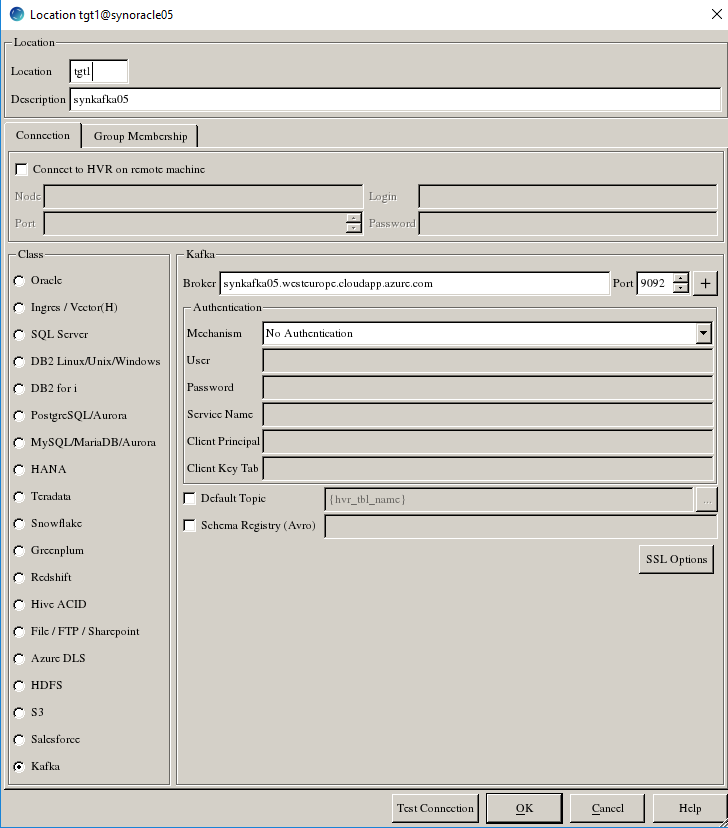
Create kafka location
To create a Kafka location, right–click on Location Configuration ->New Location.
-
HVR creates a Kafka location that sends messages in JSON format by default.
-
To create a Kafka location that sends messages in (micro) AVRO format, select Schema Registry (Avro) and provide the URL for Schema Registry
Now you need to try and use above instructions to replicate data from oracle database to kafka using HVR. If you follow steps carefully you won’t have many problems and you will see that HVR is a powerful tool for the job. Enjoy! 🙂
Please visit the first part of the blog series:

