Karlo Kričkić
CLOUD INFRASTRUCTURE ENGINEER
Cloudera Enterprise is a modern platform for machine learning and analytics, optimized for the cloud to be:
- Unified – brings your data warehouse, data science, data engineering, and operational database workloads together on a single integrated platform
- Hybrid – the most popular data warehouse and machine learning engines that can run on any compute resource for ultimate deployment flexibility
- Enterprise-grade – the scale and performance required for today’s modern data workloads meets the security and governance demanded by today’s IT departments
Cloudera Enterprise provides the following solutions:
- Data Warehouse
- Data Science
- Data Engineering
- Operational Database
- Run Everything in the Cloud, Multi-Cloud, or on a Hybrid “Cloud / On-Premises” Deployment
Task Overview
Cloudera works on the principle of master and worker nodes. The installation consists of several steps:
- Creating the network
- Creating the virtual machines
- Preparation of OS (in this example we will use CentOS)
- Installing the Cloudera manager
- Installing the Cloudera cluster
Creating a network
Alibaba Cloudby default requires the creation of a virtual network so that machines can communicate with each other and be visible on the public Internet. Network creation takes place through the interface of the Alibaba Cloud itself.
Alibaba Cloud network setup
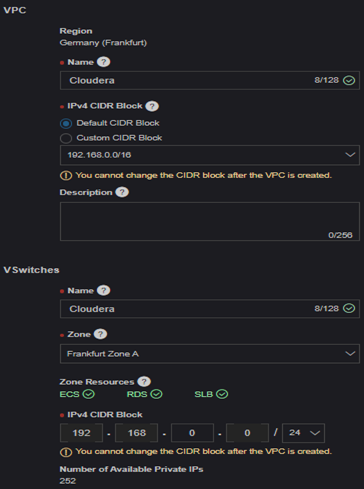
Go to Virtual Private Cloud Console and choose Create VPC.
In create network dialog enter:
- Name: Cloudera
- IP Range: 192.168.0.0/16 (Default CIDR Block)
- VSwitches: Cloudera
- Frankfurt Zone A
Click on OK and you are finished creating private network.
Alicloud Virtual Machines
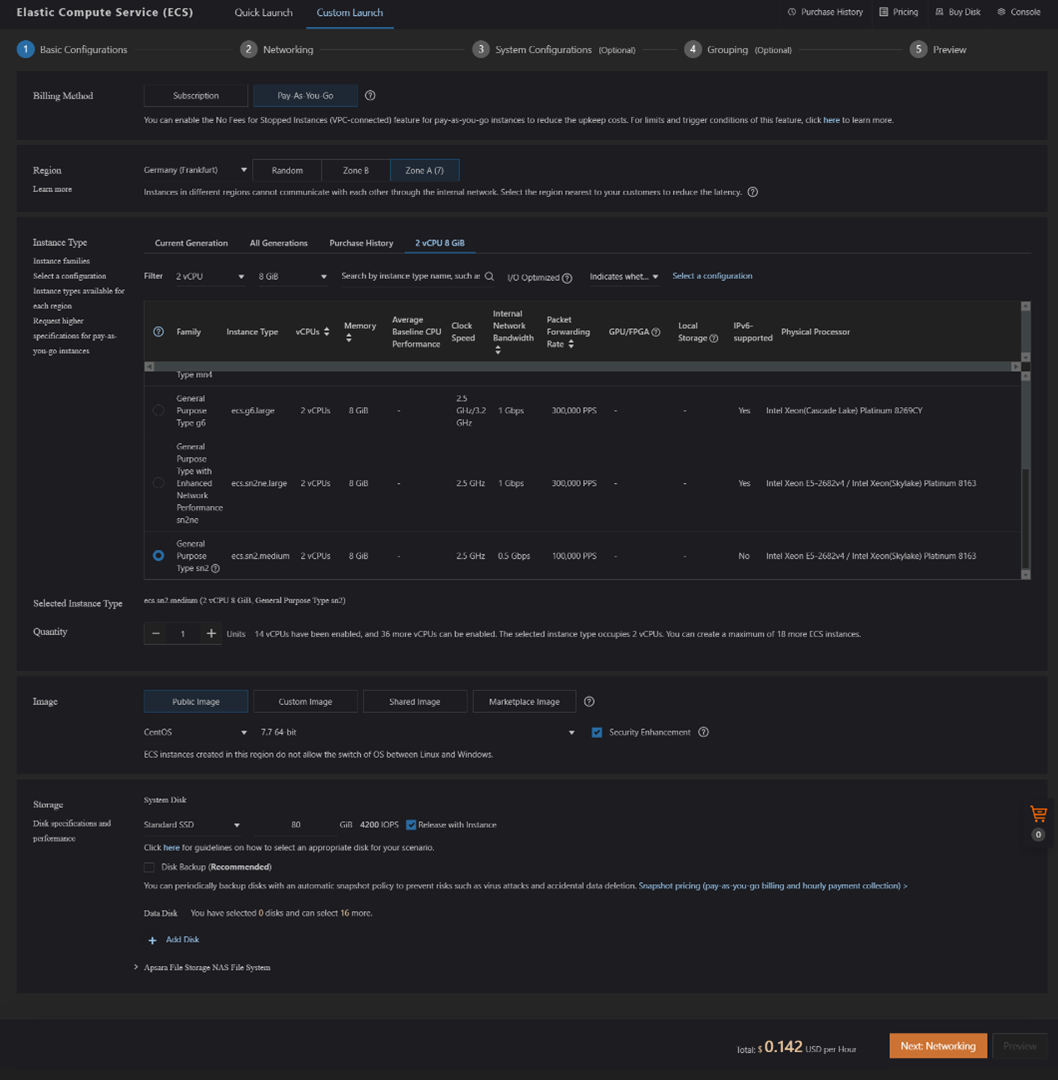
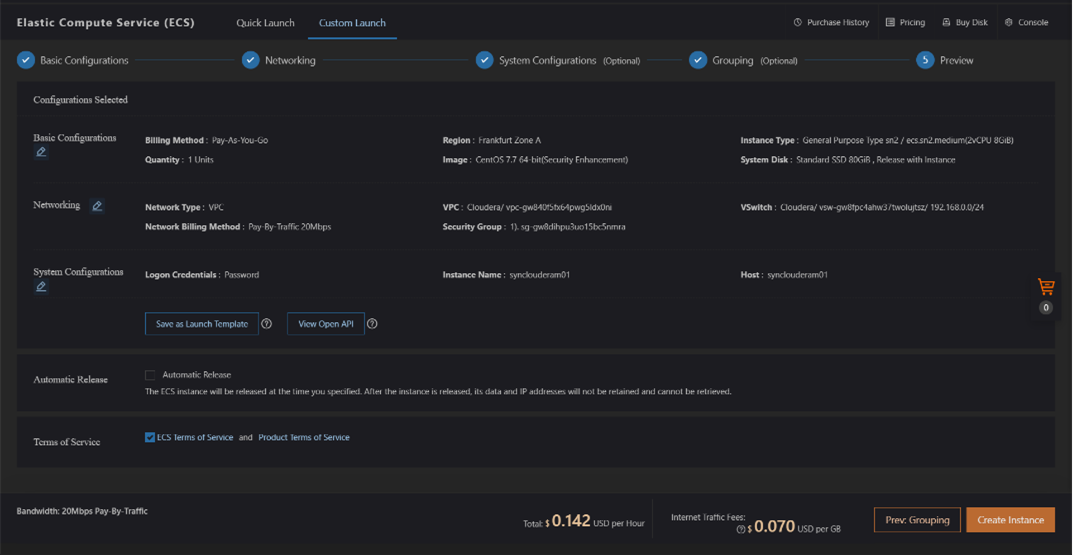
Next step is to create Virtual Machines in Alibaba Cloud; two management nodes and five worker nodes.
Basic Configuration
Region: Germany(Frankfurt) – Zone A
Type: ecs.sn2.medium – General Purpose Type sn2) (2 vCPU, 8GB RAM)
Public image: CentOS 7 – 7.7 64-bit; Security Enhancement
Storage: Standard SSD 80 GB; Release with Instance
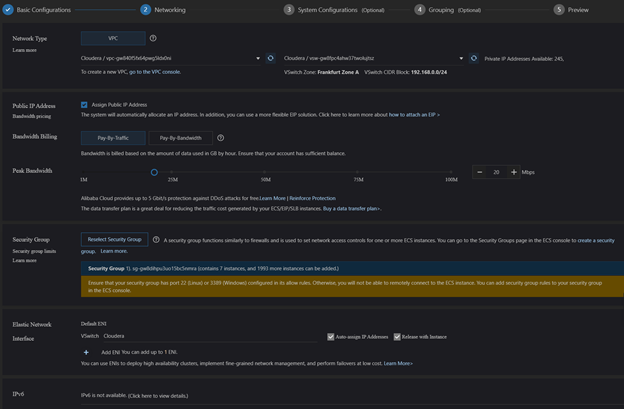
Networking
Network: Use existing network which you set up on 1. step:
- Cloudera
- Assign Public IP Address
- Bandwith Billing: Pay-By-Traffic
- Peak Bandwith: 20 Mbps
- Security Group auto selected by VPC
- Elastic Network Interface: VSwitch Cloudera
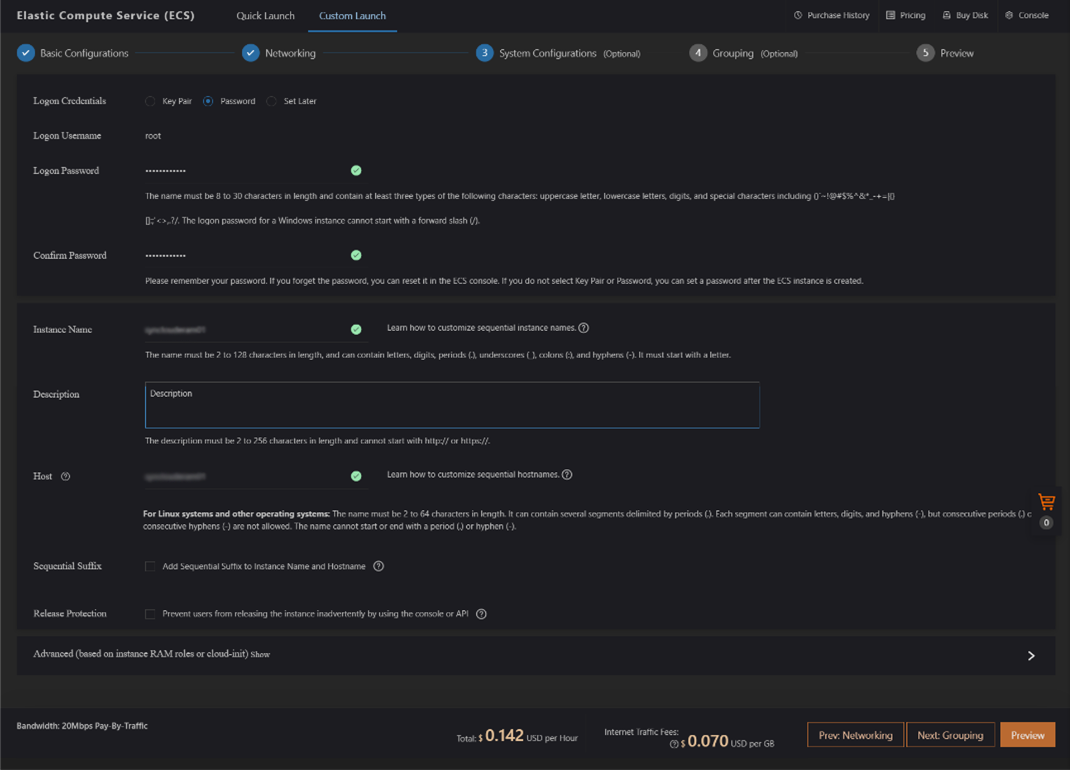
System Configuration
Logon credentials : Password
Logon Password :
Instance Name : clouderam01 or clouderaw01
Host : clouderam01 or clouderaw01
Preview
CentOs preparation Alibaba Cloud
Connect to each server using built-in web Console, or your favorite SSH client and create admin user:
adduser admin
Use the passwd command to update the new user’s password.
passwd admin
Set and confirm the new user’s password at the prompt.
Set password prompts:
Changing password for user admin.
New password:
Retype new password:
passwd: all authentication tokens updated successfully.
Use the usermod command to add the user to the wheel group.
usermod - aG wheel admin
By default, on CentOS, members of the wheel group have sudo privileges.
Use the su command to switch to the new user account.
su - admin
Step1 – Remove sudo password for user admin:
sudo vi /etc/sudoers
Addline totheendofthefile:
admin ALL=(ALL) NOPASSWD: ALL
Step2 – Disable firewall (if enabled):
sudo systemctl disable firewalld
sudo systemctl stop firewalld
Step3 – Disable root login remotely
sudo vi /etc/ssh/sshd_config
PermitRootLoginno
sudo systemctl restart sshd.service
Step4 – Prepare host name lookup
(add IP address followed by FQDN (fully qualified domain name) and short name – make sure FQDN is first after IP address otherwise Cloudera Manager takes short name during installation which results with unsuccessful installation):
sudo vi /etc/hosts
Add these lines to the file:
192.168.0.118 clouderaw05 clouderaw05
192.168.0.117 clouderaw04 clouderaw04
192.168.0.116 clouderaw03 clouderaw03
192.168.0.115 clouderaw02 clouderaw02
192.168.0.114 clouderaw01 clouderaw01
192.168.0.113 clouderam02 clouderam02
192.168.0.112 clouderam01 clouderam01
Disable all IPv6 entries on all hosts.
#::1localhost localhost.localdomain localhost6 localhost6.localdomain6
#127.0.0.1localhost localhost.localdomain localhost4 localhost4.localdomain4
Step5 –setup auto login from ‘clouderam01’ to all hosts:
First, let’s create a public and private key pair on the main Cloudera Manager server ‘clouderam01’ using (leave defaults when asked):
cd /home/admin
ssh-keygen
cat ~/.ssh/id_rsa.pub >> ~/.ssh/authorized_keys
chmod 700 ~/.ssh
chmod 600 ~/.ssh/*
Now let’s copy the public key to all included servers:
scp /home/admin/.ssh/id_rsa.pub admin@clouderam01:id_rsa.pub
scp /home/admin/.ssh/id_rsa.pub admin@clouderam02:id_rsa.pub
scp /home/admin/.ssh/id_rsa.pub admin@clouderaw01:id_rsa.pub
scp /home/admin/.ssh/id_rsa.pub admin@clouderaw02:id_rsa.pub
scp /home/admin/.ssh/id_rsa.pub admin@clouderaw03:id_rsa.pub
scp /home/admin/.ssh/id_rsa.pub admin@clouderaw04:id_rsa.pub
scp /home/admin/.ssh/id_rsa.pub admin@clouderaw05:id_rsa.pub
On each server add this public key into authorized_keys:
mkdir -p ~/.ssh
cat id_rsa.pub >> ~/.ssh/authorized_keys
chmod 700 ~/.ssh
chmod 600 ~/.ssh/*
All hosts ssh from clouderam01 must be valid (paswordless):
ssh clouderam01 (as well)
ssh clouderam02
ssh louderaw01
ssh clouderaw02
ssh clouderaw03
ssh clouderaw04
ssh clouderaw05
Cloudera Manager setup
Now that the VMs are properly configured, it’s time to install the Cloudera Manager on our main node ‘clouderam01‘.
Connect to the node and download the installer:
wget https://archive.cloudera.com/cm6/6.3.1/cloudera-manager-installer.bin
Next up, we need to give the installer executable permission:
chmod u+x cloudera-manager-installer.bin
And lastly – run the Cloudera Manager Server installer:
sudo ./cloudera-manager-installer.bin
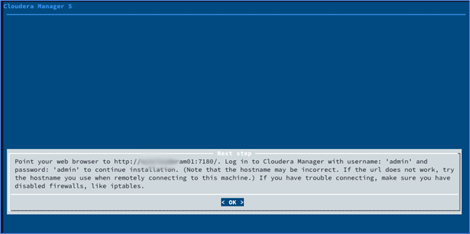
The installation is fairly simple (next – next – next – accept – accept – finish).
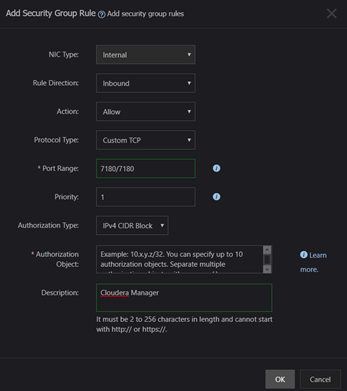
After the installation, the Cloudera Manager service should be up and running after a couple of minutes. But, before we’re able to access the manager, we need to open up some ports that Cloudera Manager uses.
Go to Elastic Compute Service and select in right menu Network & Security – Security Groups- name of VPC.
Click on Add security group rule and add port 7180.
Cloudera cluster setup
Open your browser and type in the address of you cloudera main node:
http://ip_address::7180/
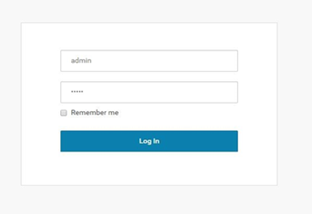
If everything up to this point was done correctly, you should get a login screen:
Login using username/pass: admin/admin.
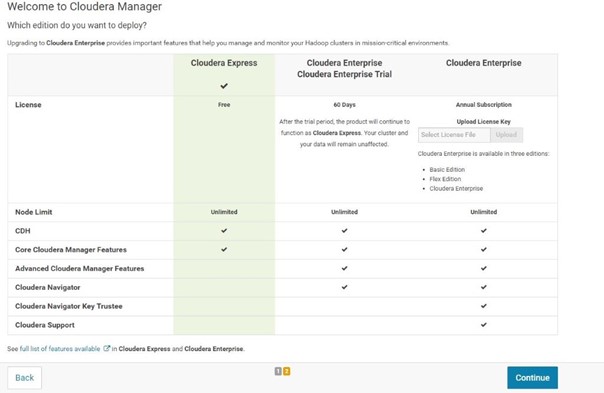
Accept the agreement and move to choose which edition to deploy.
Choose ‘free’ edition.
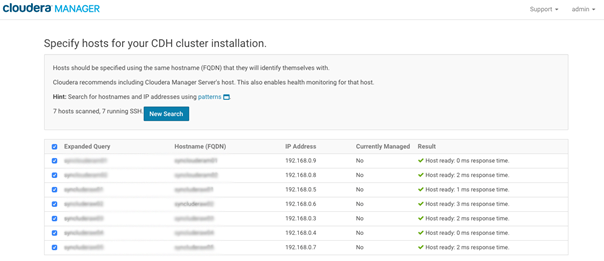
Click continue the next screen and you’ll come to the host specification part of the cluster installation.
To specify our hosts, enter the following:
clouderam[01-02]
clouderaw [01-05]
This will now search for all ‘clouderam’ hosts that end with numbers from 01 to 02 and all ‘clouderaw’ hosts that end with numbers from 01 to 05. That would be all our VMs.
Click ‘Search’.
If done correctly, the search will find our 7 hosts:
Click ‘Continue’.
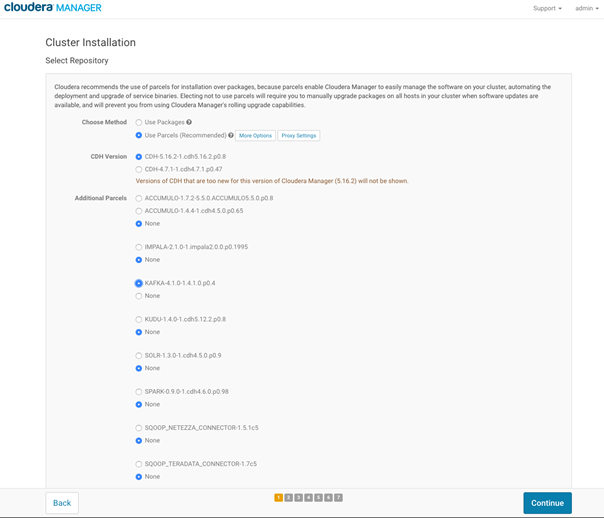
On the next screen leave everything as is, just under ‘Additional Parcels’ choose KAFKA (at least we did):
Click ‘Continue’.
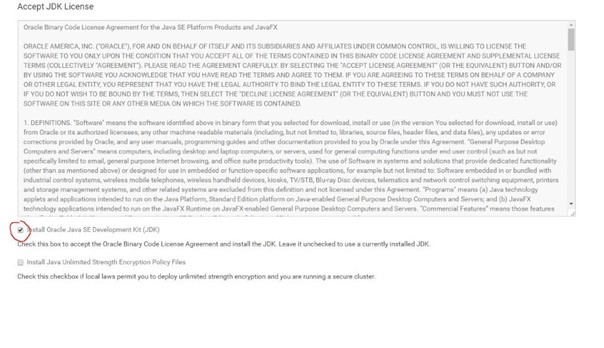
On the next screen, select the checkbox ‘Install Oracle Java SE Development Kit (JDK)’ and click ‘Continue’:
Do not enable Single User Mode on the next screen. Just click ‘Continue’.
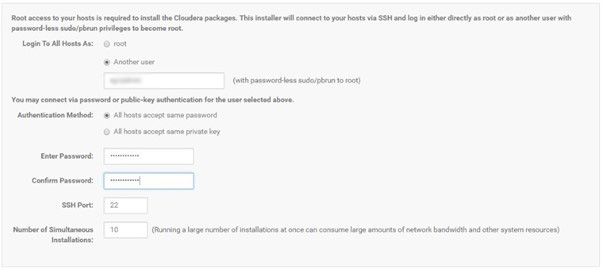
We login using ‘admin’ user, so put its login info on the next screen:
Continue.
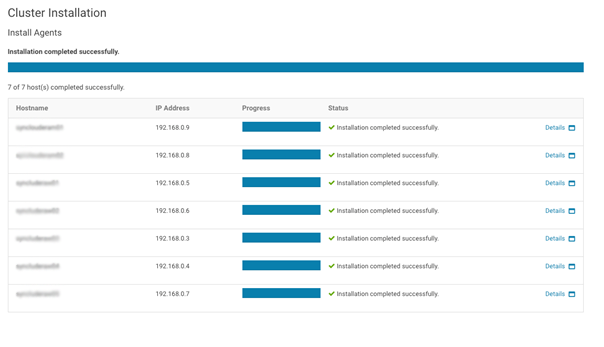
Agent installation will start. If everything up to this point was done correctly, all bars should be green by the end with text ‘Installation completed successfully’:
Side note: there’s a common error here if /etc/hosts on our VMs is not configured properly - agents won’t be able to heartbeat and installation will fail, but only after everything has already been installed.
To fix this – check your /etc/hosts file if everything was typed in correctly.
Click ‘Continue’ and wait for selected parcels to be installed:
Continue when finished.
At the end you will get a Cluster Installation Validations and Summary.
There should be no errors, maybe only some warnings.
Click ‘Finish’.
Cloudera custom services
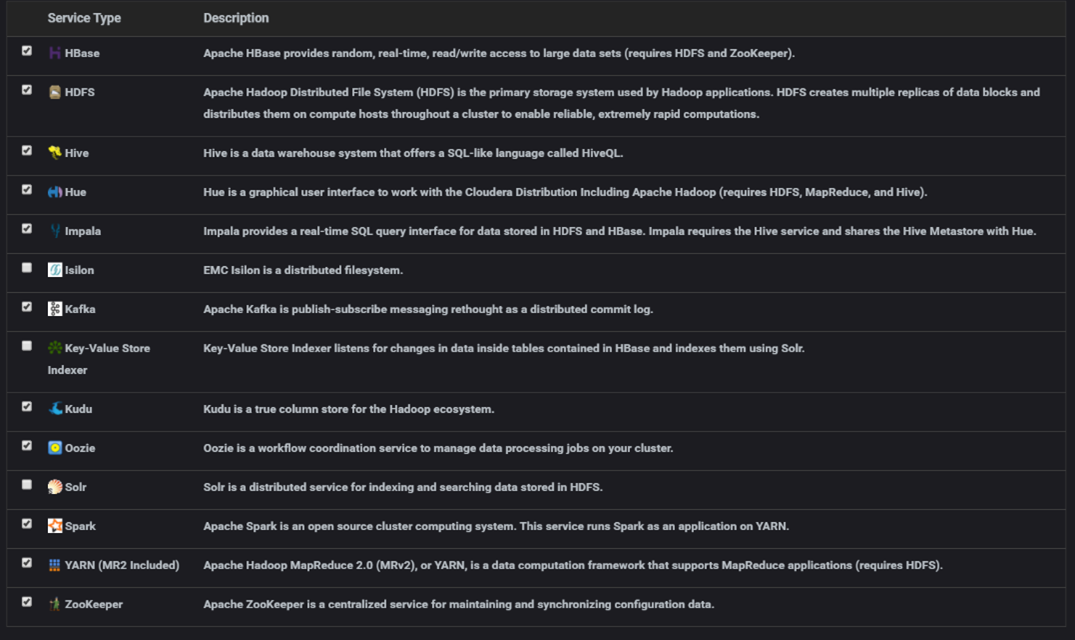
Select ‘Custom Services’ when asked which combination of services to install. A new menu will appear. Select every service type except for isilon, key-value store indexer, solr (at least in our case i.e. choose depending on your needs):
Continue.
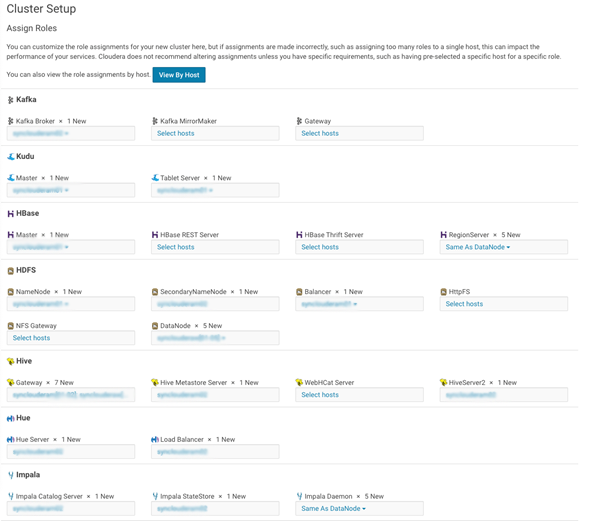
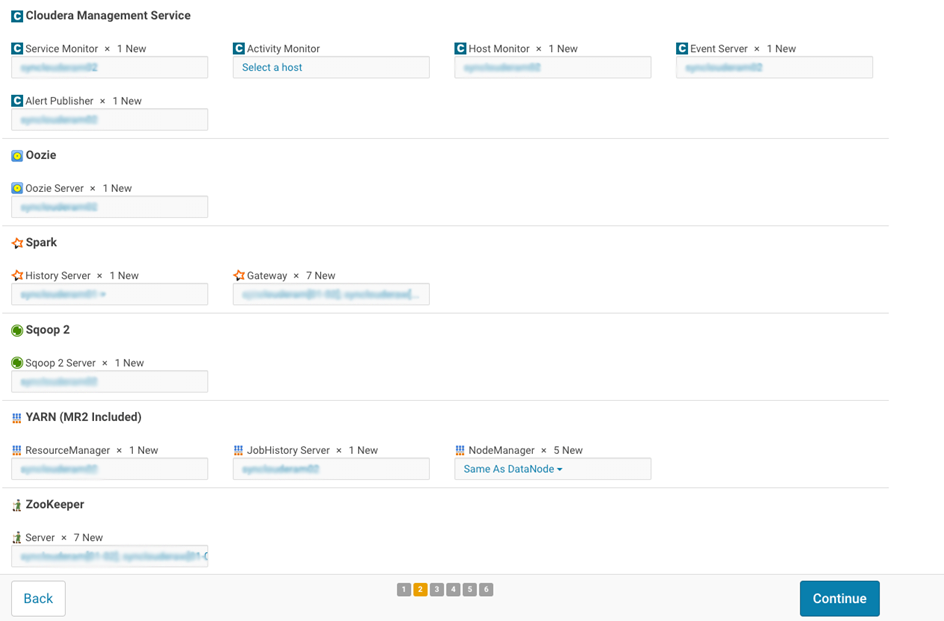
Now it’s time to Customize Role Assignments.
Here we assign which hosts will be management nodes (NameNode) and which will be workers (DataNode). In our case clouderam01/02 are primary/secondary NameNode and others are DataNodes. Most of the services are divided between NameNodes. Usually were host is not assigned (e.g. Kafka MirrorMaker) we left it empty as it is.
The result looks like this:
Click ‘Continue’ when finished.
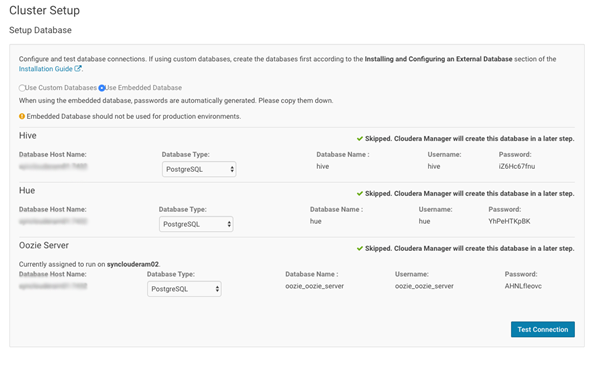
On the next screen choose ‘Use Embedded Database’, Test Connection and Continue.
You will arrive to the Review Changes screen.
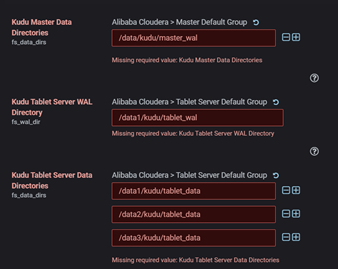
By default, some services haven’t set directory paths for Kudu.
Add value as mentioned in picture.
Kudu Master Data Directories : data/kudu/master_wal
Kudu Tablet Server WAL Directory : data/kudu/tablet_wal
Kudu Tablet Server WAL Directory : data1/kudu/master_wal
Kudu Tablet Server Data Directories : data1/kudu/tablet_data
data2/kudu/tablet_data
data3/kudu/tablet_data
Click continue and finish setup.
Conclusion
In this blog we covered the installation of a clouder cluster on an Alibaba Cloud environment and the preparation of the environment itself.
References:

