Davor Habjanec
SENIOR DATA ENGINEER
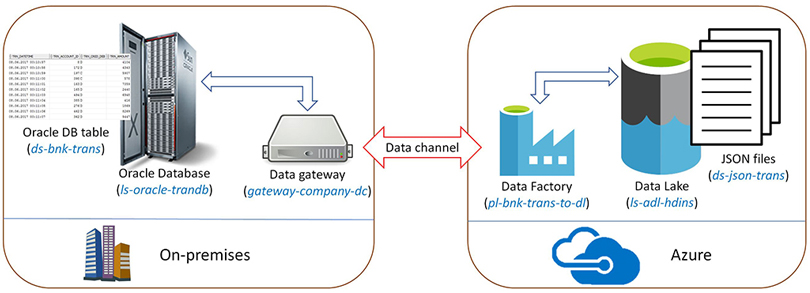
The best way to show basic concepts of Azure Data Factory is to create data transfer example. In our example we will create Azure Data Factory pipeline to transfer data from on-premises oracle database table to Azure Data Lake files. Source Oracle table will be simulation of banking transactions (SYN_SOURCE.BNK_TRANS), pipeline will have time slices of six hours and for each time slice in target Azure Data Lake folder one file will be created (folder /clusters/hdinstest/json_bnk_trans).
If you are not familiar with basic concepts of Azure Data Factory first read our related blog entry: Azure Data Factory – Transfer data between on-premises and Azure cloud.
First step is Microsoft Data Management Gateway installation. This is quite simple installation procedure – in Azure Data Factory open Author and deploy tool and select More -> New data gateway. We will skip installation steps because there is nothing special to do here. For this example we will create gateway named gateway-company-dc – gateway to main corporate data center.
Linked services
Now we need to create two linked services – one for source Oracle Database and one for target Data Lake definition. Linked service is a connection information needed for Data Factory to connect to external resources.
LINKED SERVICE FOR ON-PREMISES ORACLE DATABASE
We will use standard Oracle Database client drivers to access on-premises database. To create Oracle Database linked service go to Azure Data Factory and open Author and deploy tool. Then select New data store -> Oracle. This will open draft JSON definition of Oracle DB linked service, something like (modify parameters according to your environment, use ls-oracle-trandb for name):
{
 "name": "ls-oracle-trandb",
 "properties": {
 "type": "OnPremisesOracle",
 "description": "On-premises Oracle transaction handling database.",
 "typeProperties": {
 "connectionString": "Data Source=(DESCRIPTION=(ADDRESS=(PROTOCOL=TCP)(HOST=some-host.company.com)(PORT=1521))(CONNECT_DATA=(SERVICE_NAME=oradb12c)))",
 "gatewayName": "gateway-company-dc"
 }
 }
}
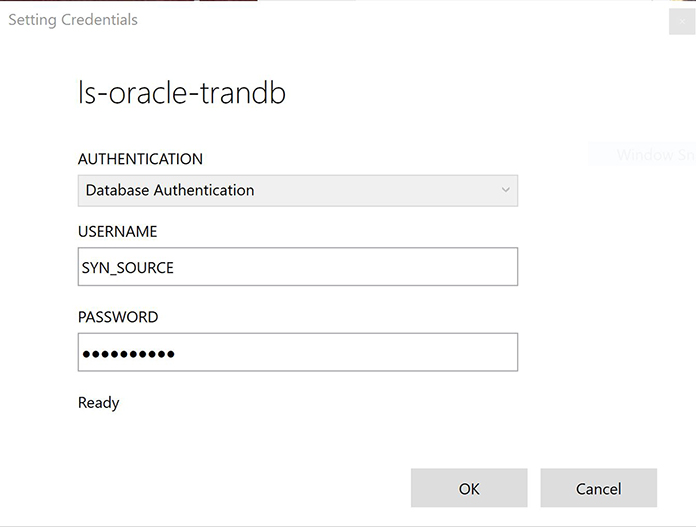
Do not enter username and password in JSON window, instead use Encrypt button when all properties are set. Encrypt button will then open Credentials Manager application to enter Database Authentication username and password. This is secure way to enter and store username and passwords. Credentials Manager works with Edge and IE out-of-the-box and for other browsers additional applications/plugins are needed. If you do not use some of the encryption methods then credentials will be stored in plain text format on Gateway machine.
After credentials are successfully entered, in JSON file will appear additional parameter EncryptedCredential with some big string as value, something like “XCD32fr…sada12DSF=”. Now click Deploy button to save Linked service definition.
LINKED SERVICE FOR AZURE DATA LAKE STORE
Microsoft Data Factory connector for Data Lake Store supports two authentication methods: Service principal authentication and User credential (OAuth) authentication. In this example we will use Microsoft recommended service principal authentication. To use service principal authentication, we need to register an application entity in Azure Active Directory (Azure AD) and grant it the access to Data Lake Store. There are many online tutorials on how to register AD application in Azure, so here are only basic steps:
-
In Azure Portal go to Azure Active Directory -> App registrations -> New application registration
-
Create application registration with name AzDataFactoryDataLake of type “Web app / API”, type some address into Sign-on URL (e.g. HTTP://WWW.SYNTIO.HR), click Create and save Application Id for later use
-
Now click on created application and then open Keys tab
-
Create new key with “Never expires”, click Save and then copy key value for later use (it will be visible only once after first save)
When AD application is created we need to authorize this application to access specific Data Lake Store folders. Open “Data Explorer” in Azure Data Lake Store and create target folder, in this example we will use /clusters/hdinstest/json_bnk_trans folder. Enter this folder, click Access button in Data Explorer and add access for AzDataFactoryDataLake application like in he picture on the right. Also, read+execute permission should be added on root folder and all children in path to avoid access errors.
After those steps you will have Application ID, related secret key value and permissions for that application to access Data Lake. To define Azure Data Lake Store linked services we need to find three more parameters:
-
Tenant ID – In Portal go to Azure Active Directory, click Properties and copy “Directory ID” value
-
Subscription ID – In Portal open related Data Lake Store and copy “Subscription ID” from properties
-
Resource group name – In Portal open related Data Lake Store and copy “Resource group” from properties
-
Data Lake Store URI – Portal open related Data Lake Store and copy ADL URI
Now we have all information needed to access Data Lake Store from Data Factory. In Data Factory Author and deploy tool select Azure Data Lake Store from New data store menu and create new linked service named ls-adl-hdins. JSON should look like:
{ "name": "ls-adl-hdins", "properties": { "type": "AzureDataLakeStore", "description": "", "typeProperties": { "dataLakeStoreUri": "adl://som-dl-store.azuredatalakestore.net", "servicePrincipalId": "xxxxxx-2344-vvvvv-234-sadawe34f", "servicePrincipalKey": "lkjdslksajdALKJSOADLAKdislakdjalkdj=", "tenant": "aaaaaaa-bbbb-cccc-dddd-231423dfss", "resourceGroupName": "som-rg-name", "subscriptionId": "34dfds-dsfa-asdw-dsaw-23123fgr4" } }}
Only thing to do now is to click Deploy to save linked service. This is cloud linked service so principal key will be stored encrypted in Azure Cloud.
Datasets for Oracle table and Data Lake files
Compared to linked services definitions, creating datasets for source and target is quite simple. Datasets are self-explaining from JSON files, we will use six-hour time periods as batch extract base.
SOURCE DATASET – ORACLE TABLE
We will use Oracle Database table SYN_SOURCE.BNK_TRANS. We will read table data in six hour slices.
{ "name": "ds-bnk-trans", "properties": { "type": "OracleTable", "linkedServiceName": "ls-oracle-trandb", "typeProperties": { "tableName": "BNK_TRANS" }, "external": true, "availability": { "frequency": "Hour", "interval": 6 } }}
TARGET DATASET – DATA LAKE FILE
In this example we will use partitioning options to create dynamic target folder names and file names. For each month one folder will be created in format YYYYMM, and each file in folder will have name based on trans-yyyyMMdd-HHMISS.json template. This means that data for six hour time slice begining at 2017-06-09 00:00:00 will be placed in file /clusters/hdinstest/json_bnk_trans/201706/trans-20170609-000000.json.
{ "name": "ds-json-trans", "properties": { "structure": [ { "name": "TRN_DATETIME", "type": "Datetime" }, { "name": "TRN_ACCOUNT_ID", "type": "Int32" }, { "name": "TRN_CRED_DEB", "type": "String" }, { "name": "TRN_AMOUNT", "type": "Int32" } ], "published": false, "type": "AzureDataLakeStore", "linkedServiceName": "ls-adl-hdins", "typeProperties": { "fileName": "trans-{Year}{Month}{Day}-{Hour}0000.json", "folderPath": "/clusters/hdinstest/json_bnk_trans/{Year}{Month}", "partitionedBy": [ { "name": "Year", "value": { "type": "DateTime", "date": "SliceStart", "format": "yyyy" } }, { "name": "Month", "value": { "type": "DateTime", "date": "SliceStart", "format": "MM" } }, { "name": "Day", "value": { "type": "DateTime", "date": "SliceStart", "format": "dd" } }, { "name": "Hour", "value": { "type": "DateTime", "date": "SliceStart", "format": "HH" } } ], "format": { "type": "JsonFormat" } }, "availability": { "frequency": "Hour", "interval": 6 } }}
Pipeline to copy data
Last thing we need to define is pipeline – mapping and workflow which will copy data. This pipeline will have only one activity – data copy. Once this pipeline is deployed, activities based on time slices are automatically scheduled. Time slices are six hours and will be loaded from oldest to newest.
{ "name":"pl-bnk-trans-to-dl", "properties":{ "start":"2017-06-09T00:00:00Z", "end":"2017-12-31T18:00:00Z", "description":"Copy BNK_TRANS to ADL", "activities":[ { "name": "OracleToDataLake", "description": "Copy BNK_TRANS to ADL", "type": "Copy", "inputs": [ { "name": "ds-bnk-trans" } ], "outputs": [ { "name": "ds-json-trans" } ], "typeProperties": { "source": { "type": "OracleSource", "oracleReaderQuery": "$$Text.Format('SELECT TRN_DATETIME, TRN_ACCOUNT_ID, TRN_CRED_DEB, TRN_AMOUNT FROM BNK_TRANS WHERE TRN_DATETIME >= TO_DATE(\\'{0:yyyy-MM-dd HH:mm}\\', \\'YYYY-MM-DD HH24:MI\\') AND TRN_DATETIME < TO_DATE(\\'{1:yyyy-MM-dd HH:mm}\\', \\'YYYY-MM-DD HH24:MI\\')', WindowStart, WindowEnd)" }, "sink": { "type": "AzureDataLakeStoreSink" } }, "scheduler": { "frequency": "Hour", "interval": 6 }, "policy": { "concurrency": 4, "executionPriorityOrder": "OldestFirst", "retry": 3, "timeout": "00:30:00" } } ] }}
Monitor and Manage
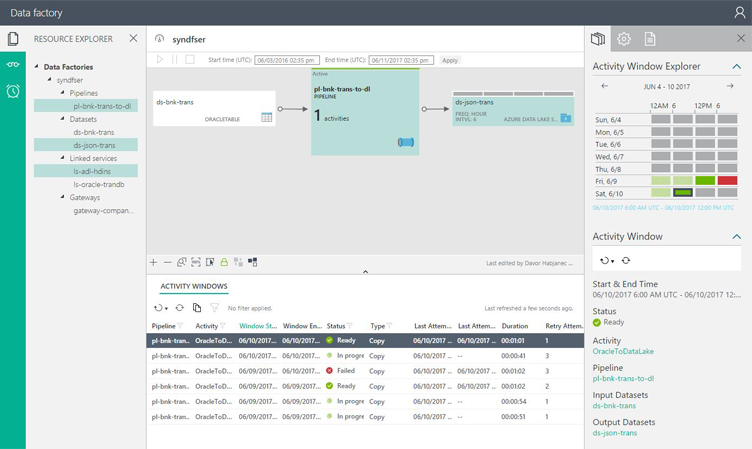
When all objects are created and pipeline is scheduled, we can monitor and manage activities using Data Factory Monitor and Manage tool. Tool looks like:
In this tool we can visualize pipelines, view status of activities, view overall status of pipelines, get errors, restart activities and so on. All activities are time sliced to get better insight in pipeline status.
Once activities are finished files should appear in target folders. This was very quick example, full documentation for each of steps taken here can be found on Microsoft official site.


